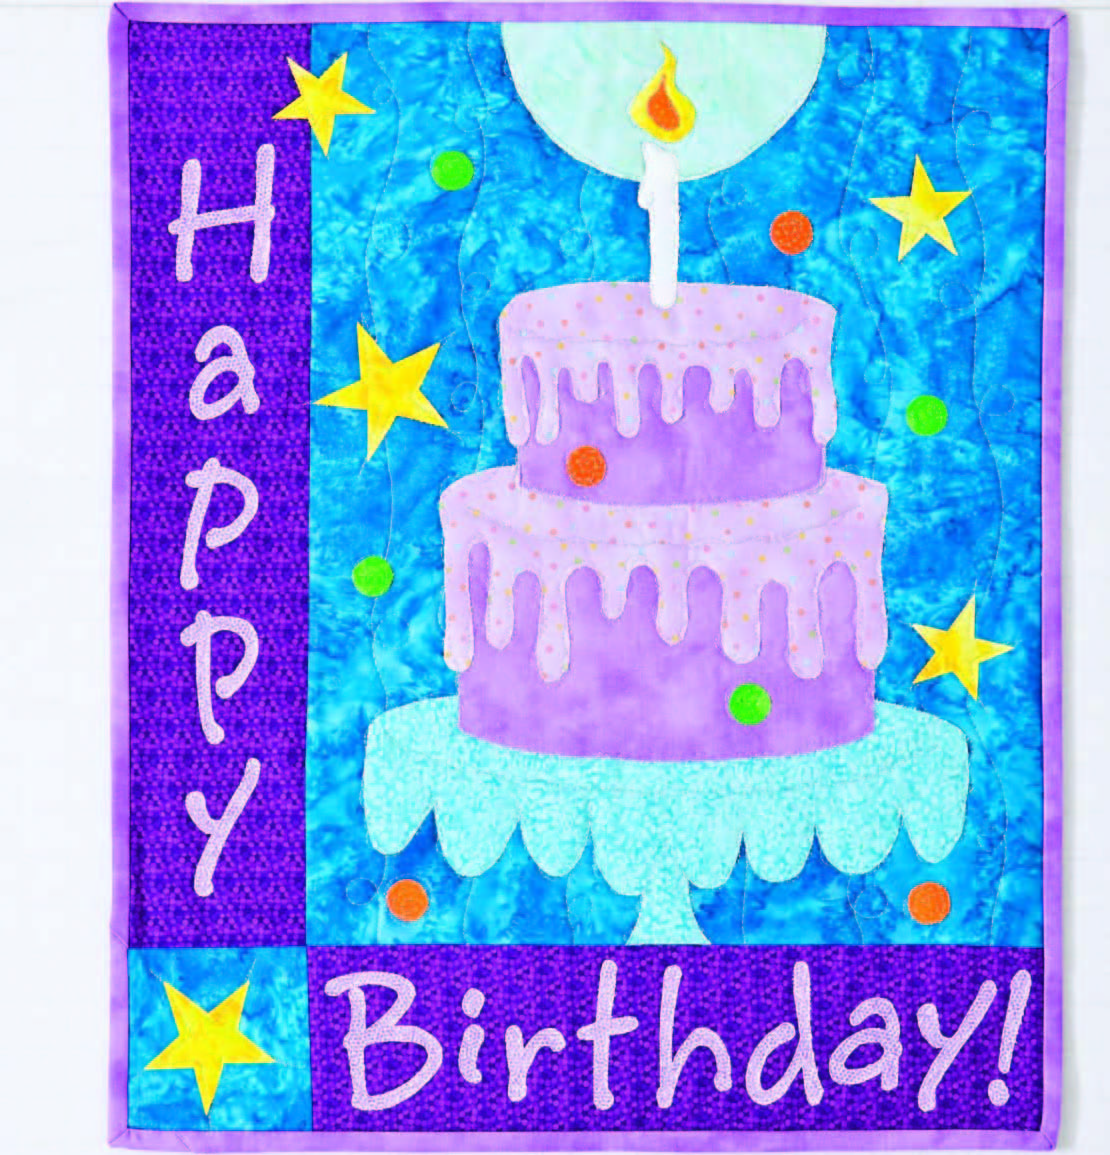
Happy Birthday Cake Quilt
Make this cheerful Happy Birthday cake quilt as a wall hanging for birthday parties at your home. You can also give this quilt as a homemade birthday gift sure to impress. This quilt project is an excerpt from C&T Publishing Poster Quilts with Patrick Lose.
Materials:
- Turquoise: ½ yard for background and corner block
- Purple: ¼ yard or fat quarter for vertical and horizontal border blocks
- Lavender: 5/8 yard for binding and upper and lower cake appliqués
- White: 2˝ × 4˝ rectangle for candle
- Green: 2˝ × 4˝ rectangle for 4 confetti pieces
- Orange: 3˝ × 5˝ rectangle for 4 confetti pieces and inner candle flame
- Aqua 1: 4½ ˝ × 8˝ rectangle for candle glow
- Aqua 2: 6½ ˝ × 14˝ rectangle for cake stand
- Yellow: 9˝ × 9˝ square for stars and candle flame
- Light lavender 1: 9˝ × 11˝ rectangle for frosting
- Light lavender 2: 1/8 yard for letters
- Backing and batting: 23˝ × 27˝
- Fusible adhesive (18˝ wide): 1 yard
Instructions:
Cutting Fabrics
From Turquoise:
- Cut 1 rectangle 16½ ˝ × 20½ ˝ for the background.
- Cut 1 square 4½ ˝ × 4½ ˝ for the corner block.
From Purple:
- Cut 1 rectangle 4½ ˝ × 20½ ˝ for the vertical border block.
- Cut 1 rectangle 4½ ˝ × 16½ ˝ for the horizontal border block.
From Lavender:
- Cut 3 strips 2½ ˝ × width of fabric for the binding.
- Cut 1 square 10˝ × 10˝ for upper and lower cake appliqués.
Creating the Appliqués
Find all of the appliqué template pieces here. They are printed at 50% and are reversed for tracing onto fusible adhesive.
- Lay the fusible adhesive, paper side up, over each appliqué template, and trace the shapes onto the paper. Be sure to trace the placement and stitching lines also. Leave approximately ¼ ˝ cutting space around each piece. trace 2 of each of the letters that indicate 2, and 1 each of the rest of the letters.
- Use paper-cutting scissors to roughly cut out all of the pieces outside the traced lines.
- Following the manufacturer’s instructions for fusing, fuse the traced template pieces, paper side up, onto the wrong side of the fabrics you’ve chosen for your appliqués. don’t fuse them until all the pieces are arranged to fit on the fabrics.
- Neatly cut out all of the appliqués from the fused fabrics. Transfer the placement and stitching lines onto the right side of the fabric.
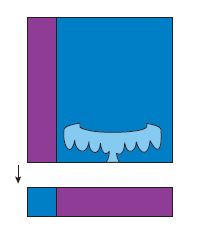
- Remove the paper backing from the cake-stand appliqué, and position the appliqué at the bottom center of the turquoise background block, using the project photo, for reference and aligning the bottom of the “stem” with the raw edge of the background.
- Following the manufacturer’s instructions for the fusible adhesive, fuse only the cake-stand appliqué into place before proceeding; the rest of the appliqués will be added later.
Piecing the Banner
- Stitch one of the long sides of the vertical border block to one of the long sides of the background block, right sides together, using a 1/4˝-wide seam. Press the seam allowance toward the purple side.

- Stitch one of the sides of the corner block to one of the short sides of the horizontal border block, right sides together, using a 1/4˝-wide seam. Press the seam allowance toward the purple side.

- Stitch the 2 pieces together to complete the top. Press.
Positioning and Fusing the Appliqués
- Remove the paper backing from the remaining appliqués.
- Referring to the project photo, arrange all of the appliqués on the quilt top. When centering the letters and the corner block’s star, remember that there is a 1/4˝-wide seam allowance on all sides for the binding. The straight edge of the candle’s glow is aligned with the raw edge of the top.
- When you’re satisfied with the arrangement of the appliqués, fuse them into place. Always follow the fusible adhesive manufacturer’s instructions.
Quilting and Finishing
- Sandwich the batting between the quilt top and backing, and quilt as desired. I used a silver metallic thread and free-motion quilting to outline each of the pieces by going around them several times in a “scribbled” manner. I treated the detail lines the same way in the cake frosting, the cake-stand appliqués, and the drip on the side of the candle. I quilted spirals in the star centers.
- Finish the banner with the lavender binding strips.
Read NextNo Binding Hot Pads
Your Recently Viewed Projects

Thanks for your comment. Don't forget to share!
mulberrygalprinces s
Jun 23, 2018
What a cute idea! It would be nice to have this for each birthday celebration at home. I would make another that is more masculine for the men in my life. This is so easy to do because of the wonderfully written directions. Plus a video too. You can't go wrong.
Marilyn B
Mar 27, 2017
Photo and instruction pictures are great...thank you! This really helps clarify how to put this darling birthday quilt banner together. What a great tradition and keepsake this piece could be! I would add some sparkly or metallic fabric for the candle flame and the stars, and maybe even some 3-dimensional ribbons or streamers! Another option is to make several candles separate from the quilt and have a bit of felt and add the age appropriate number of candles for your kids' ages! Love this idea, what fun!
sylkanen 9677783
Nov 01, 2010
Where's the picture???? It would help to make the determination to print out the directions or not.
purpleheartAW2mom
Apr 13, 2010
The picture shows up if you cut and paste it into another document in a word processing program like word. Works everytime. For some reason all the pictures for most projects here are imbedded in the file and show up when you import them into another document. I hope this helps a few people with this problem. "o))
barbben
Apr 09, 2010
It would be good if the picture would show up. I had no trouble with the other patterns, but this one did not and would not show up at all. Too bad, it is probably quite pretty.
Report Inappropriate Comment
Are you sure you would like to report this comment? It will be flagged for our moderators to take action.
Thank you for taking the time to improve the content on our site.