Gamer's Delight Mini Fridge
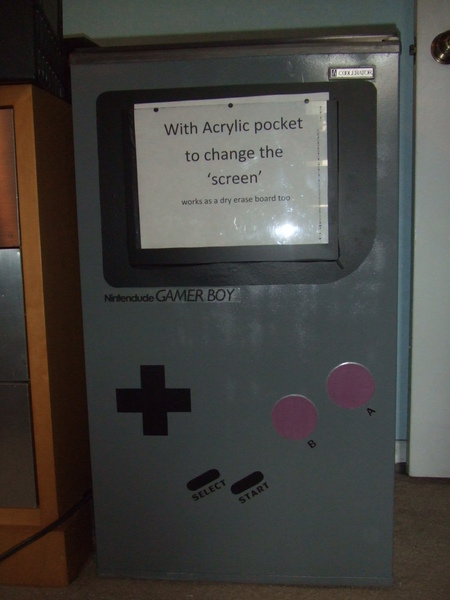
Turn an old mini fridge into something memorable with this free craft tutorial. A Gamer's Delight Mini Fridge will look great in a basement or man cave. Do it yourself craft ideas should be creative and this project really fits the bill. If you don't have a mini fridge, consider replicating this project using another surface, like a wall or table. Paint craft ideas help you turn a boring item into something extraordinary and eye-catching. This is a fun throwback for 80s gamers - all you need is some Mario and Ms. Pac-man to complete your time travels. I was given my older brothe'rs rusty mini-fridge. It was in desperate need of a paint job and my Mom suggested doing something video game related since it is my passion. The tall rectangluar shape was a problem for an idea, until I saw my original 'grey brick' gameboy! Internet research showed that you can print on contact paper with a laser printer and MS Word had fonts close to what I was duplicating. Finding gray spray paint made the project so much easier!
Primary TechniquePainting

Materials:
- Mini fridge
- Painter's tape & double-sided tape
- Krylon primer spray paint
- Krylon gray spray paint
- Roll of clear contact paper
- Roll of black contact paper
- Foam core board
- Laser printer
- 9" X 12" sheet of clear acrylic
- Colored paper in dark orchid purple
Instructions:
- Using painter's tape, cover the seals and trim edges that you do not want to get paint on. Cover the back coils with paper or aluminum foil to clean paint off. Sand and paint the primer on the fridge. Allow to fully dry and paint at least two coats of the grey.
- Cut a piece of the black contact paper 16 inches by 11-1/2. Round corners using a glass or bowl to achieve the three corners and a plate for the lower right curve. Peel backing and attach centered approximately 2 inches below top edge of mini-fridge. Cut to strips foam board 1/2 inch by 9 inches. Cut one strip of foam board 1/2 inch by 11. Glue or tape these strips to the back side of the acrylic sheet. Using double sided tape, attach the acrylic to the back plate of black contact paper, starting 2 inches from the top left edge (not corner). Cut strips of black contact paper to cover the edges of the acrylic and front to hide the foam core board strips.
- Cut a piece of contact paper to 8-1/2 inches wide. Using MS Word Select a page layout of Landscape . Using MS Word font "Century Gothic" size 45, type "Nintendude" enter a space and using MS Word font "Gill Sans MT" in 75 size, type "GAMER BOY". Enter two blank lines to give room to cut. Using MS Word font "Lily UPC" size 36 type "SELECT START", leaving enough room to cut the two words apart. Using MS Word font "Lily UPC" size 72 type "A B ", leaving enough room to cut the two letters apart. Print this page on the contact paper with the paper backing on it. Place another piece of the clear contact paper, with the backing removed, over the lables. Cut the various sections apart; peel the backing off and arrange the text to look like a vintage game boy.
- Using dark orchid purple paper and a compass, draw two circles, 2-1/2 inches in diameter, on the wrong size of the paper and cut out. Using double sided tape, attach to 3 inch by 3 inch square of clear contact paper with backing on. Cover this with clear contact paper with the backing removed. Burnish, by rubbing with a smooth surface, to remove any air bubles. On the back size, center the compass and draw a 3" diameter circle. Cut this out, remove the backing and place buttons on front of fridge.
Read NextCharming Country Mason Jars