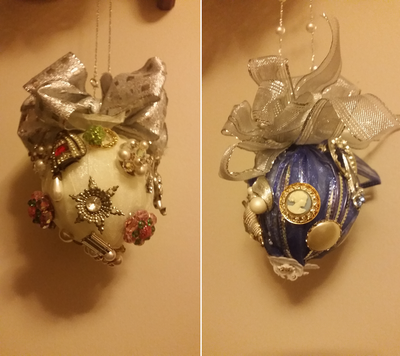
Vintage Christmas Ornaments
Create a classic Christmas look with these Vintage Christmas Ornaments. Your favorite holiday photo or some vintage Christmas clipart will help bring these ornaments to life, and they'll look absolutely stunning hanging on your tree. These handmade ornaments also make wonderful gifts and package accents for the holiday season.

Materials:
- 1 pack 2 x 4 Studio Pro™ Diamond Bevels
- 1 pack 1 1/2 x 2 1/2 Studio Pro™ Diamond Bevels
- Studio Pro™ Soldering Iron
- Studio Pro™ Lead Free Solder
- Studio Pro™ 7/32” Black Backed Copper Foil
- Studio Pro™ Safety Flux
- Studio Pro™ Flux Brush (or a cotton swab)
- Studio Pro™ 2 Pack Fid (or craft stick or pencil)
- 1 pack 7 mm jump rings
- Jewelry Pliers
- Long Tweezers
- Heat Resistant Work Surface
- Assorted Ribbon (we used red and white)
- Old Holiday Cards, Scrapbook Paper or Vintage Clipart
- Modge Podge® and Brush
- Scissors
Instructions:
-
Thoroughly clean the bevels and dry with a lint free cloth.
-
Measure and mark the shape of the bevel on a holiday card, vintage clipart or scrapbook paper. For this project we choose a 2" x 4" and one 4 1/2" x 2 1/2" diamond shaped bevel. Cut the shape from paper using a scissors.
-
Use Modge Podge® to adhere images face-down to the back of each bevel. Follow manufacturer’s instructions for the best application and allowing each layer to dry thoroughly.
-
When dry, peel 1” of the backing from the foil tape. Center the edge of your bevel on the sticky side of the foil. Wrap the entire outer edges of the bevel with foil, overlapping the end by 1/4”.
-
Use a fid or craft stick to burnish (rub) the surface of the foil to the edge of the glass. Press firmly, however too much pressure may cause the foil to tear.
-
Once foiled, lay all bevels on a heat resistant surface and plug in your soldering iron.
-
Apply a small amount of flux with a brush or cotton swab along the foiled edges of the bevel.
-
Unroll a 6” length of solder; heat the solder with the tip of the soldering iron. Apply a thin layer of solder (tinning) over all foiled edges of the bevel. Using needle-nose pliers flip the bevel over, flux and solder the other side of the bevel.
-
Repeat steps 7 - 8 until all bevels have been tinned. Allow to cool.
-
To add a jump ring to the top and bottom of the bevel, hold it with needle nose pliers to the bevel. Apply a small amount of flux to the ring and the bevel’s edge, then place a small amount of solder on the tip of the iron and touch the iron to the connecting joint. Allow to cool. For added join strength, flux and solder the back of the jump ring.
- Use additional jump rings to connect bevels and embellish with ribbons or beads of choice.
Soldering Tips:
- If solder doesn’t flow smoothly apply more flux.
- If seams bulge over the glass there’s too much solder; you may need to melt and pull off the excess.
- If solder spits or bubbles there’s too much flux; wipe some off.
- Flat seams need more solder.
- Don’t stay in the same spot too long or the solder will bleed through or the glass will crack.
- Wipe your iron tip frequently on a wet sponge while you are soldering.
- Re-tin your tips as needed using a sal-ammoniac block.
Read NextGorgeous Vintage Jewelry Ornament