

This project was submitted by one of our readers, just like you.
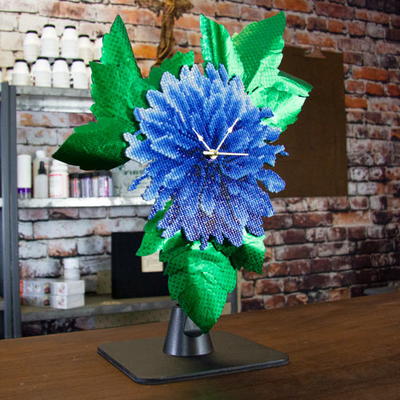
DIY: Diamond Art Dahlia Clock with Rinea Foiled Paper Leaves

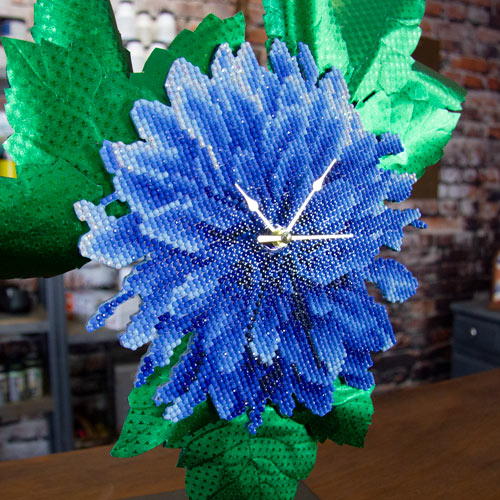
DIY Diamond Art Dahlia Clock with Rinea Foiled Paper Leaves
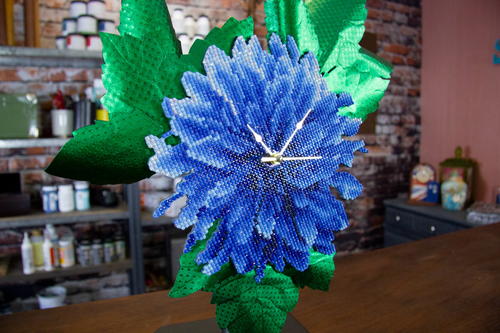
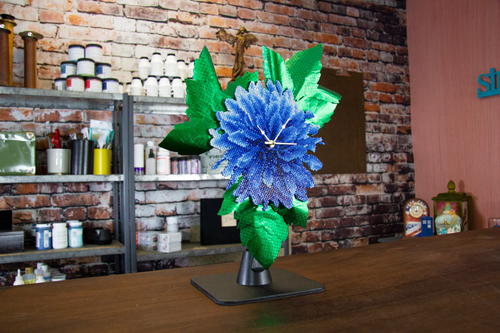
From the Designer: "Create a dazzling flower wall clock that sparkles in the light! The Diamond Art by Leisure Arts Blue Dahlia and Starstruck Emerald Foiled Paper by Rinea are the stars that shine in this functional piece of art. Shiny foiled paper leaves are "stiffened" in to shape by mounting the foiled paper on to felt, applying Mod Podge® Stiffy and shaping them over aluminum foil armatures until they are dry. The dahlia is mounted on a piece of 1/8" Baltic Birch cut out on a Proxxon Scroll Saw. This project includes downloadable patterns for the Blue Dahlia base and dahlia leaves."
Get the Project Tutorial PDF.
This project is divided up in to 4 parts: 1. Diamond Art Blue Dahlia 2. Wood Base 3. Rinea Foiled Paper Leaves 4. Assembling the Clock
Primary TechniqueMixed Media

Project TypeMake a Project
Materials List
- Diamond Art by Leisure Arts Blue Dahlia Kit
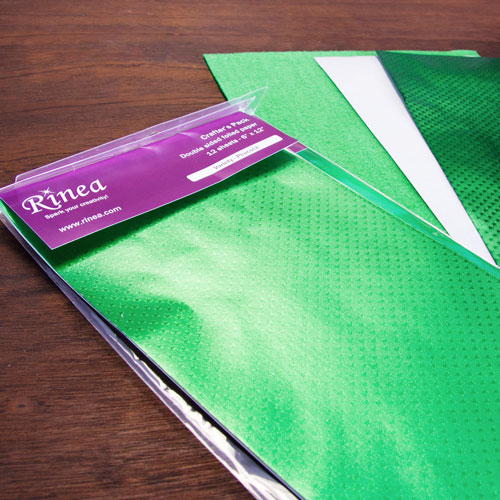
- Rinea Foiled Paper – Starstruck Emerald
- FolkArt® Color Shift paint – Blue Flash
- Marvy Uchida Le Plume alcohol based ink marker – Cobalt Blue, Green
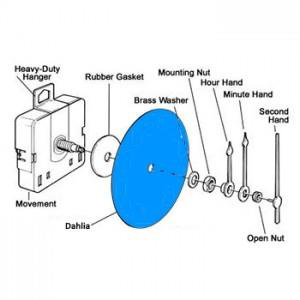
- Plaid Clock Movement Kit
-
1/8” or 3mm Baltic Birch (1 pieces, about 10” x 10”)
Green felt - Mod Podge® Stiffy
- Mod Podge® Ultra Matte
- DAP RapidFuse
- Aluminum foil
- Clear plastic film/wrap
- Newspaper to protect your work surface
- Brother ScanNCut SDX125
- Proxxon Scroll Saw DS 115/E
- Drill
- Small drill bit
- Safety goggles
- Scissors, craft knife, cutting mat
- Pencil
- Brushes
- Plaid® Art Materials – Brush Basin filled with water
- Diamond Art Blue Dahlia Clock Patterns (Zip File)
Instructions
Diamond Art Blue Dahlia
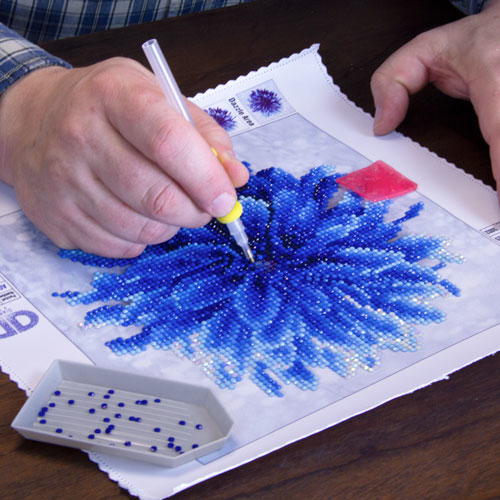
Diamond Art Tip Only pour enough Diamond Gems in to the Craft Tray to cover about two-thirds of the tray and then gently shake (or shimmy) the tray side-to-side so the gems align in the grooves and magically arrange themselves with the faceted side up. This makes the gems quick and easy to pick up and place on the pre-printed design.
-
Apply Diamond Art Gems Following the instructions included with the Diamond Art by Leisure Arts Blue Dahlia kit, apply the Diamond Art Gems to the pre-printed design using the wax coated tip of the stylus. Everything you need to create the dahlia is included. New to Diamond Art? Check out Joe Rotella’s unboxing video for how to get started at https://youtu.be/ZeAUSxwthSs
-
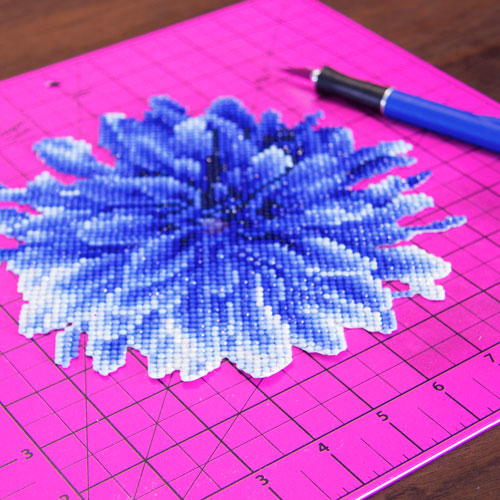
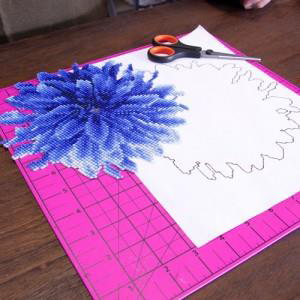
Cut Out the Dahlia Use detailed scissors or a craft knife cut out the dahlia. Follow the edge of the gems. You might find it helpful to cut away some of the excess fabric as you go around the shape of the dahlia.
-
Cut Out the Center of the Dahlia To make room for the clock movement, remove Diamond Gems to allow enough space for the washer that’s included with the movement. Trace the inside opening of the washer. This is way the clock movement stem will be inserted. Use a craft knife to cut out the canvas slightly larger than this center opening. You want some canvas to be under the washer, but don’t want any canvas where the center opening will be. Use the blue Le Plume marker to cover up the color key grid on the canvas (where the gems have been removed).
Wood Base
Scroll Saw Tips Always wear safety googles when working with power tools. Remove your watch and any dangling jewelry, like bracelets. Be sure your sleeves don’t get in the way. Never “hog” the wood. “Hogging” is the woodworking term for pushing the wood too fast through the blade. Allow the blade to do the cutting. It takes practice and patience to get the “feel” of using a scroll saw. The effort is worth it. You’ll be amazed at what you can create with this bench top tool.
-
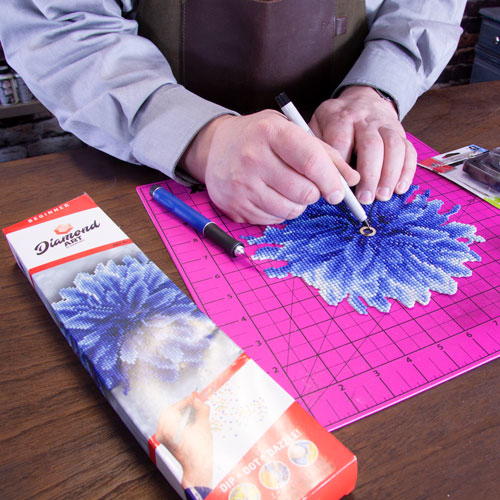
Prepare the Dahlia Pattern The Diamond Art Dahlia needs to be mounted on a stable base to support the clock movement and leaves. You can trace the Dahlia on paper or download the pattern file (SVG, PDF). Transfer the pattern to your base material (e.g., 1/8″ Baltic Birch) in preparation for cutting it out.
-
Cut Out the Dahlia Use the Proxxon scroll saw to cut out the dahlia. Alternatively, you can cut the base out from chipboard using the Brother ScanNCut and the pattern (SVG, PDF) provided or from foam core board using a craft knife.
-
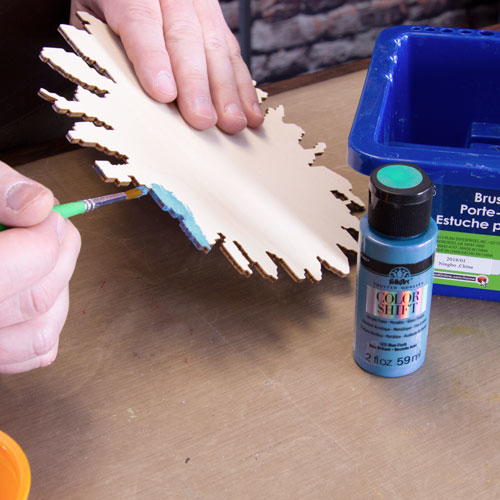
Paint the Base Paint the back, edge and around the edge of the front of the base with Blue Flash. This ensures no exposed wood will be shown in the finished project. Set the piece aside to dry.
-
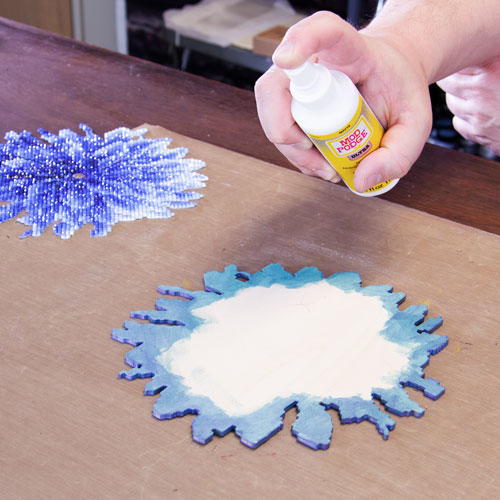
Adhere Dahlia to Base Protect your work area with newspaper or a non-stick craft sheet. Spray the base with Mod Podge Ultra and place the dahlia on top to adhere it to the base. Set aside to dry.
-
Drill Hole for Clock Movement Drill the hole for the clock movement.
Rinea Foiled Paper Leaves
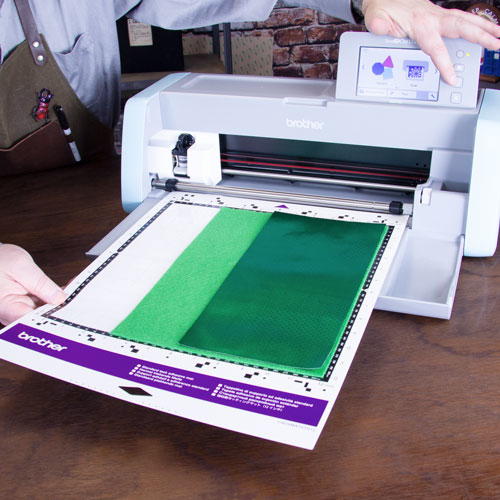
Cutting Fabric with the Brother ScanNCut In this project, we’re cutting felt that’s layered with dry adhesive and foiled paper. That gives the felt enough stiffness that it can be cut without the addition of fusible web or spray starch. Use a dedicated blade for cutting fabric. Just as you should have a dedicated pair of scissors for fabric and one paper, you should have a dedicated blade for fabric and a separate one for paper.
-
Create Foiled “Felt” To give the foiled paper more body and so it can be stiffened using Mod Podge Stiffy, it’s backed with felt. The finished foiled felt is made of three layers; Rinea foiled paper, Scor-Tape double-sided adhesive and felt. To create the foiled felt, peel away the carrier sheet from one side of the double-sided adhesive sheet and apply it to the felt. Then peel off the top layer of carrier sheet, exposing the adhesive, and apply the foiled paper.
-
Cut Dahlia Leaves from Foiled “Felt” Download the pattern (FCM) for the dahlia leaves, import the design in to the Brother ScanNCut SDX125 electronic cutting machine and then cut them out of the foiled felt. You’ll need to rearrange the design to fit the size foiled felt you have created. After they are cut out, use a stylus or the rounded end of a small paint brush to “emboss” veins on each leaf. The softness of the felt backing makes it easy to indent the foiled paper. Go around the edge of each leaf with the green Le Plume marker to hide any exposed silver core of the foiled paper.
-
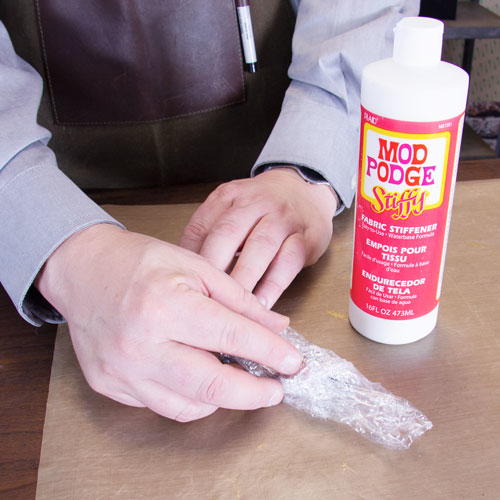
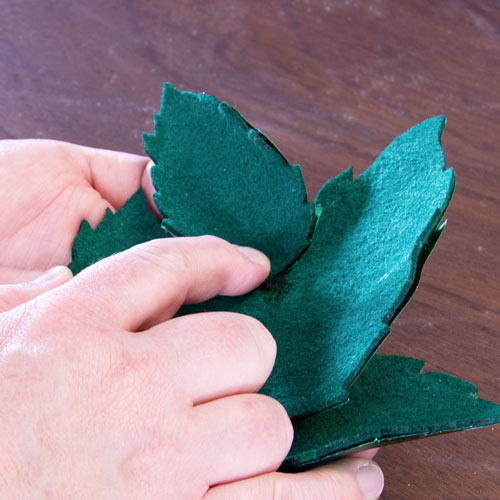
Create Armatures Using the aluminum foil, create armatures the leaves can be draped over to give them a 3D effect, while the fabric stiffens. I created a small cone shape so each leaf would curve down on each side. The goal is to create a form that will transform the leaves from two dimensional (i.e., flat) piece of foiled felt to three dimensional shapes. Cover the foil armatures with plastic wrap.
-
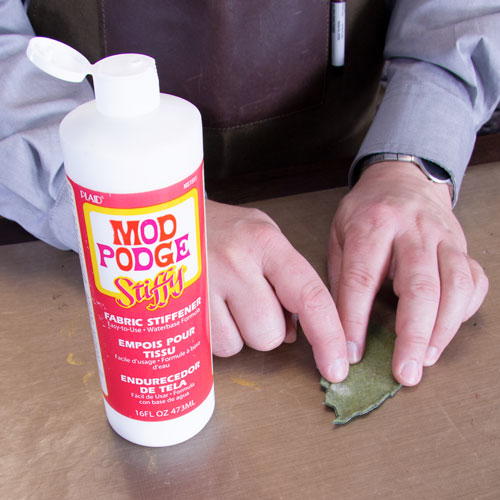
Apply Mod Podge Stiffy Liberally apply Mod Podge Stiffy to the underside of each leaf. I found it easiest to pour small drops of Mod Podge Stiffy on to the felt and then massage it in with my finger. Be careful to avoid getting any Stiffy on the foiled paper. While it dries clear, it can slightly change the shine of the foil.
-
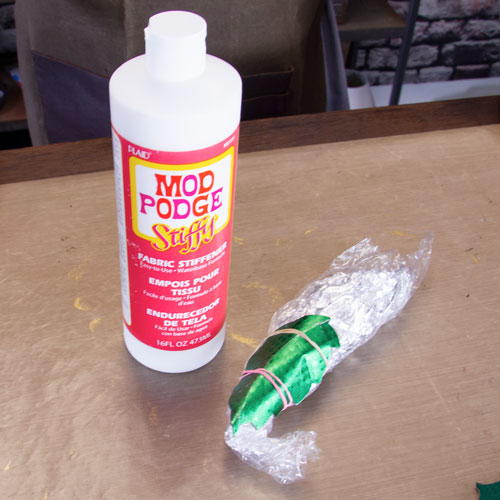
Shape the Leaves Drape each leaf over an armature to give each one a unique shape. You can use rubber bands to help hold the shape of each leaf. Let these dry. It can take 24-48 hours for the Stiffy to fully harden. It helps if you remove the leaves from the armatures after about 24 hours, put the rubber bands back on (loosely) to help them hold their shape, and then let them dry another 24 hours. The foiled paper on the top and the clear wrap makes it difficult for air to circulate around the leaf, which is what’s required for the Stiffy to dry. Exposing the felt helps speed up the process. Once dry, carefully remove the aluminum foil and gently peel back any plastic wrap that may have gotten stuck to the underside of each leaf. The result is a pile of 3D leaves.
Assembling the Clock
The Best Battery for your Clock Movement Alkaline batteries are the only type of battery that should be used in clocks. Lithium powered or re-chargeable batteries can cause your clock to malfunction, or not function at all. Lithium & re-chargeable batteries are meant for high-drain devices, such as digital cameras, etc. Alkaline batteries are best used in low-drain devices, which includes clock movements.
-
Make Leaf Clusters Make three clusters of leaves by arranging 3-4 leaves and adhering them together with DAP RapidFuse.
-
Assemble the Clock Adhere the leaf clusters to the back of the clock base with DAP RapidFuse. Insert the clock movement following the instructions provided. Touch up any spots of the leaves where the green color was removed using the Le Plume marker.
About Joe Rotella
Joe’s work has appeared in Scrap & Stamp Arts, Just Cards, Just Steampunk! and Somerset Studio Gallery magazines. He’s been a guest on Crafting at the Spotted Canary with Joy Macdonell and Scrapbook Soup TV. Look for him on the TV show Make It Artsy, airing nationally on PBS TV and Create TV. He’s won Archiver’s One-of-a-Kind Wall Art contest and blue ribbons at the Ohio State Fair. He’s served on the Viva Las Vegastamps!, Want2Scrap, USArtQuest and Proxxon design teams and is currently a Brother Signature Designer and a Plaid Ambassador. He's a regular instructor at AFCI Creativation, Artiscape, Stampaway, Memories Expo and Gen Con and has his own line of embellishments and kits. Learn more about Joe on his site, www.createNcraft.com When he’s not designing paper art projects, he works as Chief Marketing Officer (CMO) at Delphia Consulting. He frequently speaks at AFCI events and delivers AFCI webinars.

Read NextMarker Art Quote Page