

This project was submitted by one of our readers, just like you.
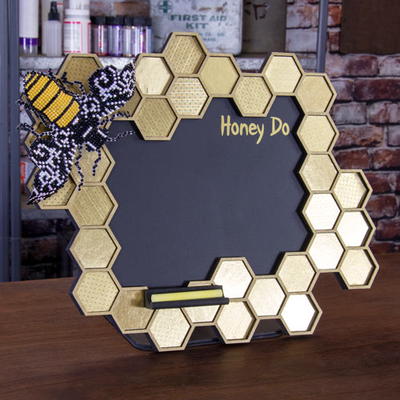
DIY: Diamond Art Bee and Honeycomb Chalkboard "Honey Do" List

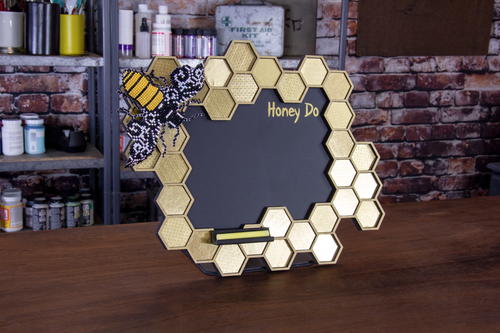
DIY Diamond Art Bee and Honeycomb Chalkboard Honey Do List
From the Designer:
"Create a chalkboard to track all your Honey Do tasks by combining a sparkling Diamond Art by Leisure Arts Bee kit, FolkArt® paints, Mod Podge® Stiffy, Rinea Foiled Paper, Styletech Craft vinyl, glass from a picture frame and wood. Move from crafting to making by building a functional art piece that really is mixed media."
"Use the downloadable patterns and instructions to create this project or let it get your imagination buzzing to create your own interpretation of a chalkboard embellished with a 3D bee covered in faceted diamond gems. Each gem in a Diamond Art kit has 13 facets!"
Primary TechniqueMixed Media

Project TypeMake a Project
Materials List
- Diamond Art by Leisure Arts Bee
- FolkArt® Home Decor™ Chalk paint – Rich Black
- FolkArt® Bushed Metal Paint – Brushed Gold
- Rinea Foiled Paper – Starstruck Gold, Glossy Gold
- StyleTechCraft™ vinyl – black chalkboard, gold
- StyleTechCraft™ Clear Transfer Tape
- 8×10 Picture Frame Glass (about 1/8” or 3mm thick)
- 1/4” or 6mm Baltic Birch (1 piece, each about 15” x 17”)
- 1/8” or 3mm Baltic Birch (2 pieces, each about 15” x 17”)
- Scrabble® tile tray
- Saw-toothed hanger
- Chalk
- Mod Podge® Stiffy
- Mod Podge® Ultra Matte
- DAP RapidFuse
- Scor-Tape double-sided adhesive tape
- Aluminum Foil
- Plastic Wrap
- A non-stick craft sheet or newspaper to protect your work surface
- Brother ScanNCut SDX125
- Proxxon Scroll Saw DS 115/E
- Proxxon Bench Drill Press TBM 115
- Xyron Sticker Maker
- Small drill bit (1/4″ or smaller to accommodate the scroll saw blade)
- Safety goggles
- Scissors, craft knife, cutting mat
- Pencil
- Brushes
- Plaid® Art Materials – Brush Basin filled with water
- Small spring clamps
- Honey Do Chalkboard Pattern Files (Instant ZIP Download)
Instructions
Wood Structure: Base, Frame, Honeycomb Top & Cells
Scroll Saw Tips: Always wear safety googles when working with power tools. Remove your watch and any dangling jewelry, like bracelets. Be sure your sleeves don’t get in the way. Never “hog” the wood. “Hogging” is the woodworking term for pushing the wood too fast through the blade. Allow the blade to do the cutting. It takes practice and patience to get the “feel” of using a scroll saw. The effort is worth it. You’ll be amazed at what you can create with this bench top tool.
-
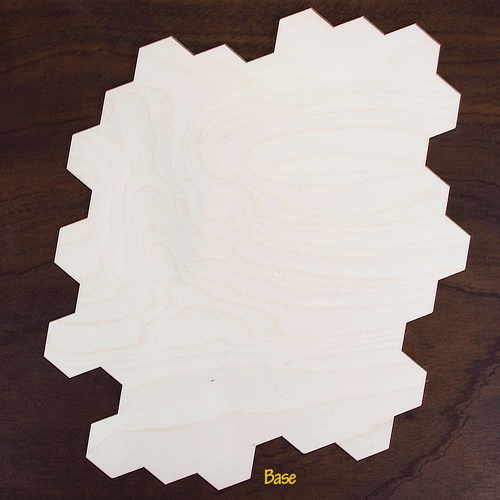
Download the Patterns The wood structure of the chalkboard consists of three layers of Baltic Birch; the Base (1/8” thick), the Frame (1/8” thick) and the Honeycomb Top (1/4” thick). The Base is solid (like the back of a picture frame). The Frame has an opening cut out of the center that fits the glass insert. The Honeycomb Top holds the glass in place and provides the decorative element. Some of the honeycomb cells have a hexagonal wood insert. Download, unzip and print the pattern files, then cut them out so you can trace them on the Baltic Birch. If necessary, adjust the size of the opening in the Frame to fit the glass you have selected.
-
Cut Out the Outer Shape To be sure all three layers have the same outside shape (i.e., silhouette or contour) when cut out, cut them out as a single piece. To do so, stack the three pieces of Baltic Birch together, holding them in place with a few short pieces of double-sided adhesive tape. Use a pencil to trace the Base on to the top layer. Use the scroll saw to cut out the outline. After the shape has been cut out, separate the layers, remove any adhesive residue and set aside one of the 1/8” thick layers to use as the Base.
-
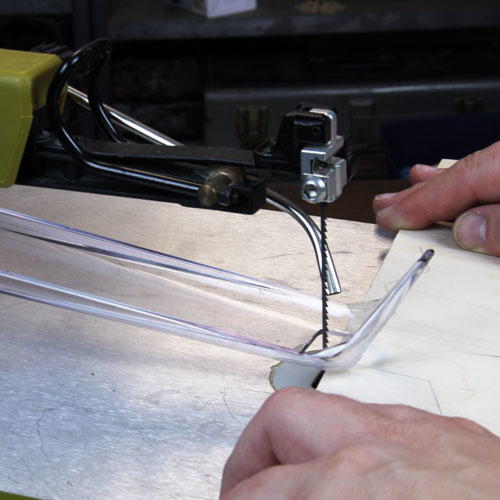
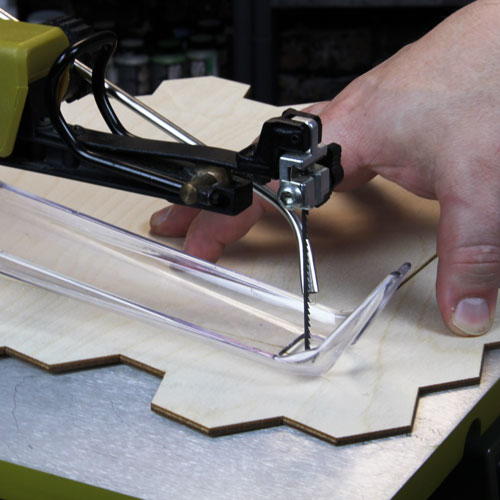
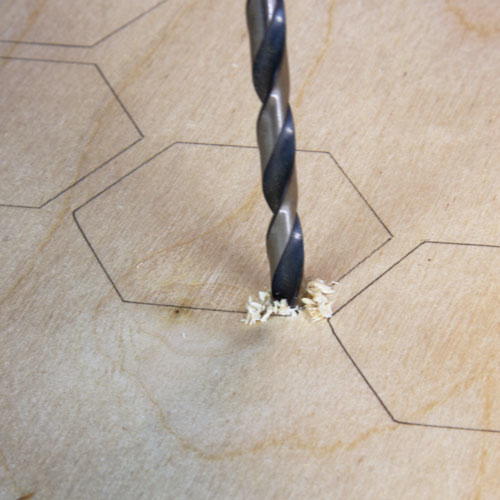
Cut Out the Frame Trace the Frame on to the remaining 1/8” thick layer. Make an inside cut to remove the part of the Frame that will hold the glass. Drill a small hole inside the corner of the center cutout. Release the tension on the scroll saw blade, insert the blade in to the hole and then re-tension the blade. Cut out the center of the frame. After the center has been cut out, set the Frame aside.
-
Cut Out the Honeycomb Top Trace the Honeycomb Top on to the ¼” thick layer. Use inside cuts to remove the center area and all the honeycomb cells. Finish all 3 layers by sanding as needed to remove any rough edges.
-
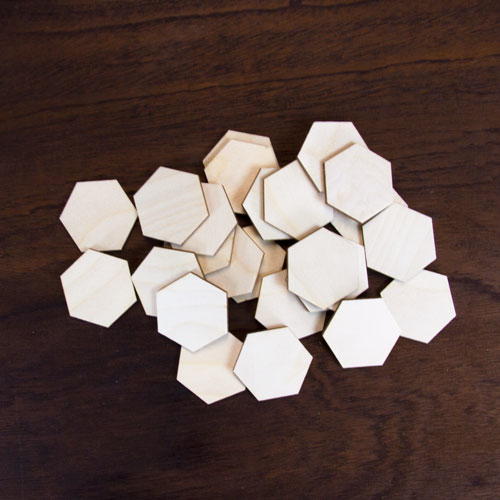
Cut Out the Cells Cut out 22 Cells from scrap pieces of the 1/8” Baltic Birch. The centers of the Frame and Honeycomb Top should be enough scrap material to get all the Cells you need. These must fit inside the cells around the inner edge of the Honeycomb Top. Sand as needed to remove any rough edges and to be sure they fit the Honeycomb Top.
-
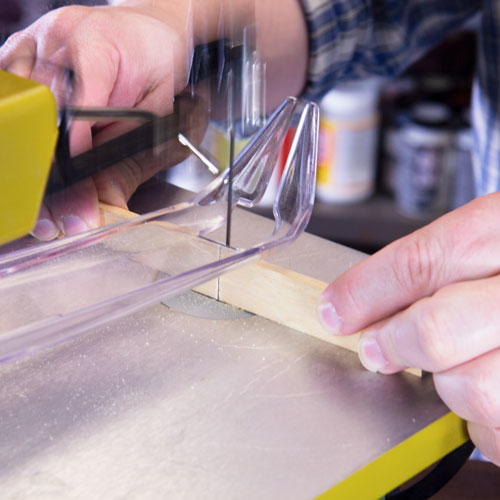
Cut the Scrabble Tile Tray in Half A typical Scrabble tile tray is about 7″ long, which is twice the size of an average piece of chalk. Cut the Scrabble tile tray in half. You’ll use one half in this project and can save the other half for use in another project.
Diamond Art Bee Embellishment
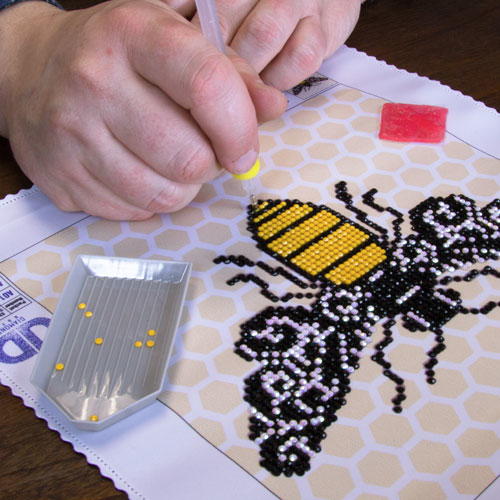
Diamond Art Tip Only pour enough Diamond Gems in to the Craft Tray to cover about two-thirds of the tray and then gently shake (or shimmy) the tray side-to-side so the gems align in the grooves and magically arrange themselves with the faceted side up. This makes the gems quick and easy to pick up with the wax-tipped stylus and then place on the pre-printed adhesive design.
-
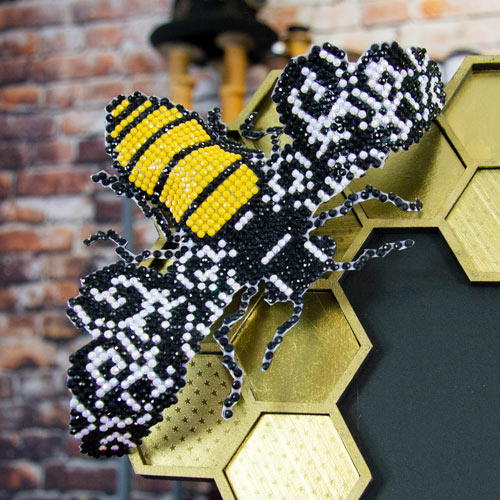
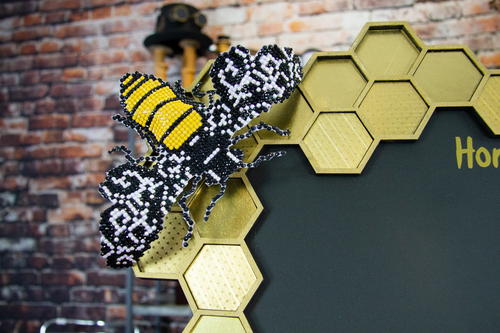
Apply Diamond Art Gems Following the instructions included with the Diamond Art by Leisure Arts Bee kit, apply the Diamond Art Gems to the pre-printed adhesive-covered design using the wax coated tip of the stylus. Everything you need to create the bee is included in the kit. New to Diamond Art? Check out Joe Rotella’s unboxing video for how to get started at https://youtu.be/ZeAUSxwthSs
-
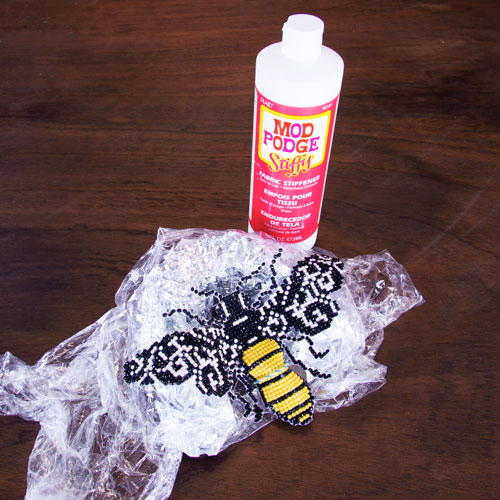
Cut Out the Bee Use small (i.e. detail) scissors or a craft knife cut out the bee. Follow the edge of the gems. You might find it helpful to cut away some of the excess fabric as you work your way around the shape of the bee. Be especially careful around the antennae and feet since those areas are somewhat thin.
-
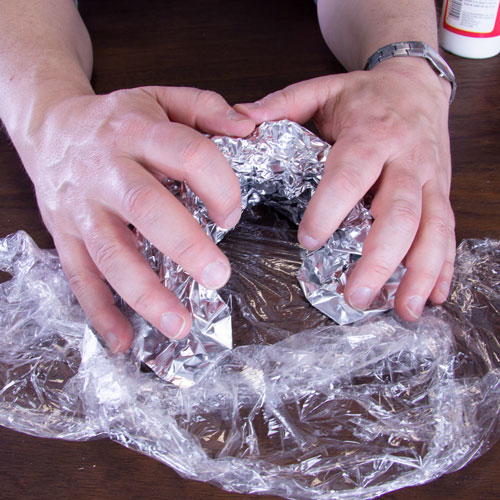
Create an Armature Using the aluminum foil, create an armature the bee can be draped over to give it the desired 3D effect while the fabric stiffens. Use the foil to curve the sides of the body downward and the wings and antennae upward. The foil will look more like a mountain range than a bee. The goal is to create a form that will transform your bee from a two dimensional (i.e., flat) piece of fabric to a three dimensional shape. Loosely cover the foil with plastic wrap.
-
Shape the Bee Liberally brush the underside of the bee with Mod Podge Stiffy. Drape the bee over the armature and let it dry 24 to 48 hours. You might find it helpful to put a rubber band around the body of the bee to help hold it against the armature. Once dry, carefully remove the aluminum foil and gently peel back any plastic wrap that may have gotten stuck to the underside of the bee. Paint the underside of the bee black. The result is a 3D bee that looks like it just landed.
Honey Do or Bizzy Bee Tagline and Cells
Vinyl Cutting Using an Electronic Cutting Machine Tip The goal is to “kiss cut” the vinyl. That means you only want to cut the vinyl layer and not go through the carrier sheet it comes on. Be sure to do test cuts to determine the right blade exposure, pressure and speed to kiss cut the vinyl. Clear transfer tape lets you transfer the vinyl cut out from the carrier sheet to the desired surface and see exactly where it’s positioned. Since this design isn’t very big, if you don’t have transfer tape, try using a piece of clear packaging tape. Be sure you make the tape “less sticky” by applying and removing it off a piece of cotton (i.e., a t-shirt) a few times.
-
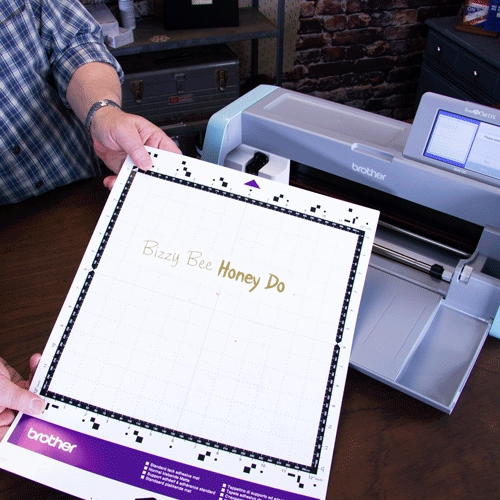
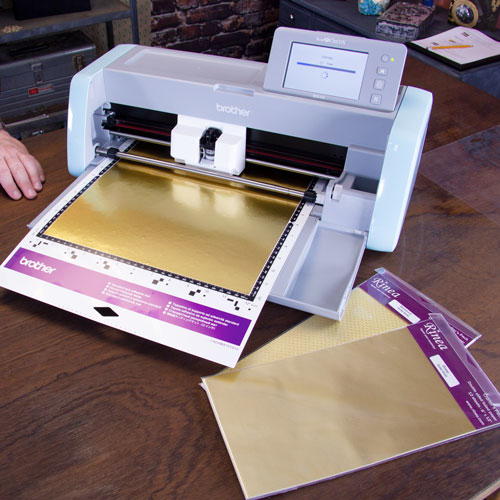
Cut Out the Vinyl Tagline Load the “Bizzy Bee” FCM file in to the Brother ScanNCut. Decide which tagline you want to use in your project and adjust the pattern to remove the additional tagline. Put a piece of gold vinyl on the mat and cut out the design using “kiss cut” (i.e., Half Cut) settings. This cuts only the top layer of vinyl and preserves the backing sheet. Weed out the excess vinyl leaving only the tagline.
-
Cut Out the Foiled Paper Cell Tops Load the Honeycomb Cell FCM in to the Brother ScanNCut. Cut out 33 of this hexagon shape from the gold foiled paper.
Finishing and Assembly
Assembly Tips When adhering two pieces of wood together, it’s best to clamp the materials in place until the adhesive has cured. This ensures a nice tight fit. It’s generally easier to work on a project when it lays flat. In this project, we put the saw-toothed hanger after everything else is done (except the final bee embellishment, since it’s so bulky) so the back can lay flat for all of the previous steps.
-
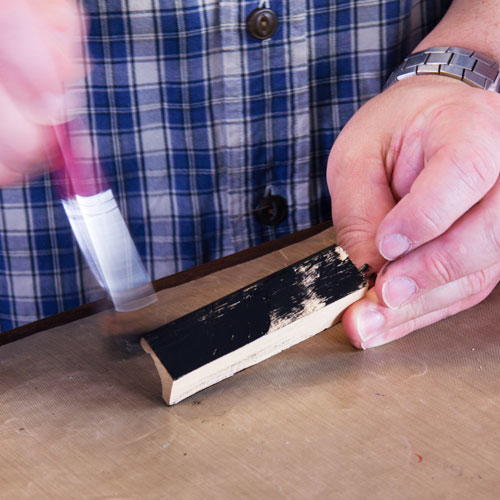
Paint the Edges and Back & Scrabble Tile Holder Paint the Scrabble Tile Holder black. Paint the back and edge of the Base black. Paint the outer edge of the Frame black. Paint the outer edge, inside edge and cell walls of the Honeycomb Top black. Don’t worry if any of the black paint gets on the top of the Honeycomb Top. The brushed gold paint you’ll apply in the next step will look great over any black bits. Set the pieces aside to dry.
-
Paint the Honeycomb Top Paint the top of the Honeycomb Top gold. Set aside to dry.
-
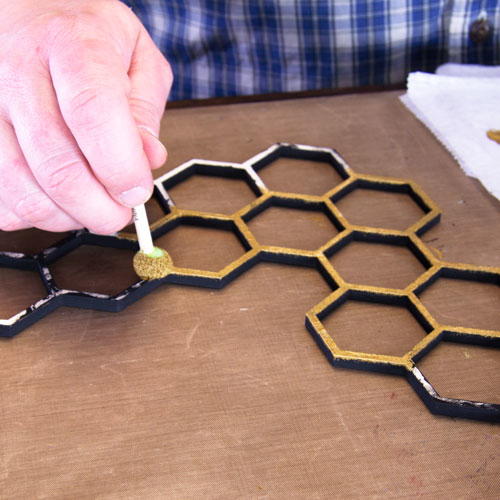
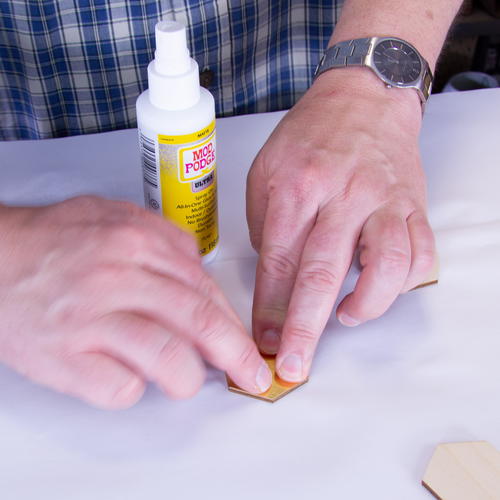
Cover 22 Wood Cells with Foiled Paper Protect your work area with newspaper or a non-stick craft sheet. One-by-one, spray a wood Cell with Mod Podge Ultra and place a foiled paper hexagon on top. Set the piece aside to avoid getting any over spray on it and repeat the process, until all 22 wood Cells are covered. Set these aside to dry. Once dry, remove any excess paper around the edge of each cell by sanding in the downward direction (from the paper down to the wood).
-
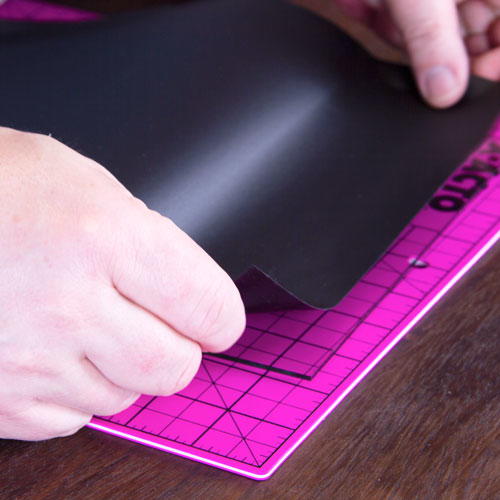
Apply Chalkboard Vinyl to Glass Thoroughly clean the glass. Apply a piece of chalkboard vinyl to the front of the glass. Since this is a fairly large area to cover, only peel back a bit of the backing sheet. Apply the vinyl and smooth it out flat, slowing peeling away more backing sheet and working your way down the glass until it’s fully covered. It is a similar motion to unrolling pie dough off a rolling pin and on to the top of a pie.
-
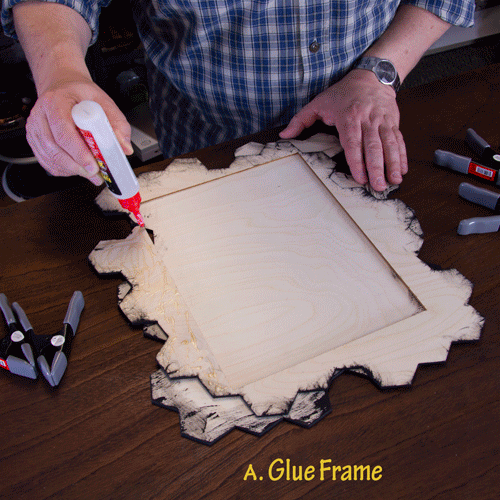
Glue the Three Layers Together (Base, Frame, Honeycomb Top) Use DAP RapidFuse glue to adhere the Frame to the Base. Clamp and set aside to dry. Once dry, use double-sided adhesive tape to adhere the vinyl-covered glass in position in the Frame (chalk side up). Lastly, use DAP RapidFuse glue to adhere the Honeycomb Top to the Frame. Clamp and set aside to dry.
-
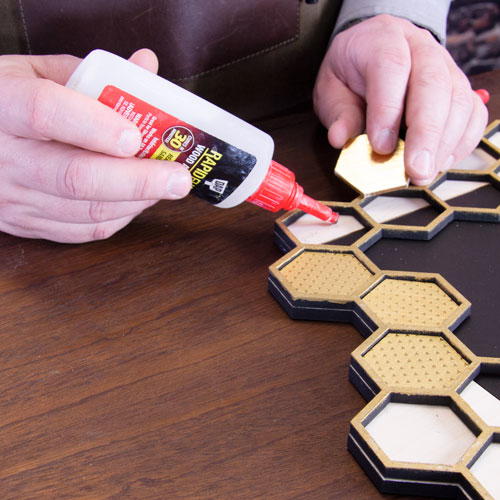
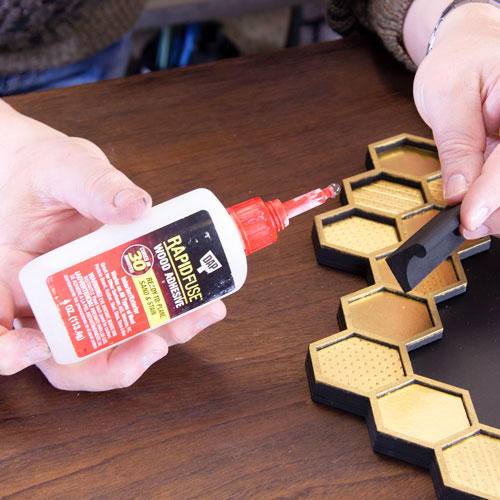
Glue the Wood Cells into the Honeycomb Top Use wood glue to adhere wood cells (covered with foiled paper) in to the inner cells that go around the chalkboard. This covers up the areas where the glass meets the edge of the frame.
-
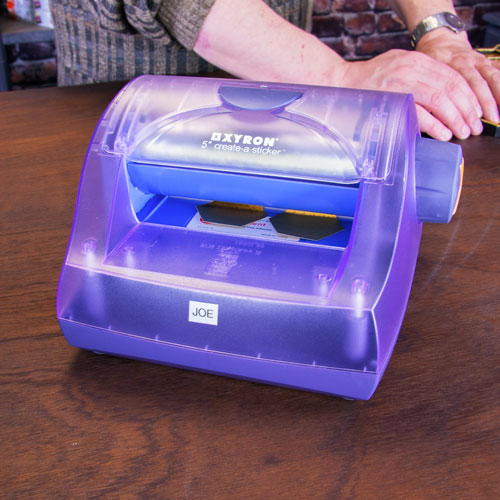
Fill Perimeter Cells with Hexagon Stickers Turn 11 of the honeycomb cell foiled paper cutouts in to stickers by running them through the Xyron Sticker Maker. Peel each sticker off the backing sheet and apply it in to an empty cell around the perimeter of the honeycomb.
-
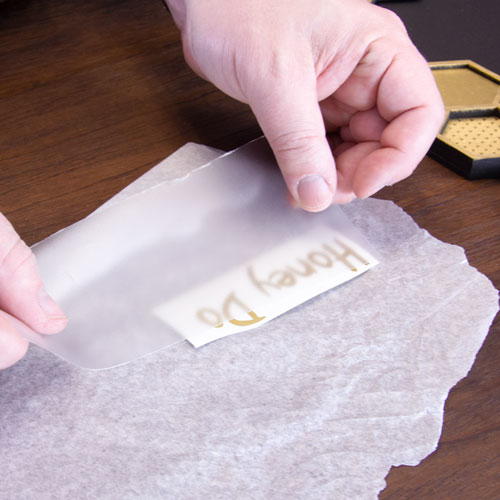
Transfer the Vinyl Tagline Decide if you like the chalkboard to be portrait or landscape. Then use transfer tape to transfer the tagline of your choice (e.g., “Honey Do”) to the chalkboard.
-
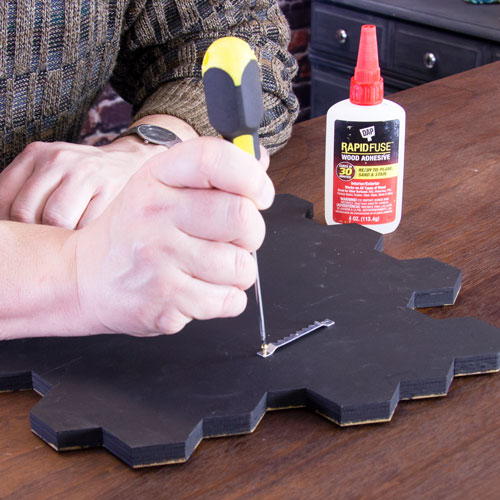
Adhere the Saw-Toothed Hanger Turn the piece over and attach the saw-toothed hanger with the screws provided. For extra holding power, put a dot of DAP RapidFuse glue under the hanger ends before you screw it in place.
-
Adhere the Chalk Holder Adhere the Scrabble tile tray to the Honeycomb Top with DAP RapidFuse glue. This turns the tile tray in to a little chalk rest.
-
Adhere Diamond Art Bee Add the Diamond Art Bee to the Honeycomb Top. To lift the bee up off the surface, use a scrap of wood or a small wood block. Adhere the block to the Honeycomb Top with DAP RapidFuse. Let that dry. Then adhere the bee to the top of the block with DAP RapidFuse.
About Joe Rotella
Joe’s work has appeared in Scrap & Stamp Arts, Just Cards, Just Steampunk! and Somerset Studio Gallery magazines. He’s been a guest on Crafting at the Spotted Canary with Joy Macdonell and Scrapbook Soup TV. Look for him on the TV show Make It Artsy, airing nationally on PBS TV and Create TV.
He’s won Archiver’s One-of-a-Kind Wall Art contest and blue ribbons at the Ohio State Fair. He’s served on the Viva Las Vegastamps!, Want2Scrap, USArtQuest and Proxxon design teams and is currently a Brother Signature Designer and a Plaid Ambassador.
He's a regular instructor at AFCI Creativation, Artiscape, Stampaway, Memories Expo and Gen Con and has his own line of embellishments and kits. Learn more about Joe on his site, www.createNcraft.com
When he’s not designing paper art projects, he works as Chief Marketing Officer (CMO) at Delphia Consulting. He frequently speaks at AFCI events and delivers AFCI webinars.

Read NextMarker Art Quote Page