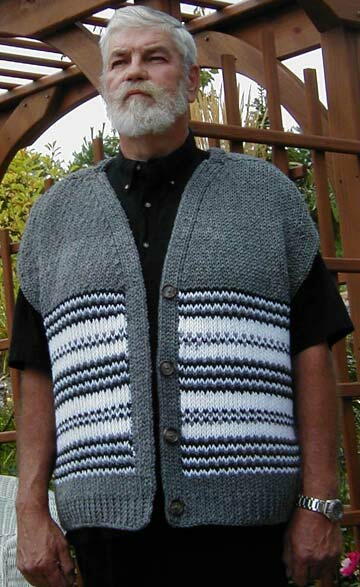
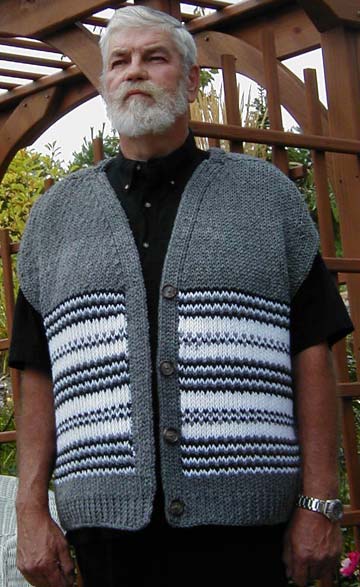
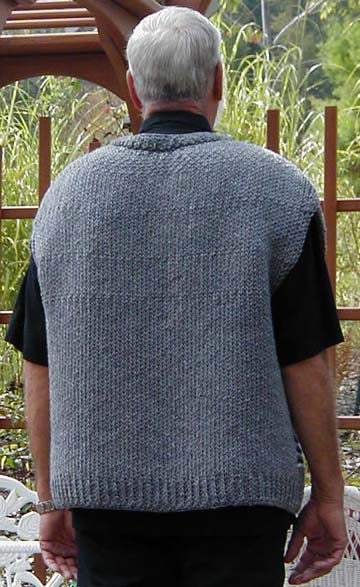
Cozy Vest with Traditional Styling
A cozy, sleeveless vest with button front and longer length is a wardrobe staple. The vest from Authentic Knitting Board features a soft, rounded V-neckline and shaped arm openings with off-the-shoulders drop. Knit in solid one color or add some accent stripes (as shown).
Materials:
- Yarn: Berella Muskoka Canadian 100% Merino wool, machine washable for pattern. 200 yds per skein. Worsted weight. Gauge: 3.5 sts=1” Yardage needed is aprox 800 yards total for 1X.
- 28” knitting board (minimum of 84 needles)
- Knit hook
- Crochet hook for finishing
- Large eyed needle for sewing pieces together
- (4) buttons 1” diameter
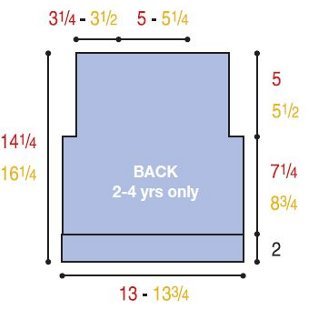
Measurements are taken with garment laying flat:
Sizes sml/med (lge/ X-Lge) (1X)
Chest 18” 21” 24”
Shoulders 17” 20” 23”
Hip 18” 21” 24”
Length:
Shoulder to hem 24” 26” 28”
Armhole length 9.5” 11” 11”
Instructions:
Armhole Bind Off:
At yarn end-lay yarn across the stitches between boards. With crochet hook, bind off by picking up first (2) loops, one on each board. Pull (1) thru (1). Pick up (1) more loop (alternating boards) and pull (1) thru (1). Do this until the first (5) stitches are finished off. Lay the last loop onto next needle on bottom board. When hooking the next row, lift the 2 loops over needle. Back of sweater: At opposite end of board, bind off in same manner and place last loop on bottom board, next needle. Next row, weave your pattern on your new amount of stitches.
Back of Vest:
- Cast On 62 (74) (84) stitches. Lay anchor yarn.
- Knit (6) rows in Rib Stitch.
- Change to Stockinette Stitch.
- Knit to armhole: 42 (46) (52) rows.
Armhole:
- Next row Bind Off first (5) stitches at both ends.
- Start each row with placket band and end each row with placket band. When you do an increase or decrease, do it between placket and body of sweater.
- Placket band: Used for reinforcement around arm opening and vest front.
- Do circular on first (4) needles. This means that you weave down on first (4) needles, and return. Then, do the full circular on all needles, going over the first wrap on (4) needles. This gives a double strength to the edges.
- When doing increase, move stitches over to expose an empty needle after the band. Do increase to the open needle. This will keep the placket even.
- Knit in Stockinette for additional 10 rows.
- Increase (1) stitch each end of board. (after the placket)
- Knit in Stockinette for additional 10, (12), (12) rows.
- Increase (1) stitch each end of board.
- Knit in Stockinette for additional 6, (10), (10) rows.
- (See stripe pattern instructions at end of pattern.)
- You are now ready for the shoulder. Next row has no placket. Hook over so that all needles have only one loop.
Shoulders:
- Decrease (1) stitch each end.
- Knit row.
- Repeat this decrease row for total of 6 rows.
- Next row: count the remaining stitches. Place pin or yarn piece at center of the remaining stitches. This will note the center of the neck opening.
- Decrease (1) stitch at each end of row.
- Go to center of remaining stitches. Bind off from center--(2) stitches to each side of center. This will reduce the stitches by (4) in center. Be sure to place loop onto the next needle on both sides of neck. When you hook over this row, be sure to lift both lower loops over. You will need to attach a piece of yarn to end of board that does not have the yarn at neckline. You will be working the remaining of the neckline in two separate sections.
- Knit row, both sections.
- Left side-shoulders.
- Next row: Decrease (1) stitch at beginning of row. Bind off 2 (3) (3) stitches at neckline.
- Knit row. Repeat this row 4, (5), (6) additional times. Bind Off remaining stitches.
- Right side-shoulders.
- Next row: Lay yarn between boards before you bind off. You will do this side just the opposite of the left side, but same amount of rows.
- Decrease (1) stitch at end of row. Bind Off 2 (3) (3) stitches at neckline.
- Knit row. Repeat this row 4, (5), (6) additional times.
- Bind Off remaining stitches.
R-VEST FRONT WITH BUTTONS:
(women’s version-add buttonholes)
- Cast On 34 (38) (46) Stitches
- Knit in Rib Stitch for (6) rows.
- Change to Stockinette Stitch
- Placket band will be at beginning of each row for center neckline.
- Knit a total of 42 (46, (52) rows to armhole.
- Bind Off last (5) stitches for armhole. Be sure to place last loop on next needle.
- Begin placket band at end of board for armhole.
- Decrease (1) stitch at beginning of board after placket. Move the stitches over to close the empty needle. Do this Decrease every 3rd row for neckline to shoulder shaping.
- Begin the placket band for arm opening. You will be doing the placket band on beginning of each row at neckline and at end of board for the arm opening.
- Knit in Stockinette for additional 10 rows.
- Increase (1) stitch at end of board for dropped shoulder. Knit in stockinette for additional 10, (12), (12) rows.
- Increase (1) stitch at end of row. Be sure to do the increases inside of placket band and move stitches over.
- Knit in Stockinette for additional 6, (10, (10) rows. Hook over all loops to have (1) loop on each needle. You will now stop the placket band at arm opening.
- Shoulder shaping for R-front:
- Continue doing the placket band for neckline until final bind off.
- Decrease (1) stitch at arm opening every row.
- Decrease at neckline every other row.
- Do this for additional (6) rows.
- Bind Off.
L-VEST FRONT WITH BUTTONHOLES
(women’s version-button side)
- Cast On 34 (38) (46) Stitches.
- Knit in Rib Stitch for (3) rows.
- Row 4-Buttonhole row: Lift loop from needle (3) and place onto needle (2). Do this to both boards. Weave row in Rib. Do not hook single loop on needle (3).
- Do lift both bottom loops on needle 4. All needles now have (1) loop.
- Knit row 5 and 6 in Rib Stitch.
- Change to Stockinette Stitch. Do placket band at beginning of all rows.
- Knit (6) rows in Stockinette.
- Continue this front piece as you did the R-front
- Place a buttonhole row after each 13, (14), (16) rows with last button hole at neckline decrease. The button hole will be in the placket band. When you shift the loops for the buttonhole, be sure to lift both loops.
- Back Neckline Band: This (3) row piece will be used for the back of the neckline.
- To be sure it fits the sweater; lay the back piece of sweater flat after it is complete. Measure the length. Measure your knitting to know the gauge you are knitting. Multiply the number of stitches per inch by the length in inches. This will tell you exactly the amount of stitches to cast on. ( example=if you are knitting 3 st to each inch, and your neckline measures 10 inches, you would cast on 30 stitches. Adjust to fit your neckline.
- Cast on your stitches. Knit in Stockinette for (3) rows. Bind Off.
- Sew this band to back neckline for reinforcement.
- Finishing and Sewing:
- Lay the (3) pieces of knitting together so that the shoulders match, the arm openings and front seams.
- Using matching yarn, Sew the Shoulder seams including ends of Neckline band.
- Sew the side seams matching the arm openings.
- Sew on the buttons so that they match up with your buttonholes.
- Optional Pockets. Cast on (18) stitches. Knit in Stockinette. Knit this for (20) rows. Bind Off snuggly as this is your pocket top edge. You may also end the pocket with 4 rows of ribbing. Sew to vest front, right and left. You may also want to knit with stripe pattern on pockets for a nice finish.
Stripe Pattern:
This stripe pattern is done on both sides of front, and may also be done for sweater back. (we show no stripes in sweater back.)
- After the (6) rows of ribbing, knit in stockinette for additional (6) rows in gray. Start stripes after the placket in gray. Do not cut the yarns as you alternate-just lay them aside.
- Always do the placket in gray before beginning the color changes.
White 1 row
Black 1 row
Gray 1 row - Repeat the 3 rows additional 2 times. Lay down the black and gray.
- White, knit 4 rows.
Argyle Pattern:
- Next 3 rows are knit in argyle pattern: knit with your 3 colors going down the board with one color (lay it down) and back with another (lay it down).
- White, knit 4 rows.
- Repeat the 3 rows a total of 3 times. Lay down the black and gray.
- White, knit 4 rows.
- Repeat the ARGYLE PATTERN.
- White, knit 4 rows.
- Repeat the pattern for a total of 2 times or until you reach desired number of rows to armhole shaping.
- End with Black, 1 row.
- You can simplify the stripe design if you choose and just do alternating stripes of each color in 3 or 4 rows each.
- If you yarns begin to tangle from the color changes, you can always cut off just enough to complete one row. Knot at end of row, and tie the color back on again when it is needed for your pattern. If you want to cut the white after each section of 4 rows, this will help with the yarns getting confused.
Read NextPrincess Shawl