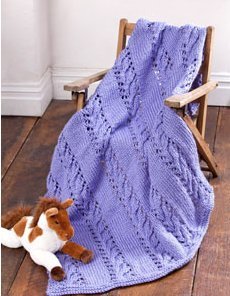
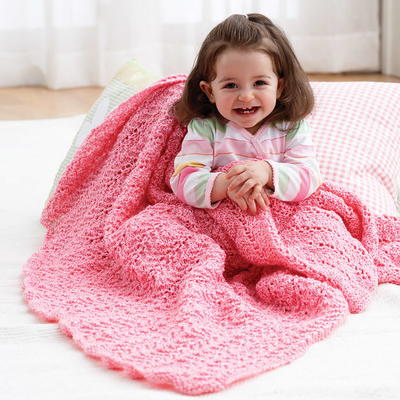
Stained Glass Afghan and Pillow Set
 This elegant Stained Glass Afghan and Pillow Set is a great way to decorate your living room or bedroom. Made with Boutique Magical yarn, this afghan is perfect for snuggling up with a book and a big cup of tea. This afghan and pillow combination also makes a great gift for the holiday season, and is a simple and rewarding knit project for knitters of all skill levels.
You can find this project, as well as many others, in our new eBook, Welcome to Our Home: Knit and Crochet Ideas from Red Heart. Download your own free copy today!

Materials:
- 3 skeins Red Heart® Boutique Magical™ yarn in Hocus Pocus (A)
- 3 skeins Red Heart® Boutique Magical™ yarn in Crystal Ball (B)
- 5 skeins Red Heart Soft® yarn in Light Grey Heather (C)
- 10mm [US 15] Susan Bates® Circular Knitting Needles 32" (80 cm) long (for throw)
- 9mm [US 13] straight needles (for pillow)
- Stitch markers
- 6" (15 cm) piece of heavy cardboard (for making fringe for throw)
- Crochet hook (for attaching fringe)
- 16 x 16" (40.5 x 40.5 cm) pillow form
- Yarn needle
Gauge: 10 sts = 4" (10 cm); 12 rows = 4" (10 cm) in Feather and Fan pattern using larger needle (for throw). 12 sts = 4" (10 cm); 14 rows = 4" (10 cm) in Feather and Fan pattern using smaller needles (for pillow). CHECK YOUR GAUGE. Use any size needles to obtain the gauge.
Pattern Stitch:
- Feather and Fan (multiple of 18 sts)
- Row 1 (right side): Knit.
- Row 2: Purl.
- Row 3: *[K2tog] 3 times, [yo, k1] 6 times, [k2tog] 3 times; repeat from * to end of row.
- Row 4: Knit.
- Repeat Rows 1-4 for Feather and Fan pattern.
Notes:
- Throw and pillow are worked with two strands of yarn held together throughout; one strand of Magical and one strand of Soft.
- Circular needle is used to accommodate width of throw. Work back and forth in rows as if working with straight needles.
- The color is changed every 24 rows when working throw and every 12 rows when working pillow.
Instructions:
Throw measures 38 x 52" (96.5 x 132 cm)
Pillow measures 16 x 16" (40.5 x 40.5 cm)
Throw
- With circular needle and one strand each of A and C held together, cast on 98 sts.
- Row 1 (right side): K4, place marker, work Row 1 of Feather and Fan pattern to last 4 sts, place marker, k4.
- Row 2: Knit to first marker, slip marker, work Row 2 of Feather and Fan pattern to next marker, slip marker, knit to end of row.
- Row 3: Knit to first marker, slip marker, work Row 3 of Feather and Fan pattern to next marker, slip marker, knit to end of row.
- Row 4: Knit to first marker, slip marker, work Row 4 of Feather and Fan pattern to next marker, slip marker, knit to end of row.
- Rows 5–24: Repeat last 4 rows 5 more times, slipping markers in Row 1 (instead of placing them).
- Change to one strand each of B and C held together.
- Rows 25-48: Repeat Rows 1–24.
- Change to one strand each of A and C held together.
- Repeat Rows 1-48 two more times, do not change color at the end of the last row. Throw should measure about 52" (132 cm) from beginning.
- Bind off.
Finishing
- Fringe for Throw: Hold A, B, and C together and wrap around 6" (15 cm) piece of heavy cardboard. Cut wraps at one end of cardboard for 12" (30.5 cm) lengths. *Hold 6 lengths together and fold in half. Insert crochet hook into edge of throw. Place fold on hook and draw fold through to form loop. Insert ends of strands into loop and pull to tighten; repeat from * to attach 25 fringes each evenly spaced across cast-on edge and bind-off edge. Trim fringes to even.
- Weave in ends.
Pillow (Make 2)
- With straight needles and one strand each of A and C held together, cast on 44 sts.
- Row 1 (right side): K4, place marker, work Row 1 of Feather and Fan pattern to last 4 sts, place marker, k4.
- Row 2: Knit to first marker, slip marker, work Row 2 of Feather and Fan pattern to next marker, slip marker, knit to end of row.
- Row 3: Knit to first marker, slip marker, work Row 3 of Feather and Fan pattern to next marker, slip marker, knit to end of row.
- Row 4: Knit to first marker, slip marker, work Row 4 of Feather and Fan pattern to next marker, slip marker, knit to end of row.
- Rows 5–12: Repeat last 4 rows 2 more times, slipping markers in Row 1 (instead of placing them).
- Change to one strand each of B and C held together.
- Rows 13-24: Repeat Rows 1–12.
- Change to one strand each of A and C held together.
- Rows 25-48: Repeat Rows 1-24.
- Change to one strand each of A and C held together.
- Rows 49-52: Repeat Rows 1-4.
- Piece should measure about 15" (38 cm) from beginning.
- Bind off.
Finishing
- With right side of both pieces facing you, align cast-on edge of one piece with bind-off edge of other piece so that the ripple edges match up. From right side, sew the ripple edges together. Fold seamed piece in half and sew side seams. Insert pillow form and sew final seam.
- Weave in ends.
Read NextLacy Violet Baby Blanket
Your Recently Viewed Projects

Thanks for your comment. Don't forget to share!
quanahs 5032097
Mar 02, 2016
This is a beautiful and elegant afghan. I think it would be suitable for a wedding present for some lucky couple. It would go fast on those big needles. I noticed there are some questions about accessing the pattern. I ended up saving the file to my desk top http//www.favecrafts.com/Decorating-Ideas/Welcome- == to-Our-Home-Knit-and-Crochet-Ideas-from-Red-Heart- == free-eBook I like saving to desk top because it gives me permanent access to the pattern along with the ability to easily print the pattern if I need to make changes or adjustments and want to keep track of them.
denandisabel 40344 65
Oct 21, 2013
Stained glass Afghan and pillow set, Would love to do this but cannot find this pattern!! keep trying and get adverts can you help please!!!!!! Thank you,
mlg1 4688464
Oct 20, 2013
Where do I find the pattern????? I've followed links and followed links and go around in circles. Thank you,
Report Inappropriate Comment
Are you sure you would like to report this comment? It will be flagged for our moderators to take action.
Thank you for taking the time to improve the content on our site.