Whimsical Lilly Pulitzer Inspired Hair Stick and Hair Combs
Create unique wire hair combs and hair sticks. These easy and quick projects will dazzle in your hair and impress your friends.

Materials:
- 20 Gauge Colourcraft Wire Hot Pink
- 20 Gauge Colourcraft Wire Turquoise/Blue
- Two Pre-Made Wire Hair Combs
- Two Pre-Drilled Hair Sticks or Balsa Wood Chopsticks
- Two Large Spring Green Metal Enamel Beads (or Comparable Wing Shaped Beads)
- Two Large Diamond Shaped Spring Green and White Diamond Shaped Glass Beads (or Comparable Wing Shaped Beads)
- Six 6mm Hot Pink Faceted Czech Glass Metallic Rounds
- Eight 6mm Swarovski Crystal A/B Finish Bicones Light Sapphire
- Two 2mm Light Green Seed Beads
- Four 4mm Czech Glass Peridot A/B Finish Rondelles
- Two Large Safety Pins
- Round Nose Pliers
- Chain Nose Pliers
- Wire Cutters
- Safety Goggles
- Small Ball Peen Hammer
Steps:
Wire Hair Combs
- Let’s get started with the hair combs, as they are the easier and more immediately rewarding of the two projects presented here. You can find these wire hair combs at you local drug or beauty supply stores. I recommend using wire over plastic, as it is sturdier and easier to manipulate during the wiring process. Take a two foot length of blue Colourcraft wire and beginning on the left hand top of your hair comb wrap it twice over and under working towards the right with two wraps per space between each tooth.
- When you reach the center of the comb you will add your butterfly. Take a large glass bead and thread it on to the wire to the bottom. Wrap the wire flush to the back of the bead and back over the bottom of the wire once around. Now thread your opposing wing bead on repeating these steps. Adjust your wing beads.
- Now you’ll be making the top wings. Add two Swarovski Bicones in Light Sapphire to your wire working the wire around and over the tops of the crystals to form a wing shape. Wrap the wire around the bottom of the wing shape once. Now repeat these steps to make the opposing wing.
- Finally wrap your wire in a criss-cross pattern around the center of the butterfly from left to right over and under and right to left over and under.
- Work the wire down the hair comb as you did before ending by cutting off the excess wire and tucking down the tail with your chain nose pliers.
- Cut a 1.5-2” length of wire to form the antennae. Thread it in a “u” shape through the front and twist the two ends around each other at the base working them upwards. Add a green Czech rondelle to each wire and use your round nose pliers to create a small loop at each end. Bend the wire in a free form manner to keep the seed bead stationary towards the top. Repeat this on the other side. Make any necessary adjustments to the butterflies and the teeth of your hair comb.
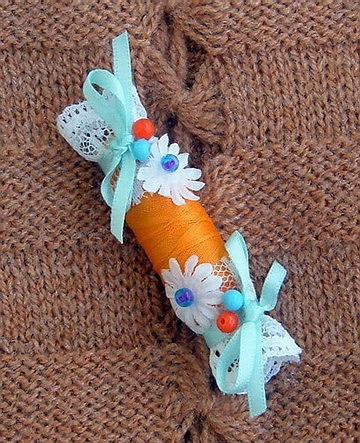
Hair Stick
- This takes some practice and patience. If you are a perfectionist it may take you a while to get the wire perfect. Thankfully, I am not! Begin by assembling your materials. Try to find hair sticks made of a softer wood like balsa if you can. Begin by inserting the sharp end of a large safety pin into the predrilled hole at the top of your hair stick (if you are using chopsticks you may want to make a small hole with a finishing nail.) Please Wear Your Safety Goggles Now! Using sturdy wire cutters cut the safety pin down to about ¼”. Now secure the hair stick and use a ball peen hammer to drive the safety pin into the wood leaving a portion of metal exposed.
- Use your round nose pliers to form a loop with the exposed metal. Test the pin to be sure that it is secure.
- Now take a two foot length of Colourcraft Hot Pink 20 gauge wire and thread it through the safety pin loop. You should have two tails of equal lengths. Wrap them around opposing sides of the top of your hair stick threading each tail over and under the other and tightening until the wire is flush and taut.
- Use one wire to create your butterfly next. Bead a large wing bead onto the wire (I have used a metallic enamel Chinese bead here.) Wrap the wire flush to the back of the bead and wrap it around the bottom twice. Repeat this with another large bead. These are your top wings.
- Add three faceted Czech glass rounds to your wire folding the wire over the top of these beads to create a bottom wing. Wrap the wire over the center of the butterfly once. Repeat this to create your second wing.
- Now you will coil your wire around the base of the butterfly over the safety pin keeping the wire taut as you work down to the top of the hair stick. You should have enough to make it there. As you run out of wire nip and tuck the excess.
- Now use the second length of wire to continue wrapping tightly around working down the hair stick from the top taking your time to make it taut. (This is really where the patience comes in; don’t worry about it being perfect unless you can’t help yourself!) When you come down to around 1” from the top of the hair stick cut off the excess wire leaving enough to wrap around the front using your round nose pliers to turn the wire back on itself and form a small loop. While doing this be sure to tighten the tension on the hair stick.
- Add your antennae by cutting a 2” length of wire and threading it through the center of your butterfly in a “u” shape. Twist the wire around itself and form it upwards making a “v.” Thread a light green seed bead on to each wire. Use your round nose pliers to create a loop at the top of each antennae. Adjust your wire to form a heart shape and to keep the seed bead stationary. Voila!
- It is possible, I am told to use hair sticks to hold your hair in place. Unfortunately most people don’t have the proper texture and thickness of hair to do this. I recommend making a bun, funky ponytail or French twist and using the hair sticks as an embellishment.