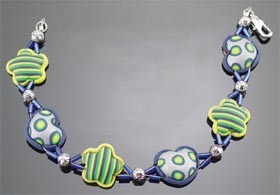
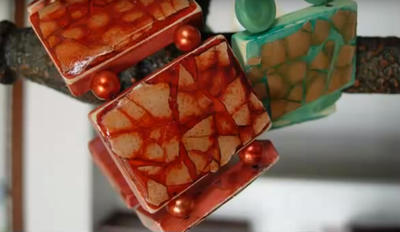
Pillow Bead Bracelet
Design and create your own clay beads for this fun and colorful bracelet from AMACO.
Materials:
- FIMO® Soft Polymer Clay — Tropical Green #53, Windsor Blue #35, Lemon #10, Metallic Silver #812 or #81
- AMACO® Pasta Machine
- AMACO® PolyBlade
- AMACO® PolyRoller™
- AMACO® Bead Baking Rack with Piercing Pins
- Heart and Flower Pattern Cutters (Kemper Tool) PCBF and PCBH
- X-Acto® Type Craft Knife
- 8" x 8" or Larger Ceramic Work/Baking Tile
- Small Silver Beads (approx. 6 mm)
- Blue Bugle Beads
- Beading Wire
- Silver Crimp Tubes
- Wire Cutters
- Crimping Pliers
- Silver Clasp with Jump Rings
- Deli Sheet or Parchment Paper
Steps:
Striped Flower Tops
- Create a striped loaf by stacking 1" x 8" sheets of Lemon, Tropical Green, and Windsor Blue FIMO® Soft rolled through the 5th largest setting the pasta machine. Lightly roll the stack with the PolyRoller to compress and remove air pockets. Cut the stack into 2" long sections. Stack these, one-over-the-other, making sure that the colors alternate.
- Slice several thin slices from this loaf using the PolyBlade. Lay the slices side-by-side over a sheet of Lemon FIMO® Soft that’s been rolled through the 5th largest setting of the pasta machine.
Tip: Whenever working with clay that may become stretched or distorted when removing from a work surface, using a deli sheet or piece of parchment paper to work on makes an easily removable backing that can be peeled away without damaging your clay work.
- Roll the PolyRoller lightly over the clay following the direction of the stripes. This will help to even the thickness between the slices and compress the edges together for a cleaner look. After rolling, run this sheet through the 4th largest setting of the pasta machine with the stripes facing up.
- Cut three 1" squares from the sheet. Place one of the squares (stripes facing down) over the opening of the flower cutter. Gently use your pinkie finger to press the clay down into the cutter opening to create a concave bowl. Do not press too hard which can cut or tear the clay.
- While holding cutter by the sides (and not the spring-loaded plunger), press it down over the work tile and pull away the excess clay leaving the “clay bowl” in place, inside the cutter. Bake the cutter with the clay at 265ºF (130ºC) for 30 minutes. Allow the cutter to cool completely then pop the clay out of the cutter by gently depressing the plunger. Note: Do not attempt until clay is completely cool or it may break. Repeat this two more times with the flower cutter.
Polka Dot Heart Tops
- Create a “Bull’s Eye” cane to make the polka dots. Start by rolling a 1" long x 1/2" diameter Lemon FIMO® Soft snake. Wrap this in a sheet of Tropical Green clay rolled out through the 3rd largest setting of the pasta machine. Wrap the snake again in a sheet of Windsor Blue clay rolled through the 5th largest setting of the pasta machine.
- Cut the bull’s eye cane in half (saving half for other projects). Roll the cane with your hand against the work surface to reduce it to 3/16" in diameter.
- Cut several thin slices from the reduced cane and place randomly over a sheet of Metallic Silver clay rolled through the 4th largest setting of the pasta machine. Embed the cane slices into the clay sheet by rolling with the PolyRoller. Hint: Working on a deli sheet is recommended for this step. Be sure to rotate the sheet often while rolling to maintain the round shape of the polka dots. Rolling in only one direction will stretch and distort the circles.
- Once the polka dots appear seamlessly embedded into the silver sheet, cut out 2 (for smaller bracelets) or 3 (for large bracelets) 1" squares. Repeat Steps 4 and 5 from the Striped Flower Tops directions to create the tops of the heart beads.
Making the Beads
- Using the pattern cutters, punch out hearts and flowers from sheets of clay rolled through the largest setting of the pasta machine (Lemon/flowers, Windsor Blue/hearts). Remove the excess clay.
- To create the stringing holes, place two bead piercing pins 1/4" apart, across the middle of each cutout. The pins should be facing parallel to one another. These will leave stringing holes/paths after baking.
- With the pins still in place, press the bead tops onto the corresponding shaped cutouts. Press the tops so that the clay on the sides rises up slightly over the bead top edges. Using your fingertips, gently press this clay against the bead tops to secure them to the bottoms creating a framed appearance.
- Suspend the beads on the Baking Rack by placing the pins in the slots and bake at 265ºF (130ºC) for 30 minutes. After completely cool, twist the pins to loosen and pull them out.
Stringing
- Cut two 12" long sections of beading wire. Holding these sections side-by-side, thread both wires through a crimp bead. Bring the ends back through to form a small loop. Secure the crimp using the pliers and trim away the excess tails.
- Thread a silver bead onto the combined wire lengths. This will hide the ends of the trimmed wire tail left after forming the starting loop. Separate the wires and thread a bugle bead over each one.
- Add a flower pillow bead, threading one wire through each of the two hole paths created with the piercing pins. Once the wire is pushed through the opposite holes, make an “X” formation with the silver and bugle beads. Separate the wires and thread a bugle bead over each one. Combine the wires and thread a silver bead over both. Separate the wires once again and string a bugle bead over each one.
- Add a heart pillow bead as in Step 3. Repeat these steps using a total of 5 pillow beads for smaller bracelet and 6 to make a larger one.
- After adding the final pillow bead, finish by stringing one bugle bead on each wire. Combine the two wires and thread a last silver bead. String a crimp bead over the combined wires and bring the ends back through. Pull out the slack, leaving a small loop at the end. Secure the crimp with pliers and trim away the excess wire with wire cutters. Hide any remaining wire tail by tucking it into the silver end bead. Add the clasp and jump ring.
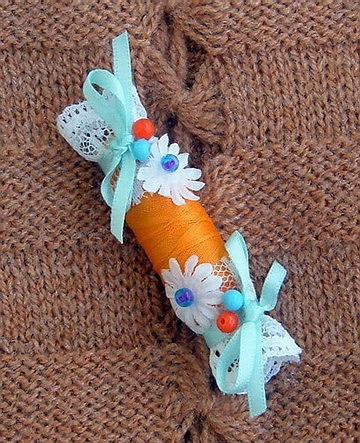
Read NextSweet as Candy Brooch