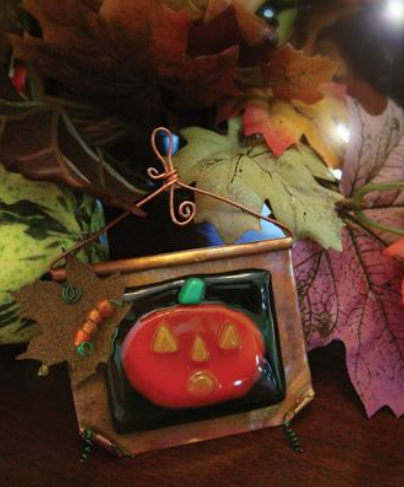
Hot Glass Pumpkin Head
This Halloween make yourself or a friend a pumpkin head using the hot glass technique. Using orange beads and transparent glass you can have this decoration in your home this holiday, from Diamond Tech.

Materials:
- Fuseworks™ Glass - Black and green opalescent, Orange and yellow transparent.
- Fuseworks™ Microwave Kiln
- Fuseworks™ kiln paper
- Rusty Tin Maple Leaf - (SCRAPBOOK OUTFITTERS)
- 3 - 6mm Orange beads
- 2 ½” X 2 ½” Copper Sheeting .002 gauge
- 8 ½” - 20 gauge copper wire
- 3 – 2” 26 gauge green wire
- Round nosed pliers
- Toothpick
- Fuseworks™ Glass Cutter
- Marker
- Scissors
- Safety glasses
- Torch
Tips:
- When the glow in the kiln opening changes to a yellow/orange, this will indicate the glass has entered a full fuse stage. At this stage glass corners will become rounded. When you see more of a yellow glow, the piece should be fully fused.
- Wear safety glasses when using glass crafting tools.
- Always read and follow kiln safety rules and warnings.
Steps:
- Measure and mark pattern pieces on the following glass sheets: Black Opalescent Glass - background Orange Transparent Glass - pumpkin Yellow Transparent Glass – pumpkin face Green Opalescent Glass – pumpkin stem.
- Using a glass cutter, cut glass following pattern. Clean glass using paper towel moistened with water. Completely dry the surface of the glass with a lint free cloth.
- Next, cut a 2” X 2” piece of kiln paper. Remove the lid from the Fuseworks™ Kiln. Place the kiln paper on the kiln base.
- Position the black glass in the center of the kiln paper. Top with orange glass, centering it on the black.
- Add the yellow pumpkin facial features; if necessary use the image for positioning. Place the green pumpkin stem at the top of the pumpkin head.
- Carefully set the base with glass inside the microwave and cover with kiln lid. Fuse in a 1200 watt microwave at 50% for 2 minutes; 80% at 1 minute and 30 seconds. If using a microwave with a lower wattage increase the power level but keep the time consistent. PLEASE NOTE: All microwave and kiln combinations will have different firing patterns. Be sure to take careful notes and log all fusing times for future use.
- After time is up, open microwave and, using Hot Mitts, carefully lift the lid enough to inspect the fusing process. Add additional time in 30 second increments until desired results are achieved.
- Remove kiln from microwave using the Hot Mitts and place on a heat resistant surface. Cool the kiln for at least 30 minutes with the lid on. CAUTION: Removing the lid or peeking under the lid during the cooling stage will result in your piece cracking. Glass remains hot for a long time and should be handled with great caution.
- To patina the copper, work in a well ventilated area or outside; put the copper sheeting in a disposable plastic container with a lid. Spray the surface of the copper with vinegar. Add approximately two tablespoons of ammonia or Windex into the bowl and cover tightly with lid or a plastic bag for one hour.
WARNING: Do not breathe fumes. When the patina process is complete; remove from the container and wash copper sheeting thoroughly.
- Using a round nosed pliers, “roll” ¼” of the copper sheet down from the top. This will create a tube like opening through which we will thread the hanger. Next, grab the two bottom corners with the pliers and roll up about 1/8”. Glue the fused Pumpkin head and a rusty tin maple leaf cut out to the copper using E6000 glue.
- Thread the 8 ½” length of copper wire through the top opening of the copper sheet. Bring both ends of the wire up so they meet. Make a loop at the end of one wire, pinch and hold. Wrap the remaining wire around the bottom of the loop to secure. Create decorative curls at the ends of each wire.
- To create the embellishments, wrap each green wire length around a tooth pick to create a spring. Slip 4 beads on to the end of one of the wire springs. Loop the end of the wire to hold the beads in place. Wrap the beaded spring around the leaf, see image for placement. Slip the remaining green springs into each curled corner to create tendrils.
Read NextDollar Store Floral Wire Pumpkins