Children's Growth Wall Chart
Use simple sewing techniques to create this fabric wall chart, where you can playfully mark heights as kids or grand-kids grow. The growing kids will love it and you'll have the memories always.
Project time: 4-5 hours
Materials:
- 1¾ yds Novelty print fabric – Cut two 10” by 60” pieces
- 1¾ yds Light colored fabric – Cut one 6” by 60” piece
- 1¾ yds Contrast fabric – Cut two 2” by 60” pieces
- 1¾ yds Medium weight fusible interfacing – Cut one 6” by 60” piece
- Dritz® 120” Tape Measure
- Dritz® Sewing/Craft Fabric Glue Stick
- Dritz® Quilting Pins
- Dritz® Button Gauge and Point Turner
- Dritz® Sharps Hand Sewing Needles
- Thread to match fabrics
- Collins Permanent Fabric Marking Pen
- Spray Starch
- Sewing Machine
- 1½" Dowel rod – Cut 15”
Instructions:
Stitching: Use ½" seam allowances.
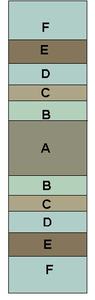
- Spray starch on cut pieces of fabric and press. This will help stabilize the fabric. Fuse interfacing to wrong side of light-colored fabric piece, 6” x 60”, following manufacturer’s directions.
- Machine stitch a 2” strip of contrasting fabric to each long side of light-colored interfaced fabric, right sides together. Press seam allowances toward darker fabric. Stitch a 10” strip of print fabric to the opposite side of each 2” strip, right sides together. Press seam allowances toward darker fabric.
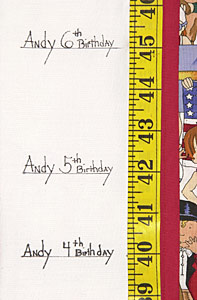
- Cut measuring tape at 16” mark. Place tape measure on light-colored fabric next to the right seam line aligning the 16” mark on the bottom edge. (See project photograph for placement) Baste in place using Fabric Glue Stick. Using yellow or black thread, stitch along each side of tape measure to secure. Cut off excess tape measure along top edge.
- With right sides together, fold fabric piece matching long sides of print fabric; stitch. Refold fabric so seamline is in middle of back section and lightly press seam allowances open. Stitch across bottom edge to close. Stitch across top edge, leaving a 4” opening. Turn to right side through opening and use point turner to create perfect corners. Hand sew to close opening.
- Press front and back making sure iron does not touch tape measure. Fold top edge 2½” toward back and pin in place. Hand sew to create casing for dowel.
- Hanging Tips: Measure up from the floor equal to the bottom measurement of Growth Chart. Mark wall with chalk. Position the Growth Chart so bottom measurement matches the chalk marking. Record a height by writing the name and date next to the corresponding measurement using Permanent Fabric Marking Pen.

Read NextDoor Stop Monster