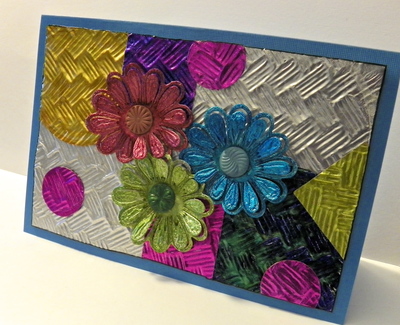
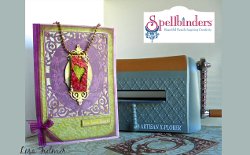
Colorful Pendant Greeting Card
Never stress about DIY gift ideas again. A Colorful Pendant Greeting Card from Lisa Fulmer is both a gift and a card, so you don't have to make two separate projects. Use cardstock, craft paper and more to create a one-of-a-kind gift for someone special.
Materials:
- Spellbinders Artisan X-plorer machine (for metal)
- Spellbinders Grand Calibur machine (for papers)
- Spellbinders Filigree Delight Card Creator die set
- Spellbinders Grate Works texture plate
- Spellbinders metal heart blanks
- Wax or parchment paper
- Thick cardstock 7”x10” folded in half to 5”x7”
- Scrapbook papers in two patterns, plus plain white
- Tissue paper to match scrapbook papers
- Colored pencil and pastel chalks
- Alcohol inks and applicator
- Metallic gold paint marker
- Sanding block
- Decoupage medium or resin, brush
- Glue, tape runner, foam adhesive squares
- “live. love. laugh!” saying (computer print-out on cardstock)
- Ribbon and self-adhesive rhinestones
- Craft drill and beading pliers
- Jump ring and chain
Instructions:
-
Diecut one color of scrapbook paper into the filigree frame.
-
TIP: With intricate dies, place a sheet of wax paper between the die and the scrapbook paper for easier release after running through the machine.
-
Add an oval emboss inside the filigree frame.
-
Glue the frame on top of the second color of paper (trimmed to a rectangle the same size as the frame).
-
Diecut plain white cardstock into the large oval, the filigree oval, and the small tab accent.
-
Glue the bottom of white oval to the inside of the front of the card to make a pocket.
-
Use a colored pencil to shade a rubbing of the texture plate on to a sheet of 4.5”x6.5” tissue paper.
-
Center and adhere the rubbing tissue with a tape runner to the front of folded card.
-
Adhere the filigree frame near the top of the card, on top of the tissue.
-
Color the white filigree oval and tab accent with pastel chalks, glue the tab on top of the filigree oval (near the bottom – the tab will hold the metal blank in place).
-
Adhere the filigree oval to the center of the filigree frame with foam squares.
-
Color the edges of the card with pastel chalk.
-
Wrap a ribbon around the front of the card near the fold and tie a small bow.
-
Accent the filigree frame and oval with rhinestones and adhere the saying below the frame with foam squares.
-
Emboss the open heart blank with the texture plate.
-
Drill a small hole at the top of the matching rectangle blank.
-
Color both blanks with alcohol inks; use a sanding block to distress and remove some ink around the border if desired.
-
Coat both blanks with some decoupage medium or your favorite resin to seal; allow to dry.
- Insert a jump ring through both blanks (heart on top) and attach to a chain.
- Insert the rectangle blank into the accent tab on front of card, leaving the heart blank to dangle on top, then drape the chain over the top of the card and tuck excess inside the pocket.
Read NextFoiled Butterfly Notecards