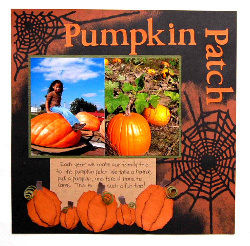
Pumpkin Patch Scrapbook Page
Create a cute and festive layout page by following these easy guidelines. All of your pumpkin patch memories will be saved on a colorful keepsake perfect for Halloween and the Fall season.

Materials:
- Therm O Web Foam Squares
- Therm O Web ClicknStick
- Therm O Web Zots Small
- Therm O Web Sticky Dots
- Therm O Web Tape Runner XL
- Wausau Cardstock Paper:
- Tuscan Sun
- Olive
- Kraft
- Eclipse Black
- Umber
- Stipple Brush or Sponge Brush
- Liquid Glue
- Fiskars Micro-Tip Scissors
- Colorbox Chestnut Roan Fluid Ink
- Tim Holtz Haunted Masks
- Making Memories Nutmeg Acrylic Paint
- Cricut and Cricut Base Camp Cartridge (or letter stickers for title of your choice)
- Black Journaling Pen
- EK Success 1/4” and 1/2” Circle Punch
- Two 4” x 6” Photos
Instructions:
1. Lay your Spider Web Masks on your Eclipse Black Cardstock as shown. With your stipple brush or sponge brush dab your Nutmeg Acrylic Paint all over the stencil making sure to use less paint as you go to the outside edges of the mask (to appear lighter). Peel mask off. Allow the paint to fully dry.
2. Mat your two 4” x 6” photos on a piece of Olive Cardstock using your Therm O Web ClicknStick so there is a 1/8” border all the way around. I mounted the 2 photos right next to each other on the mat, but you can leave some space between them if you like.
3. Cut a piece of Kraft Bark Embossed Cardstock to measure 4” x 5 3/4”.
4. Place your matted photos between your two painted webs with your Therm O Web Tape Runner XL leaving about 2 1/2” of space above and about 4” of space below. Move the mat to where you feel it looks the best. Mine is about 1” in from the left hand side.
5. Now slip the journaling piece in underneath the matted photos so it is somewhat centered and hanging down below the photos about 3”. Secure both the journaling block and matted photos in place using your Therm O Web Tape Runner XL.
6. Next we will use the torn paper technique to create our dimensional pumpkins as shown below the journaling area. Cut the following size blocks from your Tuscan Sun Cardstock:
2” x 2 1/2”
2 1/4” x 2 1/2”
2 1/2” x 3”
1 1/2” x 1 1/2” (two of these)
7. Now take each piece above and slowly tear around each corner to round the piece to become a pumpkin. I tore a bit all the way around. You want them to be oddly shaped and not perfectly rounded. You can make some tall, some wide, or change the size of each if you like.
8. Now take your Brown Ink Pad and distress the outside edges of each pumpkin.
9. Now tear some pieces to go in the center of each pumpkin as shown using your Tuscan Sun Bark Embossed Cardstock. You want the piece to be oblong and fit in the center running the full length of your pumpkin.
10. Again, ink each of these pieces.
11. Now attach your center piece to each pumpkin using your Therm O Web Foam Squares.
12. Next, create the pumpkin stems using your Umber Cardstock. Tear small pieces that look like a pumpkin stem. Attach to the top of each pumpkin using a Therm O Web Small Zot.
13. Punch three 1/2” circles and two 1/4” circles out of your Olive Cardstock.
14. Using your Micro-Tip Scissors begin on the outside of each circle and cut a very thin edge continuing to go around and around the circle until you reach the inside of the circle. This will create a vine like look once you take it and push it back together. This will be a very dimensional addition to your pumpkins.
15. Attach each vine piece with a liquid glue.
16. Attach the pumpkins in the order you like at the bottom of your journaling block. I tilted mine slightly.
17. Using your Cricut and Base Camp Cartridges cut 1 1/2” letters using cardstock to spell your layout title. I used “Pumpkin Patch.”
18. Once your letters are cut attach them to the top of your layout using Therm O Web Sticky Dots or Therm O Web Tape Runner XL (depending on the width of your letters).
19. Add your journaling on to your journaling block using a black journaling pen. I faintly draw lines to keep my journaling straight and then go back and gently erase the lines once my ink has fully set.
Read NextCute Polly Pumpkin