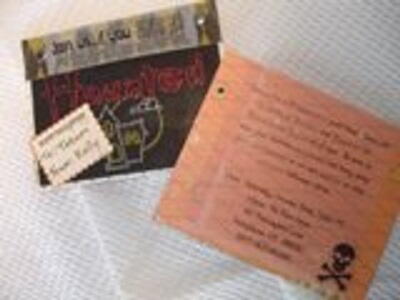
Homemade Halloween Invitations
No ghoulish get-together is complete without homemade Halloween invitations. Spice up the festivities and get noticed with this easy fall craft.

Materials:
- Tulip Glam-It-Up! Iron-On Expressions (Halloween designs), a variety
- Coordinating 12x12 scrapbook papers (we used Making Memories "Spellbound" line)
- Eyelets (you will need 2 for each invitation or you can just staple your 'header' on like the original)
- Vellum sheets (8x12 so you can run them through your printer)
- Halloween stickers or other embellishments (optional)
- 12x12 sheet of cardstock--any color, to use as an envelope pattern
- Scissors or paper trimmer, vellum adhesive, stapler or eyelet setter
- Pencil
- Bone folder
Instructions:
- Carefully remove staples from the cardboard hang tag that your Iron-Ons come packaged in. You will be replacing this with your patterned papers. Cut out instructions from back flap and slip into the clear envelope in back of the iron on (this way, if they can't make it to the party, they can still use their iron-on at home.)
- Secure the instructions in place with a loop of tape so it won't fall out.
- Cut scrapbook paper to 6"x 6 1/2" (you will get 2 invites out of one 12x12 sheet this way) Measure down 1 1/2" on your longest side, and make a score line across the sheet at that mark with your bone folder and fold over, creasing well with your bone folder.
- Place the clear envelope with your iron-on inside into this new paper sleeve and secure it either with staples or with coordinating eyelets.
- Use your favorite computer art or publishing program to print out the details of your party onto vellum. (Your text block should be 4 1/2"x6" and you will be able to fit 2 on one sheet of 8"x12" vellum).
- Use your favorite vellum adhesive to mount the invite details to your card. Add a sticker, or halloween rub-on to the bottom right hand corner of your invite if desired.
- Trace envelope pattern onto cardstock, cut out and then use your template to make custom envelopes for your invitations by using one sheet of a coordinating 12"x12" paper for each envelope.
- Place invite into center of envelope and fold side flaps in, then bottom flap, and finally, the top flap and secure with a fun Halloween sticker.
- Print out address labels or hand-deliver your spooky invites to your friends. (these may require extra postage)
Read NextSpaghetti and Meatballs Costume