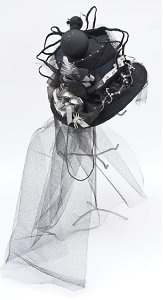
Over the Top Hat
Go over the top this Halloween with a top hat. Homemade Halloween costumes are a great idea to make time fly. You'll be the hit of the party with your obnoxious hat.

Materials:
- Pre-made, Zorro style hat
- 2”x 36” strip of Lutradur or use Lutradur Mixed Media Sheets
- 1/2 yd lightweight fast2fuse
- ½ yd+ black fabric
- Black thread
- Acrylic black paint
- 5 – 10 yards assorted style ribbons in various widths (1/4” – 1 1/2”)
- Bead trims
- Rhinestones
- Fine silver glitter
- Glitter glue
- Black or white feather
- 3 plastic spiders
- 1 small crow
- 1 – 1.25 yards black tulle, more if you want longer tails
- Glue gun
- White tape measure
- Large buckle (size and shape of your choosing)
- Silver ball head pins
- Lightweight gauge black wire
- Large wired spider
Instructions:
- Following fast2fuse directions, fuse black fabric to each side of 1/3 yard piece of Fast2fuse. Cut a piece of prepared fast2fuse the circumference of hat (plus 4”) x the height you wish the hat to be. Place on hat to establish fit then trim away the overlap. Finish off all edges of prepared fast2fuse with a zigzag stitch. Paint the edges black. When paint is dry, butt the short edges together and with a sewing machine, zigzag together forming a tube. Slide on hat with seam at back.
- To make a pattern for hat top, trace onto paper the circumference of just completed piece above. Add 1/4 inch, trace onto prepared Fast2fuse, and cut out. Finish edges as above.
- When paint is dry, hand stitch onto top of hat. Place ball pins around top of hat at even 1” intervals. Glue in place.
- Lay tulle out and loosely gather with hands; place on hat so tails in back are even. Wrap loosely with wire to hold together. If you wish your hat to have a veil, carefully work the tulle so it slightly falls over the brim. When pleased with look, tighten wire and glue in place in back of hat with hot glue.
- Cut a 2″ x 36″ strip of Lutradur. Sew a gathering stitch down the middle of the strip. Gather material slightly (careful not to break the thread. Using embossing heat tool heat the Lutradur until it melts slightly creating the look of gathered lace. At this point, it can be painted, embellished with buttons or beads, and cut, without losing the gather, to fit the hat. Place as desired around brim and secure with glue gun. Note: if using the Lutradur Mixed Media Sheets you will need to overlap the the strip ¼” and sew together until you have the necessary length.
- Add ribbons, beaded trim and embellishments around brim, using glue to hold in place. For added sparkle, glue rhinestones onto ribbon before adding.
- Glue glitter to buckle, spiders, and any other embellishments you wish to sparkle. While they are drying, make bow for back of hat. Glue in place. Add crow, and feather like trims.
- Using the photo as a guide, add wide ribbon and buckle to front of hat. Secure with hot glue or needle and thread.
- Position tape measure around brim of hat and thru the buckle. I made sure the number 31 was showing in the buckle. Then work ribbon and tape measure around hat adding folds or tucks securing all in place with a hot glue gun.
- Add glittered spiders around hat for accents. Either wire or hot glue in place.
- Set large spider on top of hat and work the legs so they hug the top of the hat. Glue in place if needed.
Read NextDIY Halloween Polka Pumpkins