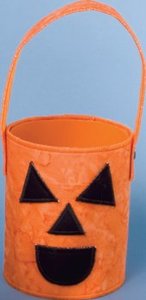
How to Make a Trick or Treat Pail
In nine easy steps you can learn how to make a trick or treat pail. Free Halloween crafts are so much fun to make during the month of October. Homemade Halloween decorations are the best. Take your pail with you on your scary night.

Materials:
- 51⁄4˝ × 141⁄2˝ piece of orange prepared fast2fuse for can
- 11⁄4˝ × 14˝ piece of orange prepared fast2fuse for handle
- Scraps of prepared black fast2fuse
- Snack can
- Orange spray paint
- 2 black 1⁄4˝ brads
- Matching thread
Instructions:
- Eat the snacks in the can (my favorite step!).
- Wash and dry the snack can. Trim the top edge so the can is 5˝ high all the way around.
- Spray paint the can orange.
- Satin stitch around both pieces of prepared orange fast2fuse.
- With your glue gun, glue the large piece of prepared fast2fuse around the can; you will have about 1˝ overlap.
- Cut out 2 eyes, a nose, and a mouth from black prepared fast2fuse. Satin stitch around each piece.
- Glue the face on the front of the pail.
- Make a 1⁄8˝ hole on each side of the can, 1˝ from the top edge. Make a 1⁄8˝ hole 3⁄4˝ from each end of the handle.
- Attach the handle to the pail using the brads.
Read NextBaby Bat Crochet Costume