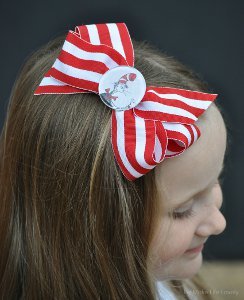
Cat in the Hat DIY Hair Bows
 Visit Laura at Make Life Lovely.
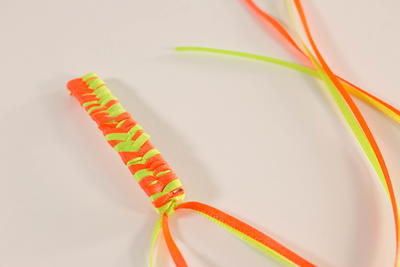
The Cat in the Hat DIY Hair Bows are the perfect way to bring your child's favorite story to life in a fun and easy hair accessory. Follow the tutorials simple steps and learn how to make a slew of cute DIY hair bows for your little girl to wear. This is as adorable as it is easy! With a little help from her favorite storybook cat, she'll have a DIY hair bow to keep her hair out of her face. Include them in birthday party goodie bags or as little presents for her friends.
You can find this project, as well as many other fabulous blogger projects, in our new eBook, The Best Blogger Craft Ideas 2014: Decoupage, Sewing, Jewelry Making, and More free eBook. Download your own free copy today!

Materials:
- 1 1/2" Wide striped ribbon
- Fiskars Amplify Mixed Media Shears, or fabric scissors
- EK Success Dr. Seuss paper, or printout, or any other type of paper you'd like to use
- Mod Podge Paper
- Mod Podge Podgeable Shapes
- Foam brush
- Small thin piece of coordinating ribbon or thin wire
- Lighter or candle
- Glue gun
- Lined alligator clip
Instructions:
- Cut a yard of ribbon, and loop one end over the top of the rest of the ribbon to form a medium-sized loop that looks like an awareness ribbon. Make sure that the longer piece of ribbon is in the back, and the short end of the ribbon be is in the front.
- Loop the long piece over the top of the ribbon to form a second loop, so that it looks like a bow and is even with the other loop.
- Make another loop with the long piece of ribbon to form a third loop next to the first loop, bringing the long piece of ribbon behind the top piece.
- Now make a fourth loop by bringing the ribbon over the top. You should now have four loops. Adjust them as necessary so that all four loops are even, and then use the small thin piece of coordinating ribbon to tie a tight knot in the center.
- Trim the excess ribbon from the knot, and adjust the bow as necessary so that every loop is even. Trim the excess ribbon off the end of the long loop, and trim the other end so that it is nice and straight.
- If left alone, the ends of the ribbon will fray. To seal the ends of the ribbon to prevent fraying, carefully use a lighter or a candle, and hold the ends of the ribbon near the flame, but not too close or it will singe the edges. Make sure that you move the ribbon so that the whole end is sealed and will not fray.
- Trace around the Podgeable circle shape onto the Dr. Seuss paper with a pen or pencil, covering the portion that you want to use on the bow. Using a foam brush and the Mod Podge Paper, brush a thin coat of Mod Podge onto the front of the Dr. Seuss paper, and stick to the clear plastic Podgeable Shape.
- Carefully glue the round Cat in the Hat piece to the middle of the bow using a glue gun. Glue the lined alligator clip to the back of the bow. If you don't know how to line an alligator clip with ribbon, this easy tutorial will show you how- http://www.makelifelovely.com/2012/11/easy-no-sew-flower-hair-clips-and.html. Let cool completely before touching. Once cool, the bow is ready to wear!
Read NextDIY Hair Scrunchies