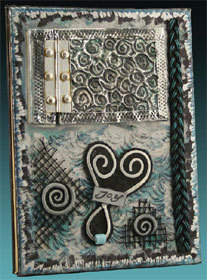
Love Letter Book
Create a love letter book with metal embossing, wire form and stamp art. This DIY journal is a great place to store all your love letters, or use it as a journal to write about your days. You could also fill it with notes and mementos for your significant other and give it as a gift for Valentine's Day. The possibilities are endless for this simple and sophisticated do-it-yourself journal.

Materials:
- FIMO® Soft Clay – Black, Metallic Silver
- AMACO® ArtEmboss® Metal Sheet – Aluminum Medium
- AMACO® ArtEmboss® Metal Foil Tape – Aluminum
- AMACO® ArtEmboss® Tool Set
- AMACO® WireForm® Black Aluminum 8 Mesh
- AMACO® WireForm® WireRod Modeling Wire – 1/8" Soft Aluminum, coiled
- AMACO® Rub ‘n Buff® – Ebony, Pearl Blue, and Pewter
- AMACO® Pasta Machine
- AMACO® PolyRoller
- AMACO® PolyBlade
- K & Company 41/4" x 53/4" Hinged Window/Accordion Fold Book (Ivory)
- Lisa Pavelka Border Molds – Ropes (JHB)
- Lisa Pavelka Texture Stamps: Love Letter and Striped Tube (JHB)
- Lisa Pavelka Poly Bonder Glue (JHB)
- JustRite Pre-inked Joy Stamp – Baby Set, Small
- Zip Dry Paper Glue (Beacon Adhesives)
- Color It Black stamp pad (Ranger)
- Merc Art 3/8" “Points” Decorative Wheel
- #11-MOLETE-06
- Photo of your choice (1/4" bigger than the opening of the hinged door)
- Glass Bead
- Scissors
- Wire Cutters
- Foam Wedges
- Phone Book
- Armor All or STP Son-of-a-Gun Automotive
- Protectant Spray
- Small, Flat Paint Brushes
- Ceramic Tile for Work/Baking
- Tissues
- Hammer
Instructions:
Condition all clay before use, starting with the lightest colors first. Knead or roll through the pasta machine until smooth and pliable.
-
Roll a pinch of Metallic Silver Clay to 1/16" thick using the acrylic roller. Stamp with the pre-inked “Joy” Stamp. Trim the edges to make a rectangular panel.
-
Cut: 4", 6", and 12" lengths of Aluminum Wire Rod. Coil the smaller lengths and form the longer length into a heart by hand (use pliers if needed). Start the heart by making a gentle bend at the middle to mark the bottom. Add a bead if desired at this point. With one end, loop and bend outward to form a loop. Finish by bending a one and a half turn at the end to form a coil. Finish the other end by mirroring the same bend and coil. Hammer the coils and heart against a metal or scrap wood work surface until flattened.
-
Roll out 1/4 block of Black clay to 1/16" thick with the clay roller. Place the clay sheet on the ceramic tile. Apply a small amount of glue to the back of the heart and press down into the clay. Repeat this with the stamped “Joy panel. Gently glue and press this piece just above the crossed wire at the bottom of the heart.
-
Repeat Step 4 for the coils, using more clay if needed.
-
Stipple the exposed Black clay background inside of the metal components using the ball tip stylus and tool ends from the ArtEmboss® Tool set. Trim the excess clay from the outer edges of the metal components.
-
Roll a 1/4" diameter snake of Black clay. Spray a small amount of automotive protectant spray on the snake and spread with your fingers. Press the lubricated clay into the woven rope cavity of the border mold. Shave off raised clay using the PolyBlade. Remove the molded clay and trim the edges.
-
Bake all of the clay components on the ceramic tile for 30 minutes at 265°F (130°C).
-
When the clay border is cool, pat Pearl Blue and Pewter Rub ‘n Buff® randomly over the raised surface of the border. Wipe away with a tissue, leaving a light patina.
-
Stamp the covers of the book with the Striped Tube stamp inked with the black stamp pad. Perfect coverage of the pattern isn’t necessary for this step.
-
Stipple Rub ‘n Buff® over the covers and the inside first page using Pearl Blue followed by Pewter.
-
Apply black ink on the Love Letter stamp and imprint the inside first page over the dried Rub ‘n Buff®.
-
Use scissors to cut a piece of ArtEmboss® metal sheeting to the outer dimensions of the hinged door. Working on top of the pages of an open phone book, make swirl patterns in the embossing metal using the stylus from the ArtEmboss® Tool Set. Antique the metal by spreading Ebony Rub ‘n Buff® into the crevices of the embossed pattern and lightly wipe away excess with a tissue.
-
Working on the open pages of the phone book, roll the embossing wheel over 2 feet of ArtEmboss® tape. Spread Ebony Rub ‘n Buff® over the textured tape and lightly wipe away excess, leaving the recessed pattern antiqued. Peel away backing and attach around the hinged door and around the top and bottom of the hinge on the left side. Make sure to apply leaving a 1/16" overhang to wrap over the raised edges of the door and hinge.
-
Mark the center of the hinged opening with a pencil. Glue the photo of your choice to over the center of the first inside page using the Zip Dry glue. Peel off the adhesive backing of the textured and antiqued ArtEmboss® tape made in Step 13. Apply around the outer edges of the photo to secure and embellish. Use scissors to trim.
-
Apply brush strokes of Ebony Rub ‘n Buff® along the outer edges of the front and back covers using a flat brush. Repeat this applying Pewter Rub ‘n Buff® slightly lower along the edges (leaving some of the Ebony color exposed) around both covers.
-
Use wire cutters or utility scissors to cut small and medium triangular “patches” from the WireForm® mesh.
- When the clay components are cool, use the Zip Dry Glue to attach the wire patches, clay/wire rod coils, heart, and border as shown. Fill with memories!