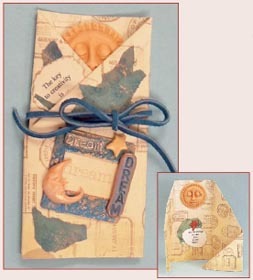
Dream Card
Create a beautiful dream card using scrapbook paper, push molds and polymer clay.
By Maureen Carlson for AMACO
Materials:
- AMACO® Designer Push Molds: Sun, Moon
- Fimo® Soft Polymer Clay: White, Sunflower
- 12" x 12" Scrapbook Paper or Folded Card of Your Choice
- Blank Slide Mount, Small
- Suede Leather Lace: 18" of Blue
- Lumiere Paint: Metallic Gold, Pearlescent Blue
- Acrylic Paint: White, Brown
- Cream Card Stock and Paper Scraps
- Glue
- Sponges for Paint
- Water
- Flat Plastic Disposable Surface for Paint
- Paper Towels
- Baking Pan or Ceramic Tile
- Oven
- Leather Alphabet Stamps
- Round Toothpicks
Note: The pictured card shape was created by folding a piece of 12" x 12" scrapbook paper into a wrap-around card. You may substitute a plain greeting card, size of your choice, for the folded paper card.
Steps:
- Condition FIMO® Soft polymer clay. Create face and any clay embellishments using AMACO® Designer Push Molds, as well as rubber stamps or leather stamps for faces and words. Alter clay shapes as desired by curving, cutting or indenting. A toothpick makes a great tool for indenting corners of mouths and eyes in molded faces. The pictured card uses one large sun face, one small moon, two stars, one word “dream” made from the moon mold, and one word “dream” made with leather stamps. Poke holes in clay if pieces are to be strung.
- Bake clay in preheated oven following directions on package. Let cool.
- Paint or antique clay pieces, wiping away excess paint with a paper towel.
- Type or print words onto cardstock. Tear out words or cut with deckle- edged scissors. Layer words with torn pieces of collage papers on both card and envelope. Embellish papers and blank slide mount by sponge painting, stippling, or dotting with paint colors of your choice. If paint gets too dark, sponge white or pale color over top.
- Use Crafter’s Pick Decoupage & Collage Gel to glue papers to card and envelope and into opening of slide mount.
- Use Crafter’s Pick The Ultimate! to glue faces and any other trims in place on card.
Read Next76 Easy Craft Projects for Adults