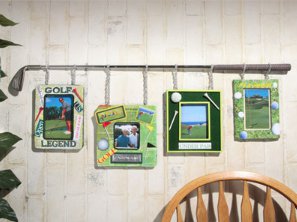
Dad's Golfing Frames
Looking for Father's Day crafts for children? This great craft for golfing frames is perfect for dad's office! If dad likes to golf, then he'll want to show off his golfing shots with these attractive homemade frames. Make them today!
Materials:
- Tulip® Fashion Bead Paint™
- Aleene's® Platinum Bond® Super Fabric Textile Adhesive
- Tulip® 3D Fashion Paint™
- 65002 Yellow
- 65000 White
- Collage Pauge® Instant Decoupage
- Tulip® Soft Fabric Paint
- BI15826 Turquoise
- BI15797 Lime
- BI15784 Glacier White
- BI15799 Holiday Green
- BI15786 Sunshine Yellow
- BI15801 Ebony
- Cardstock: green, yellow
- Ruler
- Embossing tool
- One inch Styrofoam ball
- Transfer or carbon paper
- Wood frames, desired shapes
- Toothpicks
- Hammer
- ArtEmboss, silver
- Sandpaper
- Old golf club
- Container for water
- Brushes: ¾ or 1” flat and #4 liner
- Ribbon, width to cover edges of frame
- Felt, stiff dark green
- Scrapbook paper with grass
- Sandpaper
- Small tacking nails
- Foil
- Wooden tees
- Craft sponge
- Painter’s tape
- Metal chain and/or brown grosgrain ribbon for hangers
- Newspaper articles about golfing and/or magazines
- Scissors
Instructions for all:
- Remove the backings and photos from your frames.
- Sand frames until they are smooth.
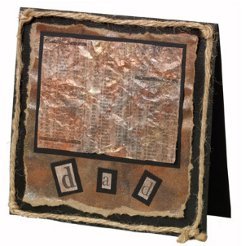
Golf Legend:
- Pour Holiday Green and a little of the Ebony paint on some foil. Mix these paints to make a dark green. Paint sides of one of your frames, then let it dry.
- Next, cut pieces of golf news articles, magazine, pictures, etc. and fit around the frame decoratively.
- Brush Collage Pauge on small area of frame and on back of paper piece.
- Lay paper on frame and brush Collage Pauge over paper. Continue until frame is covered. Brush Collage Pauge over entire frame, then let dry.
- Pour a small amount of Lime paint on foil and add water to dilute to a wash.
- Brush lightly over entire frame to tint. Let dry.
- Sandwich carbon or transfer paper then GOLF LEGEND pattern onto your frame.
- Frist trace with pencil, then remove papers amd paint in letters with mixture of Holiday Green and Ebony.
- Let it dry and then outline with fine tip marker pen.
- Cut out desired words pertaining to golf from magazines, etc. and decoupage on.
- Paint wood tees with Crimson Red paint or desired other color and glue them in place on the frame.
- Apply glue around edges of frame and attach ribbon.
- Glue the leather strip around opening of frame.
- Determine length of ribbon desired for hanging.
- Cut two; fold over each and glue to back of frame.
It’s a Gimmie!:
- Cut scrapbook paper with grass to fit frame face and edges.
- Cut out photo area.
- Brush Collage Pauge onto your frame and to the back of paper.
- Place paper on frame; smooth out and brush Collage Pauge over paper.
- Cut out pictures of golf balls and decoupage artfully onto frame, being sure to leave room for wording at top.
- Write desired words with Sunshine Yellow 3D Paint. Then let it dry.
- Once again, determine length of ribbon desired for hanging. Cut two; fold over each and glue to back of frame.
Partners:
- Cut golf related newspaper articles and/or magazine clippings to fit the frame face.
- Brush Collage Pauge directly onto frame and on backs of papers and lay on frame.
- Smooth out and Brush Collage Pauge on papers. Let dry.
- Mix a litlte Sunshine Yellow paint with the Holiday Green paint and add water to dilute to a wash. Brush lightly over papers to tint. Let dry.
- Glue ribbon around edge of frame.
- Cut out piece of Art Emboss 1” X 3-3/4”. Use embossing tool to write “PARTNERS” (or any other desired words) and score a 1/8 inch border around word.
- Cut piece of dark green cardstock 1-1/2” X 4-1/8”.
- Glue embossed piece on top. Glue below photo opening.
- Embellish frame further with cutout words from magazine and golf balls.
- Glue other favorite photos to dark green or yellow cardstock and then glue on frame.
- Create flags by cutting out "V" shapes from colored papers and gluing to toothpick.
- Brush a little Glacier White paint on some toothpicks, let it dry, and then glue to frame.
- Glue leather strip to frame opening of photo area.
- Determine length of chain desired to hang from golf club. Cut two equal lengths.
- Fold each length in half. Connect loose links and nail to back of frame.
Under Par:
- Cut felt to size of frame. Cut out photo opening.
- Paint sides and inner edges of photo opening with a mixture of Holiday Greenand Ebony paints. Then, let dry.
- Glue felt to frame. Note: If frame has a raised lip, on edges and photo opening, as pictured, paint with Lime paint.
- Print out or write words appropriate for your father’s golf experience. Tack on frame with nails.
- Glue on tees (painted or natural color).
- Slice Styrofoam ball in half, using a knife (carefully).
- With wood end of brush, punch holes on dimensional side to simulate a golf ball. Paint Glacier White color. Let it dry. Glue on upper corner of frame.
- Determine length of ribbon desired for hanging. Cut two; fold over each and glue to back of frame.
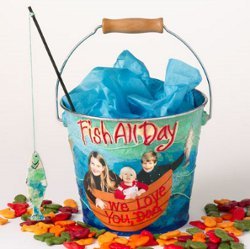
Read NextFather's Day Fishing Bucket