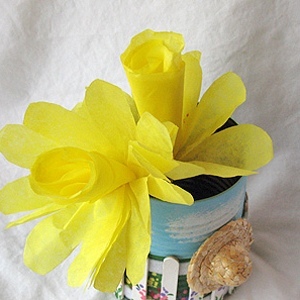
Easy Coffee Filter Daffodils
For a fun homemade crafts for kids, try these easy coffee filter daffodils by Amanda Formaro. If you have some old coffee filters around you can recycle them with these unique recycled crafts. Your kids will definitely enjoy making them!

Materials:
- 2 basket coffee filter
- 1 green chenille stem
- Yellow watercolor paint
- Paintbrush
- Scissors
- Glue stick
- Paper plate
- 2 pieces of paper towel or a kitchen towel
Instructions:
- Place one of the coffee filters onto the paper plate and flatten out.
- Paint the coffee filter with yellow water color paint.
- Move the coffee filter to the towel and lay flat to dry. Repeat with the second coffee filter.
- When dry, take one of the coffee filters and fold it in half. Now fold in half again, then again, and finally a fourth time. Hold the folded filter at the bottom and use the scissors to round the edges, this will form the outer petals of the daffodil.
- Cut a 1.5" piece off of one end of the green chenille stem and set aside.
- Take the other coffee filter and fold it in half once and then again, crease it gently and reopen it. This will give you intersecting creases that will allow you to easily see where the center of the filter is.
- Take the longer piece of chenille and poke it through the center of the second coffee filter. There should be about 2" of chenille poked through.
- Holding the filter at the bottom, roll the filter around itself to form the inner tube of the daffodil. Use a glue stick to tack it together.
- Take the second coffee filter (the one you cut the petals from) and poke the end of the chenille stem through the center. Bring the filter up to the center tube of the daffodil that you just created.
- Turn the entire thing upside down and grasp the petaled filter with your fingers. Gather it around the tubed filter and secure it by wrapping the extra piece of chenille stem that you cut off in an earlier step. Twist it around the part you are holding and turn the flower back upright.
- Manipulate with your finger until petals are spread out and it looks the way you want it to.
If you loved this project you'll love our 17 Recycled Handmade Paper Crafts page!
Read NextEasy Coffee Filter Daffodils
Your Recently Viewed Projects
Thanks for your comment. Don't forget to share!
BeckySue
Mar 10, 2016
My preschoolers in my home daycare will love making these! Sometimes its hard for them to squeeze the glue out of the bottle, so I pour some in a container and let the kids dip in a Popsicle stick to get their glue out. I use a small, glass votive candle holder because its heavy and doesnt tip over like a lightweight plastic dish would. Its also deeper than wide, so you dont have to put in a lot of glue for the kids to get enough glue on their sticks.
cactusjuanita 1531 355
May 15, 2011
One of the best printable, didn't cut the sentences or having to rearrange my settings, delicious
Paigeee1 8028372
May 02, 2011
I used to work at a daycare and instead of using the paint, we colored them with markers, sprayed them with water and let them dry. Then followed the directions. They turned out great!!!
Report Inappropriate Comment
Are you sure you would like to report this comment? It will be flagged for our moderators to take action.
Thank you for taking the time to improve the content on our site.