This project was submitted by one of our readers, just like you.
Monogram Bunny Bags

Monogram Bunny Bags
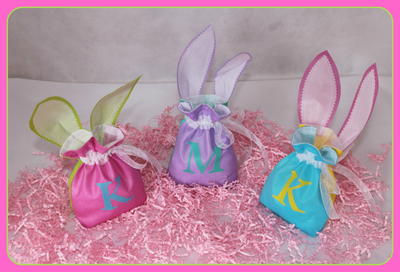
In the Designer's Words: "Cute monogrammed bunny bags perfect for treats, gifts and all kinds of surprises. Gather your supplies, your sewing machine and get started. In less than an hour you will have a trio of bags to give to friends and family."
Bring Easter treats in a beautiful bag this spring when you learn how to sew these bunny-themed sewing patterns. The Monogram Bunny Bags are adorable sewn bag patterns that feature fabulous ears and a personalized monogram. If you are looking to give out Easter gifts to your grandkids or the neighborhood children, consider making each and every one of them one of these free bag patterns. Relatively easy to sew, this sewing project for Easter comes with a printable sewing pattern that you can download and save for many Easters to come.
Project TypeMake a Project
Time to CompleteUnder an hour
Sewn byMachine

Materials List
- OlyFun™ crafting sheets by Fairfield; Snow White, Orchid, Kiwi, Lemon Drop, Sea Green and Sky Blue
-
Stick double sided fusible web by Fairfield - 1/8 yard
- Ribbon 1/2 inch wide - 14 inches per bag
-
White thread
-
Sewing machine
-
Basic sewing, pressing, measuring and cutting tools and supplies
-
Sizzix® Big Shot™ die cut machine and letter dies
- Printable Bunny Template
Instructions
-
Using the pattern provided, cut out two bunny ears and two inner ears. Cut out four 7 inch by 9 inch rectangles, two from Snow White oly-fun™ and one each desired colors of your choice. Cut two 5 inch by 1 inch rectangles for each bag to be used as the ribbon channel.
-
Center the inner ears on top of the outer ears and top stitch.
-
With right sides together, pin each of the ears together, matching the sides of the V cut out. Stitch a 1/8 inch seam next to the cut out, forming a dart and shaping the ears.
-
Pin the ears to the right side of the back bag fabric. Cover with one of the white rectangles. Stitch across the top using a 1/2 inch seam. Turn right side out and top stitch 3/8 of an inch from the seam line. Repeat stitching the front bag fabric to the remaining white rectangle. Note: All seams will be 1/2 inch unless otherwise stated.
-
Center one of the ribbon channels rectangles on top of front of the bag. Top stitch 1/8 of an inch away from the top and bottom edges. Repeat sewing the channel to the back of the bag.
-
Pin the front and back of the bag together, with the white lining facing outwards. Stitch the side and bottom seams.