Easy Santa Hat with Beard
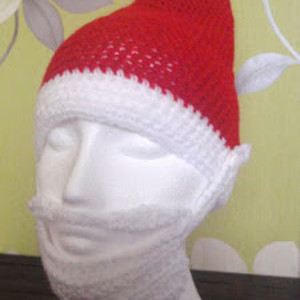
Mrs. Claus is always on the lookout for crochet hat patterns around this time of year. Her husband requested an Easy Santa Hat complete with a special pattern to keep the snow off his beard. Being the clever woman she is, Mrs. Claus created this hat that you can create for your own Kris Kringle. This free crochet hat pattern is comical, whimsical, and all-around fun. Create an Easy Santa Hat with Beard for a loved one to wear this holiday, and it will be remembered for a lifetime.
Primary TechniqueCrochet

SeasonWinter
Crochet HookH/8 or 5 mm hook
Materials:
- 5mm (H) hook
- Double knit (8ply) – Red & White
- Stitch marker wool needle
Abbreviations:
- At the end of each round just carry on.
- Mark the start of each round and then move marker as a round is completed. You don’t need to ss to join you just carry on to make the next round
- HK - hook
- CH - chain
- SS – Slip Stitch
- HDC – half double crochet
- SC – Single Crochet
- SC INC – Single Crochet increase
- SC DEC – Single Crochet increase
- HDC INC – Half double crochet Increase. Increase by placing 2 hdc in 1 stitch.
- HDC DEC – Half double crochet decrease. Yarn over hook, through 1st stitch, yarn over hook through, hook through next stitch, yarn over hook pull through. Yarn over hook and pull through all the loops.
- DC – Double Crochet
Gauge:
- 2” = 8 stitches x 6 rows
- If your hat is coming out too big go down one hook size and vice versa if it’s too small.
Instructions:
Basic hat
- Using 5mm (H) hook and Red yarn.
- Ch 2 (or use magic circle)
- Round 1) 5 hdc in the 2nd ch from the hook (5) (carry on to the first hdc to start the next round)
- Round 2) 5 hdc inc (10)
- Round 3) *1 hdc, hdc inc* x 5 (15)
- Round 4) *2 hdc, hdc inc* x 5 (20)
- Round 5) *3 hdc, hdc inc* x 5 (25)
- Round 6) 25 hdc around (25)
- Round 7) *4 hdc, hdc inc* x 5 (30)
- Round 8) 30 hdc around (30)
- Round 9) *5 hdc, hdc inc * x 5 (35)
- Round 10) 35 hdc around (35)
- Round 11) *6 hdc, hdc inc* x 5 (40)
- Round 12) 40 hdc around (40)
- Round 13) *7 hdc, 1 hdc inc* x 5 (45)
- Round 14) 45 hdc around (45)
- Round 15) *8 hdc, 1 hdc inc* x 5 (50)
- Round 16) 50 hdc around (50)
- Round 17) *9 hdc, 1 hdc inc* x 5 (55)
- Round 18) 55 hdc around (55)
- Round 19) *10 hdc, 1 hdc inc* x 5 (60)
- Round 20) 60 hdc around (60)
- Round 21) *11 hdc, 1 hdc inc* x 5 (65)
- Round 22 – 31) 65 hdc around
- Round 32) swap to white yarn & 65 hdc around (65)
- Round 33 – 34) 65 hdc around (65)
- Round 35) 65 hdc around, 2 ss (into next stitches), finish
Pom pom
- White yarn make a pom pom
- Use 2 pieces of card
- Put the 2 pieces together
- Wrapping the yarn round the two pieces
- Tie a piece of yarn round the middle of the yarn on both sides.
- Cut the yarn between the two pieces of card.
- And then wrap them together to make a pom pom
- Attach the pom pom to the hat
Beard
- White yarn & 5mm (H) hook
- Ch 51
- Row 1) 1 sc in 2nd ch from hk, 2 sc, ch 1, miss st, 10 sc, 5 hdc, 11 dc, 5 hdc, 10 sc, ch 1, miss st, 3 sc, turn (49)
- Row 2) 14 ss, 5 hdc, 11 dc, 5 hdc, 1 ss, turn (36)
- Row 3) 1 ss, ch 2, 5 hdc, 11 dc, 5 hdc, ch 2, turn (24)
- Row 4) 5 hdc, 11 dc, 5 hdc, ch 2, turn (21)
- Row 5) 1 hdc dec, 3 hdc, 11 dc, 3 hdc, 1 hdc dec, ch 2, turn (19)
- Row 6) 1 hdc dec, 2 hdc, 11 dc, 2 hdc, 1 hdc dec, ch 2, turn (17)
- Row 7) 1 hdc dec, 1 hdc, 11 dc, 1 hdc, 1 hdc dec, ch 2, turn (15)
- Row 8) 1 hdc dec, 11 dc, 1 hdc dec, finish.(13)
Moustache
- Join with ss to 12 from the end that attaches to the hat
- Ch 24, ss to join to 12 from the end on the otherside.
- Row 1) In the bottom loop only 1ss, 1sc, 1 hdc, 3 dc, 1 hdc, 1 sc, 8 ss, 1 sc, 1 hdc, 3 dc, 1 hdc, 1 sc, 1 ss, finish
- Put the beard against the hat and sew the buttons onto the hat where the beard should fasten (the ch space button hole)
- Now you have the choice to leave the beard like that or sew or ss the beard together at the edge so the beard is only not joined at the 8ss of the moustache.