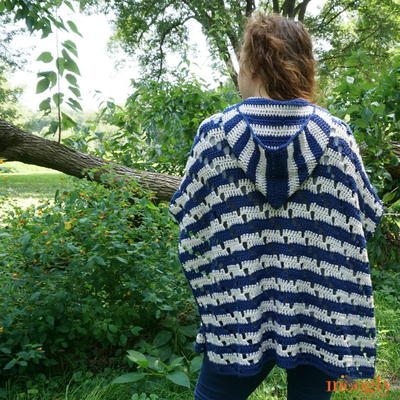
Tunic Button Vest
This experienced vest crochet pattern features an intricate design using many different stitches. The result is a beautiful tunic vest with button closure. This long vest is great for layering in the colder months and compliments several body shapes. This is a fun and fashionable jacket that you can wear year round, and it couldn't hurt to have one in all your favorite colors! Get your crochet skills up to par with this advanced crochet pattern and show off your skills to all your family and friends.

Materials:
Small (Medium, Large, X-Large, XX-Large)
- 15 (20, 20, 20, 25) oz Caron International's Simply Soft Heather (100% Acrylic) yarn in Truffle Heather
- US G-7 (4.5 mm) crochet hook
- US H-8 (5 mm)
- 5 buttons—1"/2.5 cm diameter
- Yarn needle
Gauge:
- In body patterns as established, using US G-7 (4.5 mm) hook, 18 sts = 4"/10 cm.
- In yoke pattern, using G-7 (4.5 mm) hook, 12 sts = 4"/10 cm.
Finished Measurements:
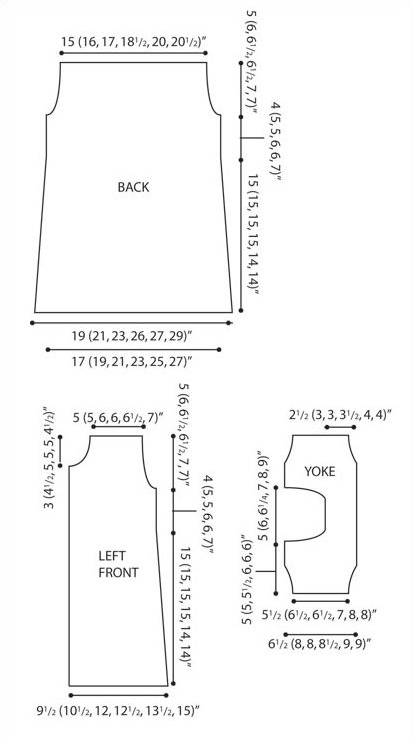
- Bust 41 (43, 46 1/2, 50 1/2, 55)" buttoned
- Length 29 (30, 31, 31 1/2, 31 1/2)"
Stitches:
- Chain (ch)
- Double crochet (dc)
- Double treble crochet (dtr)
- Half double crochet (hdc)
- Reverse single crochet (rev sc)
- Single crochet (sc)
- Slip stitch (slip st)
- Treble crochet (tr)
Special Terms:
- BPtr: Back-post treble crochet: (RS)Yarn over twice, insert hook from right-hand side of stitch to RS of piece, return to WS at left-hand side of stitch indicated, yarn over and draw up a loop, complete as tr.
- FPtr: Front-post treble crochet: (RS)Yarn over twice, insert hook from right-hand side of stitch to WS of piece, return to RS at left-hand side of stitch indicated, yarn over and draw up a loop, complete as tr.
- Left Cross Treble Cable: Skip next 3 sts, dtr in next 3 sts, working in front of 3 dtr just made, dtr in 3 skipped sts.
- Right Cross Treble Cable: Skip next 3 sts, dtr in next 3 sts, working behind 3 dtr just made, dtr in 3 skipped sts.
- Post Cable: Dc in next st, BPtr around next st 2 rows below, dc in next st.
- dc2tog: Double crochet 2 together –[Yarn over, insert hook in next st and pull up a loop, yarn over and draw through 2 loops] twice, yarn over and draw through 3 loops on hook.
- sc2tog: Single crochet 2 together – Insert hook in next stitch, yarn over and pull up a loop, (two loops on hook), insert hook in next stitch, yarn over and pull up a loop, yarn over and draw through all three loops on hook.
Instructions:
In body, post stitches are worked around stitches 2 rows below the current row (1 row below the row into which stitches would usually be worked). Always skip the stitch in the usual working row, behind or in front of a post st.
Pattern Stitches
Shell Pattern (multiple 5 sts)
- Row 1 (WS): [Skip next 2 sts, (2 dc, ch 1, 2 dc) in next st (shell made), skip next 2 sts] repeat number of times indicated.
- Repeat Row 1 for Shell Pattern
Treble Cable Pattern (12 sts)
- Rows 1 and 3 (RS): Sc in each st across.
- Row 2 (WS): Right Cross Treble Cable; Left Cross Treble Cable.
- Row 4: Left Cross Treble Cable; Right Cross Treble Cable.
- Repeat Rows 1–4 for Treble Cable Pattern.
Double/Single Row Pattern
- Row1 (RS): Ch 1, sc in each st across, turn.
- Row 2 (WS): Ch 2 (does not count as first dc), dc in each st across, turn.
- Repeat Rows 1 and 2 for Double/Single pattern.
Back
- With larger hook, chain 87 (97, 107, 118, 124, 134).
Lower Band
After the first repetition of Row 2, the first of the 2 skipped sts will have 2 sc worked into it; one sc is worked to join a previous ch-3 cable, and the other is worked when an sc is worked in the 2 skipped sts beneath the ch-3 cable.
- Row 1 (RS): Hdc in third ch from hook and in each remaining ch across, turn—85 (95, 105, 116, 122, 132) hdc.
- Row 2 (WS): Sc in next 2 sts, *ch 3, skip next 2 sts, sc in next st, turn; work 3 sc in ch-3 space just made (ch-3 cable made), slip st in next sc, turn; with ch-3 cable held in back, sc in 2 skipped sts beneath the ch-3 cable; repeat from * across, sc in each remaining st across, turn.
- Row 3 (RS): Ch 1, skipping the ch-3 cables, sc in each sc across, turn—85 (95, 105, 116, 124, 134) sts. Double-check the number of sts worked in Row 3, before proceeding, to ensure that you have the correct number of sts.
- Row 4: Repeat Row 2.
Body
- Change to smaller hook.
- Row 1 and all RS rows: Ch 1, sc in each st across, turn.
- Row 2 (set up row – WS): Ch 2 (does not count as st here and throughout), dc in next 7 (7, 9, 10, 11, 11) sts; dc in next 0 (0, 3, 0, 3, 3) sts; work in Shell Pattern to make 2 (2, 2, 3, 3, 4) shells; dc in next 3 sts; work Row 2 of Treble Cable Pattern; dc in next 3 sts; work in Shell Pattern to make 3 (5, 5, 6, 6, 6) shells; dc in next 3 sts; work Row 2 of Treble Cable Pattern; dc in next 3 sts; work in Shell Pattern to make 2 (2, 2, 3, 3, 4) shells; dc in next 0 (0, 3, 0, 3, 3) sts; dc in next 7 (7, 9, 10, 11, 11) sts, turn.
- Row 4 (WS): Ch 2, dc in next 7 (7, 9, 10, 11, 11) sts; [Post Cable] 0 (0, 1, 0, 1, 1) time(s); work in Shell Pattern to make 2 (2, 2, 3, 3, 4) shells; Post Cable; work Row 4 of Treble Cable Pattern; Post Cable; work in Shell Pattern to make 3 (5, 5, 6, 6, 6) shells; Post Cable; work Row 4 of Treble Cable Pattern; Post Cable; work in Shell Pattern to make 2 (2, 2, 3, 3, 4) shells; [Post Cable] 0 (0, 1, 0, 1, 1) time(s); dc in last 7 (7, 9, 10, 11, 11) sts, turn.
- Row 6: Ch 2, dc in next 7 (7, 9, 10, 11, 11) sc; [Post Cable] 0 (0, 1, 0, 1, 1) time(s); work in Shell Pattern to make 2 (2, 2, 3, 3, 4) shells; Post Cable; work Row 2 of Treble Cable Pattern; work in Shell Pattern to make 3 (5, 5, 6, 6, 6) shells; Post Cable; work Row 2 of Treble Cable Pattern; Post Cable; work in Shell Pattern to make 2 (2, 2, 3, 3, 4) shells; [Post Cable] 0 (0, 1, 0, 1, 1) time(s); dc in last 7 (7, 9, 10, 11, 11) sts, turn.
Shape Sides
- Row 1 (decrease – RS): Sc2tog, sc in each st to last 2 sts, sc2tog, turn—83 (93, 103, 114, 122, 132) sts.
- Rows 2–6: Work even in patterns as established.
- Row 7: Repeat Row 1—81 (91, 101, 112, 120, 130) sts.
- Rows 8–19 (25, 25, 31, 31, 31): Repeat Rows 2–7, 2 (3, 3, 4, 4, 4) more times—77 (85, 95, 104, 112, 122) sts.
- Work even in established patterns until piece measures 15 (15, 15, 15, 14, 14)"/38 (38, 38, 38, 35.5, 35.5) cm from beginning, ending with a RS row. Do not turn at end of last row.
Waistband
- Row 1 (RS): Ch 1, working in front loops only, rev sc in each st across, do not turn; ch 1, sc in back loop of each sc across, turn.
- Rows 2 and 3: Work Rows 2 and 3 of lower band.
- Row 4: Repeat Row 1.
Bodice
- Row 1 and all RS rows: Ch 1, sc in each st across, turn.
- Row 2 (set up row – WS): Ch 2 (does not count as st here and throughout), dc in next 8 (7, 9, 9, 10, 10) sts; dc in next 0 (0, 3, 0, 3, 3) sts; work in Shell Pattern to make 2 (2, 2, 3, 3, 4) shells; dc in next 3 sts; work Row 2 of Treble Cable Pattern; dc in next 3 sts; work in Shell Pattern to make 3 (5, 5, 6, 6, 6) shells; dc in next 3 sts; work Row 2 of Treble Cable Pattern; dc in next 3 sts; work in Shell Pattern to make 2 (2, 2, 3, 3, 4) shells; dc in last 8 (7, 12, 9, 13, 13) sts, turn.
- Row 4 (WS): Ch 2, dc in next 8 (7, 9, 9, 10, 10) sts; [Post Cable] 0 (0, 1, 0, 1, 1) time(s); work in Shell Pattern to make 2 (2, 2, 3, 3, 4) shells; Post Cable; work Row 4 of Treble Cable Pattern; Post Cable; work in Shell Pattern to make 3 (5, 5, 6, 6, 6) shells; Post Cable; work Row 4 of Treble Cable Pattern; Post Cable; work in Shell Pattern to make 2 (2, 2, 3, 3, 4) shells; [Post Cable] 0 (0, 1, 0, 1, 1) time(s); dc in last 8 (7, 9, 9, 10, 10) sts, turn.
- Row 6: Ch 2, dc in next 8 (7, 9, 9, 10, 10) sc; [Post Cable] 0 (0, 1, 0, 1, 1) time(s); work in Shell Pattern to make 2 (2, 2, 3, 3, 4) shells; Post Cable; work Row 2 of Treble Cable Pattern; work in Shell Pattern to make 3 (5, 5, 6, 6, 6) shells; Post Cable; work Row 2 of Treble Cable Pattern; Post Cable; work in Shell Pattern to make 2 (2, 2, 3, 3, 4) shells; [Post Cable] 0 (0, 1, 0, 1, 1) time(s); dc in last 8 (7, 9, 9, 10, 10) sts, turn.
- Work even in established patterns until piece measures 19 (20, 20, 21, 20, 21)"/48.5 (51, 51, 53.5, 51, 53.5) cm from beginning, ending with a WS row.
Shape Armholes
- Row 1 (RS): Ch 1, sc in each st across, turn.
- Row 2 (WS): Slip st in first 4 (5, 7, 7, 7, 7) sts, sc in next st, hdc in next st, dc in next 1 (4, 2, 4, 3, 8) sts; work in Shell Pattern to make 1 (0, 1, 1, 2, 2) shells; continue in patterns as established to last 12 (11, 16, 18, 22, 27) sts; work in Shell Pattern to make 1 (0, 1, 1, 2, 2) shells; dc in next 1 (4, 2, 4, 3, 8) sts, hdc in next st, sc in next st; leave remaining sts unworked, turn—69 (75, 81, 90, 98, 108) sts.
- Row 3 (RS): Slip st in first 1 (2, 2, 3, 4, 4) sts, sc in each st to last 1 (2, 2, 3, 4, 4) sts; leave remaining sts unworked, turn—67 (71, 77, 84, 90, 100) sts.
Size XXX-Large Only
- Row 4 (WS): Slip st in first 4 sts, sc in next st, hdc in next st; continue in patterns as established to last 6 sts, hdc in next st, sc in next st; leave remaining sts unworked, turn—92 sts.
All Sizes
- Work even in established patterns until armhole measures 5 (6, 6 1/2, 6 1/2, 7, 7)"/12.5 (15, 16.5, 16.5, 18, 18) cm from beginning of armhole shaping, ending with a RS row. Do not turn at end of last row.
Shoulder
- Row 1: Ch 1, working in front loops only, work rev sc in each st across, do not turn.
- Row 2: Ch 1, working in unworked back loops of previous row, sc in each st across. Fasten off.
Left Front
With larger hook, chain 45 (50, 55, 59, 63, 69).
Lower Band
- Rows 1–4: Work Rows 1–4 of back lower band—43 (48, 53, 57, 61, 67) sts.
Body
- Change to smaller hook.
- Row 1 and all RS rows: Ch 1, sc in first 40 (45, 50, 52, 56, 62) sts, [ch 10, sc in next 2 sts] 1 (1, 1, 2, 2, 2) time(s), sc in last sc.
- Row 2 (set up row – WS): Ch 2 (does not count as st here and throughout); keeping ch-10 loops on the front side of the piece, dc in next 3 (3, 3, 5, 5, 5) sts; work in Shell Pattern to make 1 (2, 2, 2, 2, 2) shell(s); dc in next 3 sts; work Row 2 of Treble Cable Pattern; dc in next 3 sts; work in Shell Pattern to make 2 (2, 2, 3, 3, 4) shells; dc in last 7 (7, 12, 9, 13, 14) sts, turn.
- Row 4 (WS): Ch 2 (does not count as st here and throughout); keeping ch-10 loops on the front side of the piece, dc in next 3 (3, 3, 5, 5, 5) sts; work in Shell Pattern to make 1 (2, 2, 2, 2, 2) shell(s); Post Cable; work Row 4 of Treble Cable Pattern; Post Cable; work in Shell Pattern to make 2 (2, 2, 3, 3, 4) shells; [Post Cable] 0 (0, 1, 0, 1, 1) time(s); dc in last 7 (7, 9, 9, 10, 11) sts, turn.
- Row 6: Ch 2 (does not count as st here and throughout); keeping ch-10 loops on the front side of the piece, dc in next 3 (3, 3, 5, 5, 5) sts; work in Shell Pattern to make 1 (2, 2, 2, 2, 2) shell(s); Post Cable; work Row 2 of Treble Cable Pattern; Post Cable; work in Shell Pattern to make 2 (2, 2, 3, 3, 4) shells; [Post Cable] 0 (0, 1, 0, 1, 1) time(s); dc in last 7 (7, 9, 9, 10, 11) sts, turn.
Shape Sides
- Row 1 (decrease – RS): Sc in each st to last 2 sts, sc2tog, turn—42 (47, 52, 56, 60, 66) sts.
- Rows 2–6: Work even in patterns as established.
- Row 7: Repeat Row 1—41 (46, 51, 55, 59, 65), sts.
- Rows 8–19 (25, 25, 31, 31, 31): Repeat Rows 2–7, 2 (3, 3, 4, 4, 4) more times—39 (43, 48, 51, 55, 61) sts.
- Work even in established patterns until piece measures same as back from beginning, ending with a RS row. Do not turn at end of last row.
Waistband
- Row 1 (RS): Keeping ch-10 loops on the front side of the piece, ch 1, working in front loops only, rev sc in each st across, do not turn; ch 1, sc in back loop of each sc across, turn.
- Rows 2 and 3: Work Rows 2 and 3 of lower band.
- Row 4: Repeat Row 1.
Bodice
- Row 1 and all RS rows: Ch 1, sc in each st across, turn.
- Row 2 (set up row – WS): Ch 2 (does not count as st here and throughout); keeping ch-10 loops on the front side of the piece, dc in next 3 (3, 3, 5, 5, 5) sts; work in Shell Pattern to make 1 (2, 2, 2, 2, 2) shell(s); dc in next 3 sts; work Row 2 of Treble Cable Pattern; dc in next 3 sts; work in Shell Pattern to make 2 (2, 2, 3, 3, 4) shells; dc in last 3 (2, 7, 3, 7, 8) sts, turn.
- Row 4 (WS): Ch 2 (does not count as st here and throughout); keeping ch-10 loops on the front side of the piece, dc in next 3 (3, 3, 5, 5, 5) sts; work in Shell Pattern to make 1 (2, 2, 2, 2, 2) shell(s); Post Cable; work Row 4 of Treble Cable Pattern; Post Cable; work in Shell Pattern to make 2 (2, 2, 3, 3, 4) shells; [Post Cable] 0 (0, 1, 0, 1, 1) time(s); dc in last 3 (2, 4, 3, 4, 5) sts, turn.
- Row 6: Ch 2 (does not count as st here and throughout); keeping ch-10 loops on the front side of the piece, dc in next 3 (3, 3, 5, 5, 5) sts; work in Shell Pattern to make 1 (2, 2, 2, 2, 2) shell(s); Post Cable; work Row 2 of Treble Cable Pattern; Post Cable; work in Shell Pattern to make 2 (2, 2, 3, 3, 4) shells; [Post Cable] 0 (0, 1, 0, 1, 1) time(s); dc in last 3 (2, 4, 3, 4, 5) sts, turn.
- Work even in established patterns until piece measures same as back from beginning, ending with a WS row.
Shape Armholes
- Row 1 (RS): Ch 1, sc in each st across, turn.
- Row 2 (WS): Work in patterns as established to last 12 (11, 16, 18, 22, 27) sts; work in Shell Pattern to make 1 (0, 1, 1, 2, 2) shells; dc in next 1 (4, 2, 4, 3, 8) sts, hdc in next st, sc in next st; leave remaining sts unworked, turn—35 (38, 41, 44, 48, 54) sts.
- Row 3 (RS): Slip st in first 1 (2, 2, 3, 4, 4) sts, sc in each st to last 3 (3, 3, 4, 4, 5) sts, [ch 10, sc in next 2 sts] 1 (1, 1, 2, 2, 2) time(s), sc in each remaining st across, turn—34 (36, 39, 41, 44, 50) sts.
Size XXX-Large Only
- Row 4 (WS): Work in patterns as established to last 6 sts, hdc in next st, sc in next st; leave remaining sts unworked, turn—46 sts.
All Sizes
- Work even in established patterns until armhole measures 2 (1 1/2, 1 1/2, 1 1/2, 2, 2 1/2)"/5 (4, 4, 4, 5, 6.5) cm from beginning of armhole shaping, ending with a WS row. Do not turn at end of last row.
Form Cable Braid
- Loop the ch-10 loops through one another to form cable braid.
Shape Neck
- Row 1 (RS): Ch 1, sc in each st across, turn.
- Row 2 (WS): Ch 1, catching the top of the cable braid in the corresponding sc, sc in first 5 (5, 8, 9, 9, 10) sts, hdc in next st, dc in next 3 (3, 5, 5, 5, 5) sts, continue in patterns as established, turn—34 (36, 39, 41, 44, 46) sts.
- Row 3 (RS): Ch 1, sc in first 24 (24, 27, 27, 30, 31) sts; leave remaining sts unworked, turn.
- Work even in established patterns until armhole measures same as back to shoulder, ending with a RS row. Do not turn at end of last row.
Shoulder
- Row 1: Ch 1, working in front loops only, work rev sc in each st across, do not turn.
- Row 2: Ch 1, working in unworked back loops of previous row, sc in each st across. Fasten off.
Right Front
- Work as for left front, reversing all shaping.
Yoke
Yoke is worked from right shoulder to left shoulder.
- With smaller hook, chain 18 (22, 22, 24, 26, 26).
- Row 1 (WS): Dc in third ch from hook (beginning ch does not count as st) and in each remaining ch across, turn—16 (20, 20, 22, 24, 24) sts.
- Rows 2–5 (5, 5, 6, 7, 7): Work even in Double/Single Row Pattern.
Shape Shoulder
- Row 6 (6, 6, 7, 8, 8) (increase): Continue in Double/Single Row Pattern and increase 1 st at beginning and end of row—18 (22, 22, 24, 26, 26) sts.
- Rows 7 (7, 7, 8, 9, 9)–8 (8, 8, 9, 10, 10): Repeat last 2 rows once—20 (24, 24, 26, 28, 28) sts.
- Continue even in Double/Single Row Pattern until piece measures 5 (5, 5 1/2, 6, 6, 6)"/12.5 (12.5, 12.5, 14, 15, 15, 15) cm from beginning, ending with a RS row.
Shape Neck
- Row 1 (WS) Ch 2, dc in next 10 (12, 12, 13, 14, 14) sts; leave remaining sts unworked, turn—10 (12, 12, 13, 14, 14) sts.
- Row 2 (RS): Ch 1, sc2tog, sc in each remaining st across, turn—9 (11, 11, 12, 13, 13) sts.
- Row 3 (WS): Ch 2, dc in each st to last 2 sts, dc2tog, turn—8 (10, 10, 11, 12, 12) sts.
- Work even in Double/Single Row Pattern until piece measures 9 (10, 10 3/4, 12, 13, 14)"/23 (25.5, 27.5, 30.5, 33, 35.5) cm from beginning, ending with a RS row.
- Next Row (WS): Ch 2, dc in each st to last st, 2 dc in last st, turn—9 (11, 11, 12, 13, 13) sts.
- Next Row (RS): Ch 1, 2 sc in first st, sc in each remaining st across, turn—10 (12, 12, 13, 14, 14) sts.
- Next Row (WS): Ch 2, dc in each st across, turn.
- Next Row (RS): Ch 11 (13, 13, 14, 15, 15), sc in second ch from hook and in each remaining ch and dc across, turn—20 (24, 24, 26, 28, 28) sts.
- Work even in Double/Single Row Pattern until left shoulder measures same as right shoulder to shoulder shaping.
Shape Shoulder
- Decrease Row: Continue in Double/Single Row Pattern and decrease 1 st at beginning and end of row—18 (22, 22, 24, 26, 26) sts.
- Next 2 Rows: Repeat last 2 rows once—16 (20, 20 22, 24, 24) sts.
- Work even in Double/Single Row Pattern until left shoulder measures same as right shoulder from neck edge to armhole edge. Fasten off.
Edging
- With RS of yoke facing join yarn in corner of back edge of yoke, work 64 sc evenly spaced along back edge of yoke. Fasten off.
- With RS of yoke facing join yarn in corner of front edge of yoke, work 22 sc evenly spaced along front edge of yoke. Fasten off. Repeat on other front edge.
Finishing
- Join Yoke to Back and Fronts
- With RS of yoke and back together, working through both thicknesses, sc top edge of back to back edge of yoke. Do not turn. Ch 1, rev sc in each st across. Fasten off.
- With RS of yoke and left front together, working through both thicknesses, sc top edge of left front to left front edge of yoke. Do not turn. Ch 1, rev sc in each st across. Fasten off. Repeat to join right front to yoke.
Neckband
- Row 1: With RS facing join yarn with slip st in back neck seam, ch 2 (does not count as st), work 75 (99, 103, 109, 115, 121) dc evenly spaced around neck edge, turn.
- Row 2: Ch 2 (counts as first st), *BPtr around next st, dc in next st; repeat from * across, turn.
- Row 3: Ch 2 (counts as first st), *FPtr around next st, dc in next st, repeat from * across, turn.
- Repeat Row 2 0 (1, 1, 1, 1, 1) time(s), then repeat Row 3 0 (0, 0, 0, 1, 1) time(s).
- Fasten off.
Button Band
- Row 1: With RS facing join yarn with slip st in top of left front edge, ch 2, work 87 (91, 91, 97, 95, 99) sts evenly spaced along left front edge.
- Complete as for neckband.
Buttonhole Band
- Row 1: With RS facing join yarn with slip st in lower edge of right front, ch 2, work 87 (91, 91, 97, 95, 99) sts evenly spaced along right front edge.
- Row 2 (WS): Work Row 2 of neckband.
- Row 3 (RS): Ch 2, [FPtr around next st, dc in next st] 9 (11, 11, 10, 9, 11) times, FPtr around next st, ch 1, skip next st, *[FPtr around next st, dc in next st] 7 (7, 7, 8, 8, 8) times, FPtr around next st, ch 1, skip next st; repeat from * 3 more times, FPtr around next st, dc in next st, turn.
- Row 4: Work Row 2 of neckband.
Sizes XX-Large (XXX-Large) Only
- Row 5: Work Row 3 of neck band.
- Fasten off.
Front and Neck Edging
- With RS facing join yarn with slip st in lower corner of right front edge, work 1 slip st in each st along right front, neck, and left front edges. Fasten off.
- Sew side seams.
Armhole Edging
- Round 1: With RS facing, join yarn with slip st in armhole seam, ch 1, work sc evenly spaced around armhole; join with slip st in first sc, do not turn.
- Round 2: Ch 2, dc in each st around; join with slip st in top of beginning ch, do not turn.
- Round 3: Ch 1, rev sc in each st around. Fasten off.
- Using yarn needle, weave in ends.
Read NextJustine Crochet Prayer Shawl Pattern
Your Recently Viewed Projects

Thanks for your comment. Don't forget to share!
pennye 5030153
May 23, 2014
Hello all, Can someone please advise if both lots of yarn are crocheted together ? Many thanks Penny
Melissa Ryan
May 23, 2014
Hi There-Thanks for your comment. I checked the designer's original pattern and did not see any mention yarn being crocheted together...I think you're crocheting just one strand of yarn. Hope that helps! FaveCrafts Editor
janie 4229493
Aug 23, 2012
Lovely Pattern, but these can't possibly be correct: Finished Measurements: (Small (Medium, Large, X-Large, XX-Large) Bust 41 (43, 46 1/2, 50 1/2, 55)"/104 (109, 118, 128, 139.5) cm, buttoned Length 29 (30, 31, 31 1/2, 31 1/2)"/73.5 (76, 78.5, 80, 80) cm A bust of 41 centimeters?? Please supply the correct measurements. Thanks
myboys 2471902
Dec 15, 2010
I'm having a difficult time with Row 2 of the back. I'm not understanding what it says under "Note:". If the pattern gave a number of how may cables there should be that might help. So instead of skipping two sc after the first row, I'm skipping one worked sc and one unworked sc? And what does it mean: "one sc is worked to join a previous ch-3 cable, and the other is worked when an sc is worked in the 2 skpped sts beneat the ch-3 cable"?
Report Inappropriate Comment
Are you sure you would like to report this comment? It will be flagged for our moderators to take action.
Thank you for taking the time to improve the content on our site.