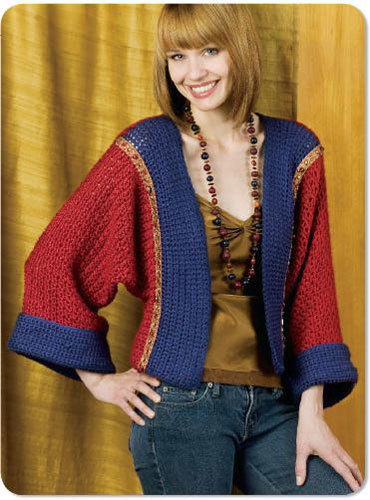
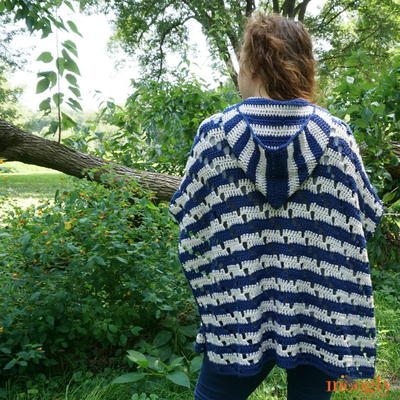
Embellished Kimono Jacket
This easy jacket crochet pattern becomes a bit more interesting with embellishing done along the front of the jacket where the colors meet. A vibrant trim is added between the colors with three different kinds of beads. You can create many different variations or skip the embellishing for a quicker crochet project.

Materials:
- Caron International's Simply Soft (100% acrylic; 6 oz/170 g, 315 yds/288 m skein):
#9730 Autumn Red (MC), 3 (3, 4, 4) skeins
#9711 Dk. Country Blue (CC), 2 (2, 2, 2) skeins
- Crochet Hooks: One each size US G-6 and J-10 (4 and 6 mm), or size to obtain gauge
- Yarn needle
- 1 1/4 yards/118 cm flat braid trim, 3/4"/1.9 cm wide, in color desired (shown in red, with gold metallic threads)
- 28 textured brass beads, 4 mm x 6 mm
- 14 bugle beads, 11 mm long, dark red
- 14 glass beads, in various sizes, no smaller than 6 mm, no larger than 11 mm, dark red
- Tapestry or beading needle (thin enough to fit through beads)
- Beading or quilting thread to match braid
- Sewing needle and thread to match garment
- Straight pins or small safety pins
Finished Measurements: Small (Medium, Large, Extra-Large)
Bust 36 (40, 44, 48)"/91.5 (101.5, 112, 122) cmLength 18 1/2"/46.5 cm, all sizes
Note: Shrug is loose fitting and designed to be worn as shown in photo. Bust measurements are suggested sizes for a standard fitting garment; choose accordingly. Due to shaping, garment is wider than measurements indicate on schematic.
Gauge: In Stitch Pattern, 12 sc and 12 rows = 4"/10 cm, using larger hook and MC; in single crochet, 13 sc and 16 rows = 4"/10 cm, using smaller hook and CC
Crochet Stitches:
ch: chain
sc: single crochet
slip st: slip stitch
Stitch Pattern (Multiple of 2 sc + 1):
Row 1 (RS): Sc in second ch from hook and each ch across, turn.
Row 2: Ch 1, sc in first st, * ch 1, skip next st, sc in next st; repeat from * across, turn.
Row 3: Ch 1, sc in first st and in each ch-1 space and sc across, turn.
Repeat Rows 2 and 3 for Stitch pattern.
NOTES
1. Shrug is worked from lower edge of Front, across shoulders to lower edge of Back.
2. Side Front/Sleeve is worked to shoulder; CC panels are then worked on each Front.
3. Back/Sleeves are joined at shoulders to Side Front/Sleeve and CC Panels, then worked down.
4. Cuffs are worked down from lower edge of Sleeves.
Instructions:
LEFT SIDE FRONT/SLEEVE
Using larger hook and MC, chain 14 (18, 22, 26).
Row 1 (RS): Work Row 1 of Stitch pattern—13 (17, 21, 25) sc.
Row 2: Work Row 2 of Stitch pattern—7 (9, 11, 13) sc; 6 (8, 10, 12) ch-1 spaces.
Row 3: Work Row 3 of Stitch pattern—13 (17, 21, 25) sc.
Rows 4 - 16: Work even in pattern, repeating
Rows 2 and 3, end with (WS) Row 2.
Shape Side and Underarm
Row 17 (RS): At side edge, ch 1, work [2 sc in first st (increase)], beginning at *, work in pattern to end, turn—14 (18, 22, 26) sc.
Row 18: Work in pattern across to last st, [ch 1, sc in last st, (increase)], turn—8 (10, 12, 14) sc; 7 (9, 11, 13) ch-1 spaces.
Rows 19 - 25: Work in pattern, increasing 1 st at side edge every row, turn—22 (26, 30, 34) sc.
Row 26: Work in pattern across to last st, ch 1, sc in last st; do NOT turn—12 (14, 16, 18) sc; 11 (13, 15, 17) ch-1 spaces.
Sleeve
Chain 31, turn.
Row 27 (RS): Sc in second ch from hook and in next 29 ch; sc in next st and in each sc and ch-1 space to end—53 (57, 61, 65) sc.
Rows 28 - 42: Work even in pattern, end with a WS row.
Shape Neck
Row 43: Work in pattern across to last st, turn, [leaving last st at neck edge unworked
(decrease)]—52 (56, 60, 64) sc.
Row 44: Slip st in next st (decrease), ch 1, sc in same st, work in pattern to end, turn—26 (28, 30, 32) sc; 25 (27, 29, 31) ch-1 spaces remain.
Rows 45 - 56: Work in pattern, decreasing 1 st at neck edge every row—20 (22, 24, 26) sc; 19 (21, 23, 25) ch-1 spaces remain at shoulder edge.
Fasten off.
Front Panel
With RS facing, using smaller hook and CC, join yarn with a sc in first row end of neck (at shoulder edge).
Row 1: Sc in each row end along Front edge to lower edge, turn—56 sc.
Row 2: Ch 1, sc in each st across, turn.
Rows 3 - 18: Work even in sc, repeating Row 2.
Fasten off.
RIGHT SIDE FRONT/SLEEVE
Using larger hook and MC, chain 14 (18, 22, 26). Work as for left Front for 16 rows, end with (WS) Row 2.
Shape Side and Underarm
Row 17 (RS): Work in pattern across to last st, work [2 sc in last st (increase)], turn—14 (18, 22, 26) sc.
Row 18: Ch 1, sc in first st, [ch 1, sc in next st (increase)], work in pattern to end—8 (10, 12, 14) sc; 7 (9, 11, 13) ch-1 spaces.
Rows 19 - 26: Work in pattern, increasing 1 st at side edge every row—12 (14, 16, 18) sc; 11 (13, 15, 17) ch-1 spaces.
At front edge, drop yarn, do NOT fasten off.
Sleeve
With RS facing, join another strand of MC with a slip st in first st of Row 26 (side edge), chain 30 Fasten off; return to front edge, pick up dropped strand of yarn.
Row 27 (RS): Work in pattern across to chain, sc in each ch to end, turn—53 (57, 61, 65) sc.
Rows 28 - 42: Work even in pattern, end with a WS row.
Shape Neck
Row 43: Slip st in next ch-1 space (decrease), ch 1, sc in same space, work in pattern to end, turn—52 (56, 60, 64) sc.
Row 44: Work in pattern across to last st, turn, leaving last st unworked (decrease)—26 (28, 30, 32) sc; 25 (27, 29, 31) ch-1 spaces.
Rows 45 - 56: Work in pattern, decreasing 1 st every row—20 (22, 24, 26) sc; 19 (21, 23, 25) ch-1 spaces at shoulder edge. F
asten off.
Front Panel
With RS facing, using smaller hook and CC, join yarn with a sc in first row end at lower edge. Work as for left Front.
BACK
Joining Row—With RS facing, using larger hook and MC, join yarn with a slip st in first sc of left Sleeve; ch 1, work in pattern (sc in each sc and ch-1 space) across to left Front Panel; working in row ends, sc in each row end across; chain 17 for Back neck; working in row ends, sc in each row end across right Front Panel; work in pattern to
end, turn—57 (61, 65, 69) sc each side of chain.
Row 2: Work in pattern across to chain; sc in each ch across Back neck; work in pattern to end, turn—29 (31, 33, 35) sc; 28 (30, 32, 34) ch-1 spaces each side, 17 sc at center Back.
Row 3: Work in pattern (sc in each sc and ch-1 space) across, turn—131 (139, 147, 155) sc.
Row 4: Work in pattern across all sts—66 (70, 74, 78) sc; 65 (69, 73, 77) ch-1 spaces.
Rows 5 - 29: Work even in pattern. Fasten off.
Sleeves
Row 30 (WS): Skip first 30 sts (Sleeve); join MC with a sc in next st; work in pattern across to last 30 sts, turn, leaving last 30 sts unworked for Sleeve—36 (40, 44, 48) sc, 35 (39, 43, 47) ch-1 spaces remain.
Shape Side and Underarm
Row 31: Slip st in next ch-1 space, slip st in next st (2 sts decreased); ch 1, sc in same st, work in pattern across to last 2 sts, turn, leaving remaining sts unworked (2 sts decreased)—67 (75, 83, 91) sc remain.
Row 32: Slip st in next 2 sts (2 sts decreased), ch 1, sc in same st, work in pattern across to last 2 sts, turn, leaving remaining sts unworked (2 sts decreased—32 (36, 40, 44) sc, 31 (35, 39, 43) ch-1 spaces remain.
Rows 33 - 38: Continuing in pattern, decrease 2 sts each side every row 6 times, working as for Rows 31 and 32—20 (24, 28, 32) sc, 19 (23, 27, 31) ch-1 spaces remain.
Rows 39: Work even in pattern39 (47, 55, 63) sc.
Rows 40 - 56: Work even in pattern. Fasten off.
FINISHING
Using yarn needle, weave in all ends.
Assembly
With WS facing each other, sew side and Sleeve seams, matching shaping.
Cuffs
Note: Work in joined rows, turning at the end of each row.
Row 1: Using smaller hook and CC, join yarn with a sc in row end at seam; sc in each row around, join with a slip st in beginning sc, turn.
Row 2: Ch 1, sc in each sc around, join with a slip st in beginning sc, turn.
Rows 3 - 22: Work even in sc, repeating Row 2.
Fasten off.
Lower Edge
With WS facing, using smaller hook and CC, working in row ends of lower edge of Front Panel, join yarn with a sc in corner row of right Front Panel; sc in each row end across to Side-Front; change to MC, working in remaining loops of foundation ch, sc in each st across Front; sc in each st across Back; working as for Right Side-Front, work across Left Side-Front; change to CC, work across row ends of Left Front Panel to end. Fasten off.
EMBELLISHING
1. Separate the beads into 3 groups: bugle beads, red glass beads, and brass beads.
2. Measure distance of contrast band from shoulder to lower edge and cut trim accordingly, adding 1/2"/1.3 cm for turn- under.
3. Fold in 1/4"/.6 cm hem at lower edge of trim and stitch.
4. Mark the trim with pins for bead placement.
5. Thread sewing needle with matching thread and bring to RS. Sew on beads as follows: brass bead, bugle bead, glass bead. Repeat in that order for the length of the trim.
6. Pin trim to Kimono over the seam and stitch in place with sewing thread.
Read NextSidewalk Shawl Crochet Pattern