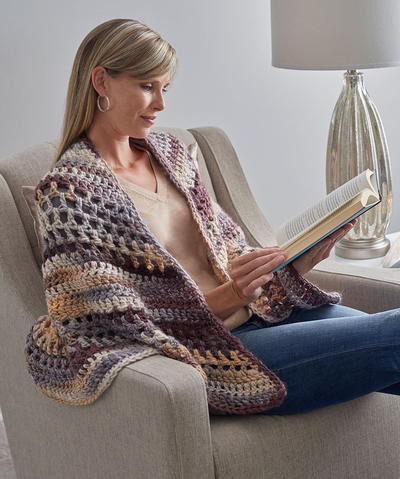
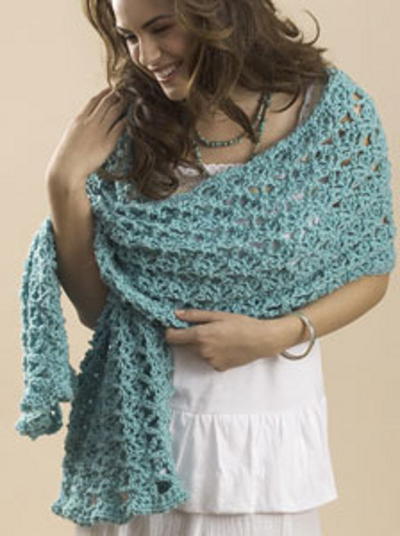
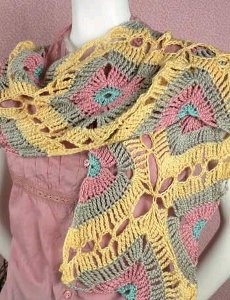
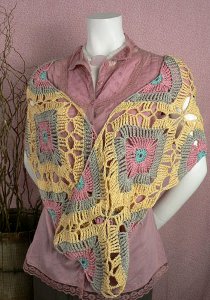
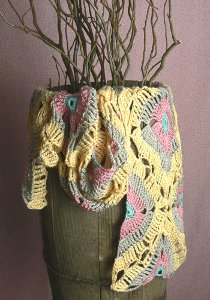
Beachy Wrap
Crochet your own beachy wrap with triangular and square interlocking motifs in summery colors. This free crochet pattern makes for a wrap that is both functional and stylish. It can be difficult to find free crochet patterns that you can wear in the summer. While yarn is an all-weather look, finding crochet patterns that are not too weighty and toasty for summer days is not as easy as it should be. Luckily, this stunning crochet wrap pattern is the perfect way to wrap up despite the warmth. Lacy and easy, this wearble will fight any cool breeze while making sure you stay as cool as a cucumber.

Find all sorts of easy and fun crochet patterns in our collection of patterns for beginners. 50+ Free Easy Crochet Patterns + Help for Beginners has crochet patterns to wear, easy afghan patterns, and the answers to any and all of your crochet questions.
Materials:
- Naturally Caron.com Spa (75% Microdenier Acrylic/25% Bamboo; 3 oz/85 g, 251 yds/230 m skein): 3 oz (A), 3 oz (B), 3 oz (C), 6 oz (D), Shown in: #0005 Ocean Spray (A), #0001 Rose Bisque (B), #0008 Misty Taupe (C), #0003 Soft Sunshine (D)
- One each size US H-8 (5mm), or size to obtain gauge.
- Yarn needle
- Pattern

Instructions:
FINISHED MEASUREMENTS:
Wrap measures approximately 61"/155 cm long x 10"/25.5 cm wide
GAUGE
Using US H-8 (5mm) hook, one square motif = 9 x 9"/23 x 23cm.
STITCHES USED
Chain (ch), double crochet (dc), double treble crochet (dtr)
NOTE
The motifs are joined as you go. Refer to assembly diagram as you make and join motifs, to determine location of current motif.
Intended construction and joining sequence: First make one triangular motif; *make two more triangular motifs, each joined to one side of the previous motif, make a square motif and join two of its sides to the previous motifs; repeat from * 2 more times, make two more triangular motifs, each joined to one side of the previous motif, make a final triangular motif and join two of its sides to the previous motifs.
TRIANGULAR MOTIF (make 10)
- With A, chain 4.
- Row 1 (RS): Work 8 dc in 4th ch from hook (beginning ch counts as dc), do not turn. Fasten off.
- Row 2 (RS): Join B with slip st in top of beginning ch, ch 8 (counts as dtr, ch 3 here and throughout), 3 dtr in same st as beginning, dtr in next 3 sts, (3 dtr, ch 3, 3 dtr) in next st, dtr in next 3 sts, (3 dtr, ch 3, dtr) in last st, do not turn. Fasten off.
- Row 3: Join C with slip st in 5th ch of beginning ch-8, ch 8, 3 dtr in same st as beginning, dtr in next 9 sts, (3 dtr, ch 3, 3 dtr) in next ch-3 space, dtr in next 9 sts, (3 dtr, ch 3, dtr) last ch-3 space, do not turn. Fasten off.
Note: Complete the appropriate joining row for location of motif. - Row 4 (no sides joined – first triangular motif): Join D with slip st in 5th ch of beginning ch-8, ch 12 (counts as dtr, ch 7), 3 dtr in same st as beginning, dtr in next 6 sts, ch 5, dtr in next 3 sts, ch 5, dtr in next 6 sts, (3 dtr, ch 7, 3 dtr) in next ch-3 space, dtr in next 6 sts, ch 5, dtr in next sts, (3 dtr, ch 7, dtr) last ch-3 space. Fasten off.
- Row 4 (one side joined): Join D with slip st in 5th ch of beginning ch-8, ch 8 (counts as dtr, ch 3), slip st in 4th ch of ch-7 space of adjacent motif, ch 3, 3 dtr in same st as beginning, dtr in next 2 sts, slip st in corresponding 5th dtr of adjacent motif, dtr in next 4 sts of current motif, ch 2, slip st in ch-5 space of adjacent motif, ch 2, dtr in next 3 sts of current motif, ch 2, slip st in ch-5 space of adjacent motif, ch 2, dtr in next 5 sts of current motif, slip st in corresponding 5th dtr of adjacent motif, dtr in next st of current motif, (3 dtr, ch 3, slip st in 4th ch of ch-7 space of adjacent motif (s), ch 3, 3 dtr) in next ch-3 space of current motif, dtr in next 6 sts, ch 5, dtr in next 3 sts, ch 5, dtr in next 6 sts, (3 dtr, ch 5, 3 dtr) in next st, dtr in next 6 sts, ch 5, dtr in next sts, (3 dtr, ch 7, dtr) last ch-3 space. Fasten off.
- Row 4 (two sides joined): Join D with slip st in 5th ch of beginning ch-8, ch 8 (counts as dtr, ch 3), slip st in 4th ch of ch-7 space of adjacent motif, ch 3, 3 dtr in same st as beginning,
- *dtr in next 2 sts, slip st in corresponding 5th dtr of adjacent motif, dtr in next 4 sts of current motif, ch 2, slip st in ch-5 space of adjacent motif, ch 2, dtr in next 3 sts of current motif, ch 2, slip st in ch-5 space of adjacent motif, ch 2, dtr in next 5 sts of current motif, slip st in corresponding 5th dtr of adjacent motif, dtr in next st of current motif, (3 dtr, ch 3, slip st in 4th ch of ch-7 space of adjacent motif (s), ch 3, 3 dtr) in next ch-3 space of current motif; repeat from * once more. Fasten off.
SQUARE MOTIF (make 3)
- With A, chain 5; join with slip st in first ch to form a ring.
- Round 1: Ch 3 (counts as dc), work 15 more dc in ring; join with slip st in top of beginning ch—16 dc. Fasten off.
- Round 2: Join B with slip st in join, ch 5 (counts as dtr here and throughout), dtr in next 2 sts, *(3 dtr, ch 3, 3 dtr) in next st, dtr in next 3 sts; repeat from * 2 more times, (3 dtr, ch 3, 3 dtr) in next st; join with slip st in top of beginning ch. Fasten off.
- Round 3: Join C with slip st in join, ch 5, dtr in next 5 sts, *(3dtr, ch 3, 3 dtr) in next ch-3 space, dtr in next 9 sts; repeat from * 2 more times, (3 dtr, ch 3, 3 dtr) in next ch-3 space, dtr in next 3 sts; join with slip st in top of beginning ch. Fasten off.
- Round 4 (two sides joined): Join D with slip st in any ch-3 space, ch 8 (counts as dtr, ch 3), slip st in 4th ch of ch-7 space of adjacent motif, ch 3, 3 dtr in same st as beginning, *dtr in next 2 sts, slip st in corresponding 5th dtr of adjacent motif, dtr in next 4 sts of current motif, ch 2, slip st in ch-5 space of adjacent motif, ch 2, dtr in next 3 sts of current motif, ch 2, slip st in ch-5 space of adjacent motif, ch 2, dtr in next 5 sts of current motif, slip st in corresponding 5th dtr of adjacent motif, dtr in next st of current motif, (3 dtr, ch 3, slip st in 4th ch of ch-7 space of adjacent motif (s), ch 3, 3 dtr) in next ch-3 space of current motif; repeat from * once more; **dtr in next 6 sts, ch 5, dtr in next 3 sts, ch 5, dtr in next 6 sts**, (3 dtr, ch 7, 3 dtr) in next ch-3 space; repeat from ** to ** once, 2 dtr in same st as beginning; join with slip st in 5th ch of beginning ch. Fasten off.
FINISHING
Using yarn needle, weave in all ends. Block piece to measurements.
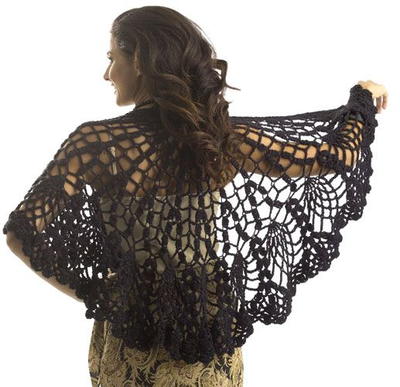
Read NextPineapple Lace Shawl Crochet Pattern
Your Recently Viewed Projects

Thanks for your comment. Don't forget to share!
Delphine Bryant
Nov 14, 2018
Either a wrap or a scarf this is a beautiful pattern. I love the colors of this design. If you really pay attention to the design you can see so many elements that make this special. Pay attention to the yellow and you can almost see a star in the cross of the design. This is made with motifs strategically joined.
Morehouse17
Oct 30, 2018
This beachy wrap is beautiful and I had no idea it was created with motifs until I read over the directions. Located this a little late for it to be designated as a beach wrap but with a switch in colors this could easily be a fall or winter wrap for added color. Because of the openness of the weave it is not for warmth and that is for sure.
princess6860504
Apr 30, 2017
I am loving this color combination. It reminds me of sun faded fabrics left out in the sun to dry. Working in motifs is one of my favorite ways to crochet because it's easily transportable- you won't be carrying around an entire wrap or shawl with you inside your tote bag.
wandaschwerer 9494 543
Apr 24, 2012
I am trying to do Row 4 for the first triange, and the instructions are confusing me. HELP. Join D with slip st in 5th ch of beginning ch-8, ch 12 (counts as dtr, ch 7), 3 dtr in same st as beginning, dtr in next 6 sts, ch 5, dtr in next 3 sts, ch 5, dtr in next 6 sts, (3 dtr, ch 7, 3 dtr) in next ch-3 space, dtr in next 6 sts, ch 5, dtr in next sts, (3 dtr, ch 7, dtr) last ch-3 space. Fasten off.
bscott1122 4679886
Apr 17, 2012
i have been crocheting for years! saw this pattern, loved it and the combination of colours. I bought the yarn and started. I could not seem to get it. i had to give it up, despite repeated attempts to understand it. this is my first time ever of not completing a project. I was disappointed.
MissMaggie
May 16, 2011
Hi Cerridwin, The diagram is linked in the materials section under "Pattern" Thanks! -Editors of FaveCrafts
Cerridwin
May 15, 2011
The assembly diagram mentioned in the notes section seems to be missing for this pattern. I'm sure having a diagram to follow would make this pattern much easier to put together.
deedeemom46 350461 3
May 09, 2011
Help I can't seem to get how to join the motifs together. Does anyone have a way they can explain this to me or show it to me. I love this wrap, the colors and the feel or this Spa Caron yarn. I hope to finish it someday and would love some expert help. I guess I am really a beginners, beginner. I miss my Mom. Please send me any advise on how I can finish this lovely shawl! deedeemom46@yahoo.com
wandaschwerer 9494 543
Apr 24, 2012
Did you get any hints on how to finish this shawl? I am having problems with the row 4 instruction. Thanks.
Report Inappropriate Comment
Are you sure you would like to report this comment? It will be flagged for our moderators to take action.
Thank you for taking the time to improve the content on our site.