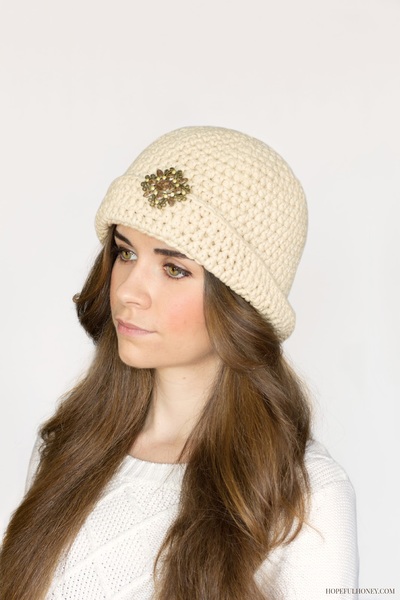
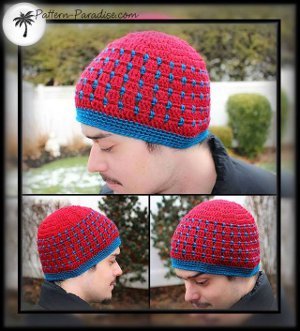
Hidden Sapphire Crocheted Hat
This cute crocheted hat pattern could easily be worn by a man or a woman. By mixing 2 yarn colors, this Hidden Sapphire Crocheted Hat gives the illusion of little hidden gems scattered throughout the hat. Use the colors listed on the pattern or mix and match your own color choices to create your own unique design. Since it's light and airy, this crocheted hat pattern can easily be worn any time of year and you don't have to worry about getting too hot.


Materials:
- 2 skeins Worsted Weight yarn in the colors of your choice
- Main Color (MC) 80-150 yards
- Contrasting Color (CC) 20-50 yards
- US H (5.0 mm) crocheted hook
Gauge: 9dc x 4 rows – 2”
Size:
- Newborn – 6 months; 13-15” circumference
- 6 – 18 months; 16-18” circumference
- Toddler – kids; 19-21” circumference
- Adult; 22-24” circumference
Notes:
- Ch1 at beginning of row does not count as stitch.
- To minimize loose ends, do not fasten off at each color change, instead, run the unused color along the inside picking up for each row as necessary.
- Instructions are given for Adult sizes, for smaller sizes end crown row as indicated: Newborn – 6 months; Round 4; 6 – 18 months; Round 5; Toddler – kids; Round 6
Instructions:
- Rnd 1: With MC, make a magic loop, ch1, 12sc in center. Join with sl st to beg sc. (12 sc)
- Rnd 2: Ch1, 2dc in each st. Join with sl st to beg dc. (24 dc)
- Rnd 3: Ch1, dc in same st, 2 dc in next st, [dc in next st, 2dc in next st] to end. Join with sl st to beg dc. (36 dc)
- Rnd 4: Ch1, dc in same st and next st, 2dc in next st, [dc in next 2 sts, 2dc in next st] to end. Join with sl st to beg dc. Diameter should be 4 1/4 ”. (48 dc)
- Rnd 5: Ch1, dc in same st and next 2 sts, 2dc in next st, [dc in next 3 sts, 2dc in next st] to end. Join with sl st to beg dc. Diameter should be 5 1/4”. (60 dc)
- Rnd 6: Ch1, dc in same st and next 3 sts, 2dc in next st, [dc in next 4 sts, 2dc in next st] to end. Join with sl st to beg dc. Diameter should be 6 1/4” (72 dc)
- Rnd 7: Ch1, dc in same st and next 4 sts, 2dc in next st, [dc in next 5 sts, 2dc in next st] to end. Join with sl st to beg hdc. Diameter should be 7 1/4”. 84 dc)
Sides
- Rnd 1: With CC, ch1, sc in same st, ch2, skip 2, [sc in next st, ch2, skip 2] to end. Join with sl st to beg sc and sl st into next ch2 opening.
- Rnd 2: With MC, ch3, 2dc in same ch2 space, [3dc in next ch2 space] to end. Join with sl st to top of beg ch3, sl st in next 2 dc, sl st into opening before next 3 dc.
- Rnd 3: With CC, ch1, sc in same st, ch2, skip 2, [sc in space between next 3dc grouping, ch2, skip 2] to end. Join with sl st to beg sc and sl st into next ch2 opening.
- Rnd 4: With MC, ch3, 2dc in same ch2 space, [3dc in next ch2 space] to end. Join with sl st to top of beg ch3, sl st in next 2 dc, sl st into opening before next 3 dc.
- Repeat Rnds 3 & 4 until piece measures the desired length less 1” from crown. In last repeat of Rnd 4, stop after joining to the top of ch3, continue with Band or Brim instructions.
For Hat with Band
Do not Join rounds; place a stitch marker at beginning of each round.
- Rnd 1 – 4: With CC, ch1, sc in same st and each remaining st. Do not join, place stitch marker to mark beginning of each row.
- Rnd 5: sl st in each st around. Fasten off.
For Hat with Brim
Do not Join rounds; place a stitch marker at beginning of each round.
- Rnd 1 – 3: With CC, ch1, sc in same st and each remaining st. Do not join, place stitch marker to mark beginning of each row.
- Rnd 4: [sc next 11 sts, 2sc in next] to end.
- Rnd 5-7: [sc next 5 sts, 2sc in next] to end.
- Rnd 8: sc in each sc to end.
- Rnd 9: With MC, ch1, sc in same st, ch1, skip 1, sc in next st one row below (space between Rnd 7 & 8). Join with sl st to beg sc. Fasten off.
Flower
- Rnd 1: With MC, make a magic loop, 8 sc in center. Join with sl st to beg sc. (8 sc)
- Rnd 2: ch1, 2dc in each st. Join with sl st to beg dc. (16 dc)
- Rnd 3: Join CC, ch1, starting in the same st, [(sc, hdc, dc, tr) in next st, (tr, dc, hdc, sc) in next st] 8 times. Join with sl st to beg sc. Fasten off. (8 petals)
Read NextFootball Season Beanie
Your Recently Viewed Projects
Thanks for your comment. Don't forget to share!
scoopercindy 85010 59
May 13, 2014
Made this in one rainy evening watching TV. Made the brim a little longer so it would be more like a floppy hat. I did find the whole hat worked up a little larger but being that I made it in one night, I'll be making more in different colors, adjusting it as I go. Can't go wrong with this hat!
Report Inappropriate Comment
Are you sure you would like to report this comment? It will be flagged for our moderators to take action.
Thank you for taking the time to improve the content on our site.