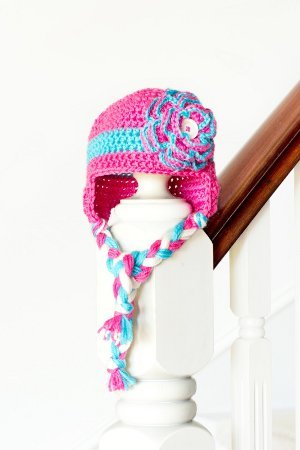
Blue Raspberry Crocheted Hat
Little ladies of all sizes will love this Blue Raspberry Crocheted Hat. Great for cooler weather, this hat has built-in ear flaps to help keep your ears nice and warm. The crocheted flower embellishment also adds a nice touch to the hat and makes it fun for girls of all ages to wear. You can make the flower match the hat or use opposite colors to help give your flower striking flair. Simple enough for beginners, this cute crochet hat pattern makes a wonderful gift for your friends or yourself!

Materials:
- 6.00mm Crochet Hook
- 4.50mm Crochet Hook
- 2 Colours of 50g 8ply Yarn (Raspberry Pink adn Turquoise)
- 20g of 8ply Yarn {White}
- 1.5 x 1.5 Inch White Button
- Scissors
- Tapestry/Wool Needle
Instructions:
3 - 6 Months Old: Head Circumference 16 inches, 40cm. Hat Height 6.5 inches, 16.5cm
Chains at the start of a round count as the first Half Double Crochet of that round
- Round 1 Taking your 6.00mm crochet hook and raspberry pink yarn, start of by making a Slip Knot, then crochet 2 Chains. Crochet 7 Half Double Crochets into the first chain you made. Slip Stitch into the top of chain 2. You should have 8 half double crochets now.
- Round 2 Chain 2, then crochet a Half Double Crochet into the same stitch. Crochet 2 Half Double Crochets into every stitch all around. Slip Stitch into the top of chain 2. You should have 16 half double crochets now.
- Round 3 Chain 2, then crochet a Half Double Crochet into the same stitch. *Crochet 1 Half Double Crochet. Then crochet 2 Half Double Crochets in the next stitch. Repeat from the * all around. Slip Stitch into the top of chain 2. You should have 24 half double crochets now.
- Round 4 Chain 2, then crochet a Half Double Crochet into the same stitch. *Crochet 1 Half Double Crochet into the next 2 stitches. Then crochet 2 Half Double Crochets in the next stitch. Repeat from the * all around. Slip Stitch into the top of chain 2. You should have 32 half double crochets now.
- Round 5 Chain 2, then crochet a Half Double Crochet into the same stitch. *Crochet 1 Half Double Crochet into the next 3 stitches. Then crochet 2 Half Double Crochets in the next stitch. Repeat from the * all around. Slip Stitch into the top of chain 2. You should have 40 half double crochets now.
- Round 6 Chain 2, then crochet a Half Double Crochet into the same stitch. *Crochet 1 Half Double Crochet into the next 2 stitches. Then crochet 2 Half Double Crochets in the next stitch. Repeat from the * all around. Slip Stitch into the top of chain 2. You should have 53 half double crochets now.
- Round 7 - 9 Chain 2. Crochet 1 Half Double Crochet into every stitch all around. Slip Stitch into the top of chain 2.
- Round 10 - 12 Change yarn colour to turquoise. Chain 2. Crochet 1 Half Double Crochet into every stitch all around. Slip Stitch into the top of chain 2.
- Round 13 - 14 Change yarn colour to raspberry pink. Chain 2. Crochet 1 Half Double Crochet into every stitch all around. Slip Stitch into the top of chain 2.
- Round 15 Chain 2. Crochet 1 Half Double Crochet only into the next 35 stitches. {Note: This is starting to create the back of the hat as well as the ear-flaps.}
- Round 16 Chain 2. Crochet 1 Half Double Crochet into the next 35 stitches. Do NOT fasten off, as you will be crocheting the left ear-flap in the same place.
Ear Flaps
Left Ear-Flap
- Row 1 Chain 1. Crochet 1 Half Double Crochet Decrease. Crochet 1 Half Double Crochet into the next 6 stitches. Then crochet 1 Half Double Crochet Decrease.
- Row 2 Chain 1. Crochet 1 Half Double Crochet Decrease. Crochet 1 Half Double Crochet into the next 4 stitches. Then crochet 1 Half Double Crochet Decrease.
- Row 3 Chain 1. Crochet 1 Half Double Crochet Decrease. Crochet 1 Half Double Crochet into the next 2 stitches. Then crochet 1 Half Double Crochet Decrease.
- Row 4 Chain 1. Crochet 2 Half Double Crochet Decreases.
- Fasten off, and weave in loose ends.
Right Ear-Flap
- Start of by attaching your raspberry pink yarn to the last stitch of Round 16.
- Right across from where the left ear-flap is.
- Row 1 Chain 1. Crochet 1 Half Double Crochet Decrease. Crochet 1 Half Double Crochet into the next 6 stitches. Then crochet 1 Half Double Crochet Decrease.
- Row 2 Chain 1. Crochet 1 Half Double Crochet Decrease. Crochet 1 Half Double Crochet into the next 4 stitches. Then crochet 1 Half Double Crochet Decrease.
- Row 3 Chain 1. Crochet 1 Half Double Crochet Decrease. Crochet 1 Half Double Crochet into the next 2 stitches. Then crochet 1 Half Double Crochet Decrease.
- Row 4 Chain 1. Crochet 2 Half Double Crochet Decreases.
- Fasten off, and weave in loose ends.
Border
- Taking your 6.00mm crochet hook and raspberry pink yarn, start of by making a Slip Knot, then attach your yarn to the back of the hat, right in the middle.
- Then Single Crochet all along the edge of your hat. Slip Stitch into the first single crochet.
- Fasten off, and weave in loose ends.
Braided Tassels
- Taking your raspberry pink, turquoise and snow white yarn, cut 12 strands of yarn (4 of each colour), each 30 inches long. Then make a simple knot into the bottom of the left ear-flap. Make a loose braid as short or long as you like, (Mine was 8 inches) then tie a knot at the end, and cut of any excess yarn.
- Repeat for the right ear-flap.
Flower
- Taking your 4.50mm crochet hook and raspberry pink yarn, start of by making a Slip Knot, then crochet 61 Chains. {Note: If you'd like your flower to be larger or smaller, simply add or take away sets of 3 chains till you've reached your desired length.}
- Row 1 Chain 2, skip 3 chains from your hook, then crochet Half Double Crochets all across into every chain.
- Row 2 Chain 4, skip 2 stitches and then crochet a Half Double Crochet into the third stitch.
- *Chain 3, skip 2 stitches and then crochet a Half Double Crochets into the third stitch. Repeat from the * mark all across.
- Row 3 *Chain 3 then crochet 3 Double Crochets into the first loop you made in the previous row. Chain 3 then Slip Stitch down into the loop. Then crochet a Slip Stitch into the next loop. Repeat from the * mark all across, making sure to finish off with a Slip Stitch. {These will be your flower petals.}
- After doing the last double crochet of your last petal, Chain 3, then Slip Stitch down into the loop.
- Fasten off, making sure to cut the strand of yarn at about 30cm {You'll need it later on}.
Border

- Start of by attaching your turquoise yarn to the first stitch of Row 3. Then Slip Stitch into every stitch till you reach the end of the flower strip.
- Fasten off, and weave in loose ends.
Assembly

- To form your flower, lay your long strip of petals down in a circle, working your way in. In the photo below I laid it down quite loosely to help show you all how to do it. However, you'll want to lay it down a lot tighter.
- Then, taking your wool needle, start sewing the flower together using the 30cm strand of yarn you leftover before.
- Once you've sewed your flower together take your tapestry needle and sew the white button right in the middle. Then sew the flower onto your hat.
- Fasten off, and weave in loose ends.
Your Recently Viewed Projects
Thanks for your comment. Don't forget to share!
lpalmer59 7490208
Mar 04, 2016
I made this hat for my 3 yr old Granddaughter and she just loves it and looks so adorable in it. She just loves pulling on the braids on both sides of her head. Whenever mom puts the hat on her, she pulls down on both braids to make sure the hat is on nice and snug, she is just so cute. She is going to be like me, and love her hats.
Report Inappropriate Comment
Are you sure you would like to report this comment? It will be flagged for our moderators to take action.
Thank you for taking the time to improve the content on our site.