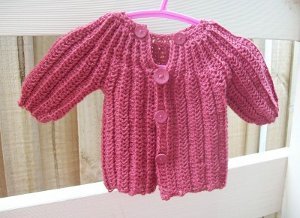
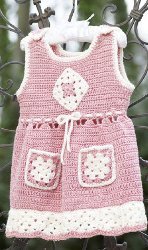
Crochet Jumper with Granny Pockets
Use this easy crochet pattern from Premier Yarns to make a cute outfit for your little girl. She'll look so adorable in this jumper that has granny pockets for all her findings. Serenity sport weight yarn is used.

Materials:
- Deborah Norville Collection: Serenity Sport Weight
- 300-12 Pink (MC) – 1 (1, 2) balls
- 300-02 Ivory (CC) – 1 (1, 1) ball
- Crochet hook: US G-6 (4mm)
- Yarn needle
- Two ¾" buttons
- Sewing needle and thread (for attaching buttons)
-
Gauge 16 sc and 24 rows = 4" (10cm). Use any size hook necessary to obtain
the specified gauge.
Instructions are for size 12 months; changes for sizes 2 and 4 are in parentheses.
Abbreviations
ch(s) – chain(s)
cm – centimeter(s)
dc – double crochet(s)
hdc – half double crochet(s)
lp(s) – loop(s)
mm – millimeter(s)
rem – remaining
rep – repeat
sc – single crochet(s)
sk – skip
sl st – slip stitch
sp – space
st(s) – stitch(es)
* – repeat instructions after the asterisk the number of times specified.
Instructions:
Bodice Front
Row 1 (RS): With MC, ch 41 (47, 51), sc in second ch from hook and in each ch across; turn – 40 (46, 50) sc.
Row 2: Ch 1, sc in each sc across; turn.
Row 3: Ch 2 (does not count as a dc), dc in each sc across; turn.
Rows 4 and 5: Ch 1, sc in each st across; turn.
Row 6: Ch 2, dc in each sc across; turn.
Row 7: Ch 1, sc in each dc across. Fasten off.
Shape Armholes
Row 8: With WS facing, skip first 4 sc and join MC with a sl st in next sc, ch 1, sc in same st and in each of next 31 (37, 41); turn, leaving rem sts unworked – 32 (38, 42) sc.
Row 9: Ch 1, sk first sc, sc in each sc across to last 2 sc, sk next sc, sc in last sc; turn – 30 (36, 40) sc.
Row 10: Ch 1, sc in each sc across; turn.
Rows 11-14: Rep Rows 9 and 10 twice – 26 (32, 36) sc.
Rows 15-17 (19, 21): Ch 1, sc in each sc across; turn.
Right Shoulder
Row 18 (20, 22): Ch 1, sc in first 11 sc; turn, leaving rem sts unworked.
Row 19 (21, 23): Ch 1, sk first sc, sc in each sc across; turn – 10 sc.
Row 20 (22, 24): Ch 1, sc in each sc across; turn.
Rows 21 (23, 25) - 24 (26, 28): Rep last 2 rows, twice – 8 sc. Fasten off at end of last row.
Left Shoulder
Row 18 (20, 22): With WS facing, skip next 4 (10, 14) sc on Row 17 (19, 21) and join MC with a sl st in next sc, ch 1, sc in same st and in each sc across; turn – 11 sc.
Row 19 (21, 23): Ch 1, sc in each sc across to last 2 sc, sk next sc, sc in last sc; turn – 10 sc.
Row 20 (22, 24): Ch 1, sc in each sc across; turn.
Rows 21 (23, 25) - 24 (26, 28): Rep last 2 rows, twice – 8 sc. Fasten off at end of last row.
Bodice Back
Work same as Bodice Front through Row 24 (26, 28) of Right Shoulder; do not fasten off; turn.
Row 25 (27, 29): Ch 2, dc in each sc across; turn.
Row 26 (28, 30): Ch 1, sk first dc, sc in each of next 5 dc, sk next dc, sc in last dc; turn – 6 sc.
Row 27 (29, 31): Ch 2, dc in each sc across; turn.
Row 28 (30, 32): Ch 1, sc in each dc across; fasten off.
Continue to work Left Shoulder same as Bodice Front Left Shoulder through Row 24 (26, 28); do not fasten off; turn.
Complete same as Right Shoulder.
Sew Bodice side seams.
Bodice Trim
Rnd 1: With RS facing, join CC with a sl st at side seam, ch 2, hdc in same st, hdc evenly around the bodice armholes, straps and neckline; join with a sl st in first st.
Rnd 2: Sl st in each hdc around; fasten off.
Bodice Granny Square (make 2)
With MC, ch 4, join with a sl st in first ch to form a ring.
Rnd 1: Ch 5, * 3 dc in ring, ch 2, rep from * 2 more times, 2 dc in ring; join with a sl st in third ch of beg ch-5; fasten off.
Rnd 2: With RS facing, join CC with a sl st in any ch-2 sp, ch 5, 3 dc in same sp, * ch 1, (3 dc, ch 2, 3 dc) in next ch-2 sp, rep from * 2 more times, ch 1, 2 dc in same ch-2 sp as beg ch-5; join with a sl st in third ch of beg ch-5.
Rnd 3: Ch 5, 3 dc in same sp, ch 1, 3 dc in next ch-1 sp, ch 1, * (3 dc, ch 2, 3 dc) in next ch-2 sp, ch 1, 3 dc in next ch-1 sp, ch 1, rep from * 2 more times, 2 dc in same ch-2 sp as beg ch-5; join with a sl st in third ch of beg ch-5; fasten off.
Weave in loose ends.
Turn the granny 45 degrees for diamond shape, center one on the front and back of Bodice; sew in place.
Jumper Skirt
Rnd 1: With RS facing and working in free lps of beg foundation ch, join MC with sl st to bottom of Bodice at side seam, ch 1, work 84 (96, 102) sc evenly spaced around, sl st in first sc.
Rnd 2: Ch 2, dc in each sc around; join with a sl st in first dc.
Rnd 3: Ch 5, sk next 2 dc, 5 dc in next dc, ch 2, sk next 2 dc, dc in next dc, ch 2, * sk next 2 dc, 5 dc in next dc, ch 2, sk next 2 dc, dc in next dc, ch 2, rep from * around; join with a sl st in third ch of beg ch-5.
Rnd 4: Ch 1, 2 sc in next ch-2 sp, sc in next 5 dc, 2 sc in next ch-2 sp, * sk next dc, 2 sc in next ch-2 sp, sc in next 5 dc, 2 sc in next ch-2 sp, rep from * around; join with a sl st in first sc – 126 (144, 153) sc.
Rnd 5: Ch 2, dc in each sc around; join with a sl st in first dc.
Rnd 6: Ch 1, sc in each dc around; join with a sl st in first sc.
Rep Rnds 5 and 6 until Skirt measures approximately 6 (8, 10)" from beg, or 1" above the knee or 2½" less than desired finished length.
Pocket Squares (make 2)
With CC, ch 4, join with a sl st in first ch to form a ring.
Rnd 1 (RS): Ch 5, * 3 dc in ring, ch 2, rep from * 2 more times, 2 dc in ring; join with a sl st in third ch of beg ch-5 – 12 sts.
Rnd 2: Sl st in next ch-2 sp, ch 5, 3 dc in same sp, * ch 1, (3 dc, ch 2, 3 dc) in next ch-2 sp, rep from * 2 more times, ch 1, 2 dc in same ch-2 sp as beg ch-5; join with a sl st in third ch of beg ch-5; fasten off.
Rnd 3: With RS facing, join MC with a sl st in any ch-2 sp, ch 5, 3 dc in same sp, ch 1, 3 dc in next ch-1 sp, ch 1, * (3 dc, ch 2, 3 dc) in next ch-2 sp, ch 1, 3 dc in next ch-1 sp, ch 1; rep from * 2 more times, 2 dc in same ch-2 sp as beg ch-5; join with a sl st in third ch of beg ch-5; fasten off.
Rnd 4: With RS facing, join CC with a sl st in any corner ch-2 sp, ch 1, * 3 sc in corner ch-2 sp, sc in each dc and in each ch-1 sp across to next corner ch-2 sp; rep from * around; join with a sl st in first sc; fasten off.
Sew Pockets to the front of the skirt.
Hem Squares—Make 13 (15, 16)
With CC, ch 4, join with a sl st in first ch to form a ring.
Rnd 1 (RS): Ch 5, * 3 dc in ring, ch 2; rep from * 2 more times, 2 dc in ring; join with a sl st in third ch of beg ch-5 – 12 sts.
Rnd 2: Sl st in next ch-2 sp, ch 5, 3 dc in same sp, * ch 1, (3 dc, ch 2, 3 dc) in next ch-2 sp; rep from * 2 more times, ch 1, 2 dc in same ch-2 sp as beg ch-5; join with a sl st in third ch of beg ch-5; fasten off.
Finishing
Sew Hem Squares together to form a ring, then sew ring to bottom of Skirt. With RS facing, join MC with a sl st in bottom edge of any Hem Square, ch 2, dc evenly around the bottom of the Hem Squares; join with a sl st in first dc; fasten off.
Sew buttons to front shoulder straps. Spaces between dc on back straps are used as buttonholes.
Bow: With a double strand of CC, make a 38 (40, 42)" chain; weave in and out of Rnd 2 of Skirt and tie in a bow at center front.
If you think this free crochet pattern is adorable, check out our collection of 15 Cute Free Crochet Patterns for Babies.
Read NextAdorable Crocheted Baby Dress
Your Recently Viewed Projects
Thanks for your comment. Don't forget to share!
nelly dean
Jul 01, 2010
Hi I cant wait to make this for my gorgeous granddaughter Evie. Im going to change the hem by fluting it out a little. bye nelly
spooker55076 05963 32
Apr 10, 2012
Nelly dean, How are you going to flute ot the hem?? I would like to flair the skirt out at the waist, hoe would I do that??
Report Inappropriate Comment
Are you sure you would like to report this comment? It will be flagged for our moderators to take action.
Thank you for taking the time to improve the content on our site.