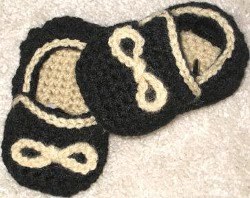
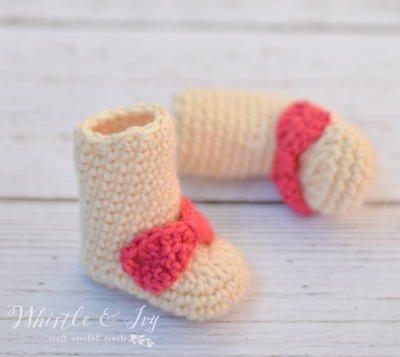
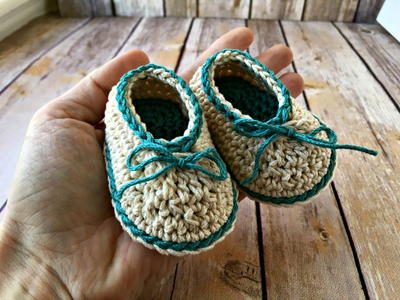
Slippons for Boy
Make these adorable booties for your child or as a gift. The easy to follow crochet pattern will result in the cozy Slippons for Boy, perfect for a son or nephew.

Materials:
Worsted weight yarn in 3 colors. I used Redheart super saver yarn as follows:
- Color A- Buff for sole
- Color B-Lavender for sides and toe top
- Color C- For bunny ear lace tie
- Hooks- H(5mm) and F(3.75mm) for sizes 0-3 months and 3-6 months.
- Hooks- H (5mm), I(5.5mm) and F (3.75mm)for sizes 6-9 and 9-12 months.
- Soles for all sizes used H hook only.
- Sewing needle with matching thread.
Size:
To fit ages 0-3, 3-6, 6-9, 9-12 Months
Finished measurements for sole:
0-3 months: 3 ½ inches long and 2 inches wide.
3-6 months: 3 ¾ inches long and 2 inches wide.
6-9 months: 4 ¼ inches long and 2 ¼ inches wide.
9-12 months: 4 ½ inches long and 2 ¼ inches wide.
Gauge:
Use finished sizes of soles for gauge.
Stitch Explanation:
1.Hdc2tog : [Yarn over, insert hook into next stitch and pull up a loop] twice to get 5 loops on the
hook, yarn over and pull through all 5 loops on the hook.
Stitch Abbreviations:
Pattern is in standard American terms.
sc- single crochet
sl st- slip stitch
hdc- half double crochet
ch- chain
(Bigger sizes are given in the brackets)

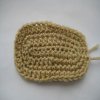
Sole:
1. Work around foundation chain without turning
2. Finished sole with wider toe side
Sole Pattern:
Tips for sole:
1.Count your stitches after every round. At end of each round when pattern says sl st into
beginning ch 1, you sl stitch into the next st visible and when it says sl st to 1st sc of the
round you skip ch 1 ( next st visible ) and then slip st to the next st, the 1st sc.
2.Some rounds involve a mix of sc and hdc to make the toe side wider. It would be a good idea to use the cursor and mark on the pattern here to know where you are. You might get confused with all the counting.
For sizes 0-3 (3-6 )months work sole as follows (for 3-6 months in brackets) :
With color A and hook H chain 10 (12). Chain tightly to maintain gauge and keep your sole stiff.
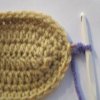
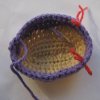
• Round 1: 1 sc into 2nd chain from hook,1 sc in each remaining chain across to last chain, 3 sc in last chain. Do not turn. Work along opposite side of foundation chain as shown in pic 1 above, sc in each chain across, join with sl st in beginning ch 1------20 sc (24 sc)
• Round 2: ch 1 , 2 sc in next st, 1 sc in next 3 st(4 st), 1 hdc in next 4 st(5st), 2 hdc in each of next 3 st, 1 hdc in next 4 st(5 st), 1 sc in next 3 st(4st), 2sc in next st, 1sc in next(joining st of previous round) , sl st into top of beginning ch 1---------26 st(30 st)
• Round 3: ch 1, sc in next st, 2 sc in next st, 1 sc in each of next 8 st(10 st), 2 sc in next st, 1 sc in next 4 st, 2 sc in next st, 1 sc in next 8 st( 10 st), 2 sc in next st, 1 sc in next, sl st to 1st
sc------------30 st( 34 st)
• Round 4: ch 1, 1 sc in next 2 sts, 2 sc in next st, 1 sc in next 5st (6 st), 1 hdc in next 4 st( 5 st) , 2 hdc in next, 2 hdc again in next, 1 hdc in next 2 st, 2 hdc in next st, 2 hdc in next st again, 1 hdc in next 4 st( 5st) , 1 sc in next 5st(6 st), 2 sc in next, 1 sc in next 2 st, sl st to 1st sc. Fasten off--------------36 st( 40 st)
For sizes 6-9 ( 9-12) months work sole as follows (for 9-12 months given in brackets) :
Using H hook and color A chain 13 (14). Chain tightly to maintain gauge and keep your sole
stiff.
• Round 1: 1 sc into 2nd ch from hook, 1 sc in next 6 st( 7 st), 1 hdc in next 4 st, 3 hdc in last ch, 1 hdc in next 4 st., 1sc in each chain across, sl st to beginning ch 1----------- 26 st( 28 st)
• Round 2: ch 1, 2 sc in next st, 1 sc in next 5 st( 6 st), 1 hdc in next 5 st, 2 hdc in each of next 4 st, 1 hdc in next 5 st, 1 sc in next 5 st(6st), 2 sc in next, sl st to beginning ch 1------- 33 st(35 st)
• Round 3: ch 1, 1 sc in next st, 2 sc in next st, 1 sc in next 12 st(13 st), 2 sc in next st, 1 sc in next center 3 st, 2 sc in next, 1 sc in next 12 st(13st), 2 sc in next, 1 sc in next st, sl st to beginning ch 1-------- 38 st(40 st)
• Round 4: ch 1, 1 sc in next 2 st, 2 sc in next, 1 sc in next 7 st( 8st), 1 hdc in next 5st, 2 hdc in next, 2 hdc again in next st, 1 hdc in next 3 st, 2 hdc in next st, 2 hdc again in next st, 1 hdc in next 5 st, 1 sc in next 7 st(8st), 2 sc in next, 1 sc in next 2 st, sl st to 1st sc. Fasten off----------43 st(45st)
Sides:
Side Pattern:
Variations for bigger sizes given in brackets in order 0-3 (3-6, 6-9, 9-12)
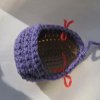
Round 5: With H hook( H hook, I hook, I hook) Join the next color B with a slip st where you fastened off and Ch 1 as in pic 1 above. . With right side of sole facing up work in back loops only, 1 hdc in next st and 1 hdc in each st around, join with slip st in top of beginning ch 2.
Round 6: Ch2, working in both the loops now, 1 hdc in next st , 1 hdc in each st around; Join with sl st in top of beginning chain 2. Fasten off. This is the ankle side of the shoe, the wider side.
Turn the sides up making the wrong side of the sole facing you. The right side of the sole will now form the outer sole of your shoe and the wrong side will be inside the shoe facing up.

Toe Top:
1. Mark the center 8 st using stitch markers.
2. Work toe top flap
3.Slip st toe flap to side on wrong side.
4.Turn the shoe right side out.
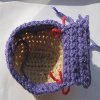
Fold the booties into half using the middle line on the sole as a guide. The toe side is the side in which the sole is wider. Count center 8 st at toe top and mark it using stitch markers as in pic 1 above. You will have 6 st between the marked stitches. Work toe flap into these 8 st as follows:
Use Hook H( H hook, I hook I hook)
Row 1: ( With ankle side near you,work only into the front loops on toe side, the inner loops, in this row) Sl st into marked stitch, 1 sc into same marked stitch, sc into next 7 st ------ 8sc. Turn
Work in both loops for the rest of the rows.
Rows 2-3 (Rows 2-4, Rows 2-5, Rows 2-6) : Ch 1, sc in same st as ch 1, sc in next 7 sc--- 8sc . Turn
Work next 2 rows with increases:
Row 4( Row 5, Row 6, Row 7) :Ch1, 2sc into same st as ch 1 (increase made), 1 sc into each of next 6
st, 2sc in last st - ----10sc
Row 5(Row 6, Row 7, Row 8): Ch1, 2sc into same st as ch 1( increase made), 1sc into each of next 8
st, 2 sc in last st-----12 sc
Row 6 (Row 7,Row 8,Row 9): Ch2, 1 hdc into next st, 1 hdc in each of next 10 st----12 hdc . Fasten
off (no increase in this row)
Switch to F hook to get a tight stitch.
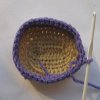
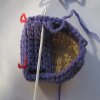
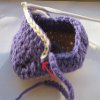
Turn the shoe inside out . Align the toe top and sides, leave the last row of hdc free and slip stitch the rest of the toe top through 4 st ( 5st, 6st, 7st ) on the sides as shown in pic 3 above (use the same color yarn). Do on both sides. Turn the shoe right side out.

Finishing:
1.Fold in half and mark the center 12 stitches at back ankle side.
2.Make lace and work hdc around.
3. slip st starting under toe flap.
4. Ch and make bunny ears.
Finishing Pattern:
Fold booties in half again and mark center 12 stitches on ankle side as seen in the pic 1 above (10 st between the marked stitches). You will be working a few decreases between these markers.
1 Using F hook ch 25 to make a lace. Change to H hook (H hook, I hook, I hook) and sl st the lace into the stitch right under toe flap and work along the ankle side as follows:
Sizes 0-3 and 3-6 months(hook H)
1.1hdc into next st and each st till the marked st, (hdc2tog in next 2 st) twice, 1 hdc in each stitch till 3 st left before the marked one,( hdc2tog in next 2 st)twice, 1 hdc in each st till 1 st left under toe top, ch 1 and sl st into last st right under toe flap, switch back to F hook ,ch 25 for lace and fasten off leaving
1 ½ inch tail. You can wrap a ½ inch cello tape on the lace tips to prevent fraying. Now to increase height of shoe on ankle side, mark the center 10 st on ankle side. Sl st into 1st marked st, sc into next st, 1 hdc in next 6 st, sc in next st, sl st in next marked st . Fasten off.
Sizes 6-9 and 9-12 Months( Hook I):
1. 1 hdc into next st and each st till marked st, (hdc2tog in next 2 st) 6 times, ending in marked st. 1 hdc in each st till 1 st left under toe top, ch 1 and sl st into last st right under toe flap, switch back to F hook ,ch 25 for lace and fasten off leaving 1 ½ inch tail. You can wrap a ½ inch cello tape on the lace tips to prevent fraying. Now to increase height of shoe on ankle side, mark the center 10 st on ankle side. Sl st into 1st marked st, sc into next st, hdc in next 6 st, sc in next st, sl st in next marked st .
Fasten off.
For all sizes:
1. Using Color C and hook H , sl st around the opening starting from under toe top as seen in pic 3 above. When you reach the last st, sl st into it, take the hook out of the loop and inserting hook from under toe flap pull the loop under the toe flap and fasten off.
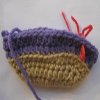
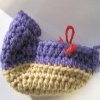
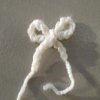
2. Using color C and hook F make ch 34, tie it like bunny ears as seen in pic 4 above, pull both
tails through toe top, tie the ends on wrong side. Sew the bunny ears in position using sewing
thread and needle.
3. Weave in all the ends .
4. Make one more shoe following the same pattern.