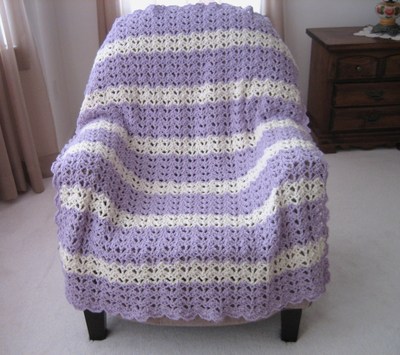
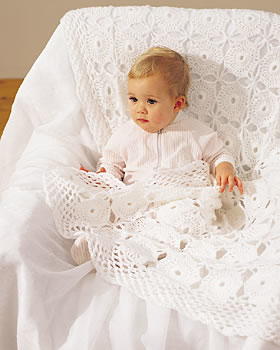
Crochet Lace Baby Blanket Pattern
This baby blanket crochet pattern creates an open lace design for a beautiful blanket. The openwork blanket looks best in white yarn. This lovely Crochet Lace Baby Blanket would make a wonderful gift for a new little one, and could also be used as a baptism or christening gift. Create this lovely baby afghan and give a sweet baby a cherished and meaningful heirloom that is sure to be treasured and appreciated for years to come.


Find this beautiful project and more in our collection of 41 Easy Crochet Baby Blanket Patterns.
Materials:
- 3 balls Bernat Softee Baby (140 g/5 oz) yarn in White
- 5 mm (U.S. H/8) crochet hook, or size needed to obtain gauge
Gauge: One Motif = 3¾ ins 9.5 cm square.
Instructions:
Approx 36 x 47 ins 91.5 x 119.5 cm.
First Strip
First Motif
- Ch 6. Join with sl st to form ring.
- 1st rnd: Ch 3 (counts as dc). 23 dc in ring. Sl st in top of ch 3.
- 2nd rnd: Ch 3 (counts as dc). 1 dc in each dc to end of rnd. Sl st in top of ch 3. 24 sts.
- 3rd rnd: Ch 3 (counts as dc). *1 dc in each of next 5 sts. (2 dc. Ch 7. 2 dc) in next st (corner st). Rep from * twice. 1 dc in each of next 5 sts. (2 dc. Ch 7. 1 dc) in sl st. Sl st in top of ch 3. Fasten off.
Second Motif
- Work first 2 rnds as given for 1st Motif.
- 3rd rnd: Ch 3 (counts as dc). *1 dc in each of next 5 sts. (2 dc. Ch 7. 2 dc) in next st (corner st). Rep from * once. 1 dc in each of next 5 sts. 2 dc in next st. With RS of 1st Motif facing, join to left top corner of 1st Motif as follows: Ch 3. Sl st in 4th ch of corner ch of 1st Motif. Ch 3. 2 dc in same st. 1 dc in each of next 3 sts. Sl st in 3rd dc on side edge of 1st Motif. 1 dc in each of next 2 sts. 2 dc in sl st. Ch 3. Sl st in 4th ch of next corner of 1st Motif. Ch 3. 1 dc in same sl st. Sl st in top of ch 3.
- Fasten off.
- Make 9 more motifs joining each to previous motif as given for Second Motif.
Second Strip
First Motif
- Work first 2 rnds as given for First Motif of First Strip.
- 3rd rnd: Ch 3 (counts as dc). *1 dc in each of next 5 sts. (2 dc. Ch 7. 2 dc) in next st (corner st). Rep from * once. 1 dc in each of next 5 sts. 2 dc in next st. With RS of previous strip facing, join to left bottom corner of 1st Motif as follows: Ch 3. Sl st in 4th ch of corner ch. Ch 3. 2 dc in same st. 1 dc in each of next 3 sts. Sl st in 3rd dc on side edge of 1st Motif. 1 dc in each of next 2 sts. 2 dc in sl st. Ch 3. Sl st in 4th ch of next corner of 1st Motif. Ch 3. 1 dc in same sl st. Sl st in top of ch 3.
- Fasten off.
Second Motif
- Work first 2 rnds as given for First Motif of First Strip.
- 3rd rnd: Ch 3 (counts as dc). *1 dc in each of next 5 sts. (2 dc. Ch 7. 2 dc) in next st (corner st). 1 dc in each of next 5 sts. 2 dc in next st. With RS of 1st Motif facing, join to left bottom corner of 1st motif of 2nd Strip as follows: Ch 3. Sl st in 4th ch of corner ch of 1st Motif. Ch 3. 2 dc in same st. 1 dc in each of next 3 sts. Sl st in 3rd dc on top edge of 1st Motif. 1 dc in each of next 2 sts. 2 dc in next st. Ch 3. Sl st in 4th ch of next corner. Ch 3. 2 dc in same st. 1 dc in each of next 3 sts. Sl st on side edge of 2nd Motif. 1 dc in each of next 2 sts. 2 dc in sl st. Ch 3. Sl st in 4th ch of next corner. Ch 3. 1 dc in same sl st. Sl st in top of ch 3.
- Fasten off.
- Make 9 more motifs joining each to previous motifs as given for Second Motif.
Third to Eighth Strips
- Work as given for Second Strip.
Border
- 1st rnd: Join yarn in top left corner ch-7 sp. Ch 4. *(1 sc in next dc. Ch 4. Miss 3 dc) twice. 1 sc in next dc. Ch 4. (1 sc in next ch-7 sp. Ch 4) twice.* Rep from * to * 9 times more. **(1 sc in next dc. Ch 4. Miss 3 dc) twice. 1 sc in next dc. Ch 4. 1 sc in ch-7 sp. Ch 4. 1 sc in same ch-7 sp (corner). Ch 4.** Rep from * to * 7 times more. Rep from ** to ** once. Rep from * to * 10 times more. Rep from ** to ** once. Rep from * to * 7 times more. (1 sc in next dc. Ch 4. Miss 3 dc) twice. 1 sc in next dc. Ch 4. 1 sc in next ch-7 sp. Ch 2. 1 dc in 1st sc.
- 2nd to 7th rnds: *Ch 4. 1 sc in next ch-4 sp. Rep from * to last ch-4 sp. Ch 4. 1 sc in last ch-4 sp. Ch 2. 1 dc in dc of previous rnd.
- 8th rnd: (Ch 4. 1 sc in next ch-4 sp) twice. *Ch 2. 4 dc in next ch-4 sp. Ch 2. (1 sc in next ch-4 sp. Ch 4) 3 times. 1 sc in next ch-4 sp. Rep from * to last ch-4 sp. 1 sc in next ch-4 sp. Ch 4. Sl st in dc of previous rnd. Fasten off.
Your Recently Viewed Projects
Thanks for your comment. Don't forget to share!
yofrendonna 927527 2
Apr 08, 2017
One of the easiest lacy afghans I have ever made. I have only been crocheting a couple of years, so I thought I would try this. Excellent instructions. I am doing a third afghan now using this pattern
Zeemer
Jun 07, 2016
This may not be Princess Charlotte's christening blanket but it can also be a princess' christening blanket because it is so cute and dainty. This can be made into a christening or baby shower gift. Thanks for the pattern which is just right in front of the page.
barblight 9134772
Jul 30, 2014
I am finding the pattern for the squares and how to join them easy to follow even though it is only the second thing I have crocheted but what does the sp on the border pattern mean
Melissa Ryan
Jul 31, 2014
Hi Barblight--Thanks for your comment. SP stands for space...so you're going to join the yarn to your pattern in the corner of the chain-7 space. Hope that helps!--FaveCrafts Editors
Nibit2U
Jul 27, 2014
These instructions are horrible. I've been crocheting for over 40 years, have done it all, seen it all and this is awful. Also, when making and giving crocheted blankets, please keep in mind the size of holes that many of these patterns have, they may be cute and beautiful, no question, but are they useful and safe?
FaveCrafts Editor JL
Jul 28, 2014
Hi there, Thanks so much for your comment. Is there a specific aspect of the pattern that you'd like clarified? We'd be happy to contact the designer. Thanks!
jcline09 6202245
Apr 21, 2014
I am having the same problem, can't get them connected together. Also what size crochet is being used? The one they say seems to be way to small for me to get them the size they are to be, i'm even trying a size 13 and maybe larger. Help!
Melissa Ryan
Apr 21, 2014
Hi jcline09--Thanks for your comment. The crochet hook size is listed above. It's a 5mm (US H8) hook size. Make sure you are using the correct yarn weight, as well. If the yarn is too thin or thick, it may not turn out like the photo. As for joining them together, you can check the company site (www.bernat.com) to see if they have a video and/or tutorial for joining the pieces together. Otherwise, we have a great community of readers on social media. Feel free to post your comment on our Facebook wall and see if one of our readers can help you out! Thanks again! --FaveCrafts Editor
jcline09 6202245
Jun 05, 2014
I have it all made but the border, hard time when I got to the end of square. I'm not real shore on how to go around the 7 ch.
FaveCrafts Editor JL
Jun 06, 2014
Hi there, For specific pattern-related questions, we suggest contacting the designer (Bernat Yarns) via the links in their designer profile. Thanks!
dawnshoe 1201863
Jan 08, 2014
i cannot join the first motif to the second. according to the directions the 3rd rnd on the 2nd motif is incomplete??? help!!
dawnshoe 1201863
Jan 08, 2014
http://speckless.wordpress.com/2011/05/21/join-as- == you-go-method-for-crochet-motifs/ i found this link and it helps for all of you needing help
songbirdsix 458248 4
Jul 11, 2013
This is the second crochet pattern I absolutely fell in love with where the lacy squares or motif's were easy to figure out but in the connecting them the directions were hard to figure out no matter how many times I have tried Kind of takes the air out of crocheting for me It's a beautiful blanket and I really wish this site had video tutorials instead so much easier to get it when you see it My brother is having a baby and I really wanted to make this for my new niece but like the other pattern on here I really loved and wanted to make for my daughter I have to toss it I've been crocheting for about a year and find the written directions to be very confusing and there are few sites that explain the connecting parts when it comes to the written directions Unfortunately I…Read More have no one to actually show me how to do them when I'm at a loss Such a shame as I would have loved this and the other blanket pattern to have become family heirlooms No wonder no one I know crochets too hard to figure out the freaking directions Hence the one star rating for me
faeriequeen2002 56 43277
Jan 18, 2015
It is very natural that you have difficulties if you are a beginner. I would advise you to start by doing projects in step-by-step tutorials, there are so many on the web! Or even videos. There are many videos on joining motifs too. Basically, on the last row, you take the last row of the preceding motif to secure it. There are a number of ways to do this. Get a book, watch a video and then you'll see you won't even need directions to be able to figure it out. You know what? You can even do the squares one by one and then sew them together. This said, I don't think such an openwork lace is suitable for a baby. I'd rather go for a softer but more compact stitch.
bremahaney 5080086
Jun 13, 2013
I am almost half way through this now. The most difficult part is the attaching as you go. The pattern is hard to understand, but I don't know how to say it better. Maybe a youtube video would help. Like Jenny said, once you know the motif the blanket isn't hard, just time consuming. Good luck to all of you who try this. It's worth figuring it out. It's beautiful. The border looks like it tops the afghan off! Love it.
mandkbennett 02819 26
Mar 19, 2013
please, please put it on you tube, it is a gorgeous blanket, but I can not understand it. If someone was on you tube, and showed how to join the motiff, it would be so helpful. Thank you in advance.
mandkbennett 02819 26
Mar 19, 2013
Can you do this pattern over you tube. that way we can see what you are actually joining the motiff.
akasha341 9217227
Feb 24, 2013
This is definitely NOT an easy pattern. I've been crocheting for decades and I cannot follow it.
jenny 9876068
Dec 03, 2012
I just finished this blanket took me part of a weekend I found it very easy once I figured out the motif When dealing with motifs if the directions don't give you a diagram use some graph paper to make one for yourself On some of the tougher patterns I work on I will get out the graph paper and pen the stitches out first Once you get the hang of the first motif and how you are going to attach it the blanket goes smoothly from there As stated before these are motifs that you attach as you go the only part in the pattern I thought was confusing was were they describes attaching the motifs by having the first motif rs facing to the motif you are attaching which didn't work for me put the motifs together ws together Just know that when working with motifs whatever you do…Read More on one side you do to the other side The biggest problem I see most people have is at the beginning chain and this pattern describes the beginning well The other part I saw that some of you could be having a problem with is that the motifs can twist as you are trying to put them together be sure and keep your work straight as you join it Other wise for a free pattern and balls of yarn I bought with coupons I have a beautiful gift for a mom with boys having her first girl I made it in pink
songbirdsix 458248 4
Jul 11, 2013
Well Jenny, it would be really nice if you could do a video tutorial showing how to connect the motif's since you seem like one of the few people here who figured it out. I really wanted to make this for my new niece who is due to make her debut in August. If you ever get the inkling, please let me know and where to find it. Many thanks!
debbiebotsford 854 0201
May 01, 2012
I am with Morinar on her comments! Would someone please let us all who want to complete this project amend the pattern so that is makes sense. I would really appreciate it as it is a beautiful blanket and would be a shame not to have some comments about the finished product by others. Thank you Debbie
akasha341 9217227
Feb 24, 2013
No way can I figure this pattern out and I've been crocheting since the 1970s!
akasha341 9217227
Feb 24, 2013
No way can I figure this pattern out and I've been crocheting since the 1970s!
Morinar
Jun 24, 2011
Question: On the 1st strip, 2nd motif joining to 1st, it says "1 dc in each of next 3 sts." is that supposed to happen on the 1st motif or the second? Then three steps after that it says "2 dc in sl st." which slst? I am good at following/figuring out patterns but this one confounds it all. Thanks for your help. Morinar
akasha341 9217227
Feb 24, 2013
Been crocheting for decades and this "easy" pattern totally confuses me especially the attaching the motifs part. I am lost.
CreativityGoddess
Apr 25, 2011
Thank you for calling the problems to our attention. We have updated the pattern instructions. Hopefully it is easier to follow now. -The Editors of FaveCrafts
mathalot 6506754
Apr 25, 2011
I don't know if I can do this one. Usually when the pattern is not quite right I can figure it out. But this is more than not quite, this is a whole lot. For example: Rep from to 7 times more. Rep from to once. Rep from to 10 times more. Rep from to once. Rep from to 7 times more. Then there is the punctuation. The person who wrote this obviously had good intentions, but needs an assistant for pattern writing. I need a job, but this one is more than even I can handle.
BklynHyLife
Apr 24, 2011
INSTRUCTIONS FIRST STRIP First Motif Ch Join with sl st to form ring st rnd Ch counts as dc dc in ring Sl st in top of ch nd rnd Ch counts as dc dc in each dc to end of rnd Sl st in top of ch sts rd rnd Ch counts as dc dc in each of next sts dc Ch dc in next st corner st Rep from twice dc in each of next sts dc Ch dc in sl st Sl st in top of ch Fasten off Second Motif Work first rnds as given for st Motif rd rnd Ch counts as dc dc in each of next sts dc Ch dc in next st corner st Rep from once dc in each of next sts dc in next st With RS of st Motif facing join to left top corner of st Motif as follows…Read More Ch Sl st in th ch of corner ch of st Motif Ch dc in same st dc in each of next sts Sl st in rd dc on side edge of st Motif dc in each of next sts dc in sl st Ch Sl st in th ch of next corner of st Motif Ch dc in same sl st Sl st in top of ch Fasten off Make more motifs joining each to previous motif as given for Second Motif SECOND STRIP First Motif Work first rnds as given for First Motif of First Strip rd rnd Ch counts as dc dc in each of next sts dc Ch dc in next st corner st Rep from once dc in each of next sts dc in next st With RS of previous strip facing join to left bottom corner of st Motif as follows Ch Sl st in th ch of corner ch Ch dc in same st dc in each of next sts Sl st in rd dc on side edge of st Motif dc in each of next sts dc in sl st Ch Sl st in th ch of next corner of st Motif Ch dc in same sl st Sl st in top of ch Fasten off Second Motif Work first rnds as given for First Motif of First Strip rd rnd Ch counts as dc dc in each of next sts dc Ch dc in next st corner st dc in each of next sts dc in next st With RS of st Motif facing join to left bottom corner of st motif of nd Strip as follows Ch Sl st in th ch of corner ch of st Motif Ch dc in same st dc in each of next sts Sl st in rd dc on top edge of st Motif dc in each of next sts dc in next st Ch Sl st in th ch of next corner Ch dc in same st dc in each of next sts Sl st on side edge of nd Motif dc in each of next sts dc in sl st Ch Sl st in th ch of next corner Ch dc in same sl st Sl st in top of ch Fasten off Make more motifs joining each to previous motifs as given for Second Motif THIRD TO EIGHTH STRIPS Work as given for Second Strip BORDER st rnd Join yarn in top left corner ch- sp Ch sc in next dc Ch Miss dc twice sc in next dc Ch sc in next ch- sp Ch twice Rep from to times more sc in next dc Ch Miss dc twice sc in next dc Ch sc in ch- sp Ch sc in same ch- sp corner Ch Rep from to times more Rep from to once Rep from to times more Rep from to once Rep from to times more sc in next dc Ch Miss dc twice sc in next dc Ch sc in next ch- sp Ch dc in st sc nd to th rnds Ch sc in next ch- sp Rep from to last ch- sp Ch sc in last ch- sp Ch dc in dc of previous rnd th rnd Ch sc in next ch- sp twice Ch dc in next ch- sp Ch sc in next ch- sp Ch times sc in next ch- sp Rep from to last ch- sp sc in next ch- sp Ch Sl st in dc of previous rnd Fasten off
CrochetLady56
Oct 28, 2010
The pattern still has not been fixed or questions answered regarding the asterisks that are missing. Can you please fix the pattern to show the missing asterisks that should be there? Kind of hard to follow: repeat from to 7 times (example). I would really like to make this.
SylviaAnne
Jul 21, 2010
I see that the asterisks are missing but it is such a beautiful blanket that I am going to give it a try anyways. I hope I am experienced enough to find the missing pieces. :) Sylvia
Crafter 4881239
May 21, 2010
I don't quite understand. When it says "repeat from to once or from to 7 times or however many times, what does TO mean?
Cathisp
Apr 16, 2010
The blanket is beautiful - looks simpler than the directions. Find the directions extremely difficult to follow.
mememouse
Mar 16, 2010
This does look beautiful and would look nice folded over the crib but I would be afraid of all those holes for baby's little fingers and toes.
Xochitls mom
Mar 14, 2010
this pattern connects the motifs as you work them- that means that as you work thru the final round, you will use slip stitches to attach the motif you're working to the one you just finished. I've done this pattern before, and I found it best to read thru the entire set of instructions for the second and subsequent motifs before starting to stitch it. this is actually an easier way to join motifs than to wait until the end and sew them all together...
bettyw41
Mar 04, 2010
I really like the looks of this blanket, but the directions for the 2nd motif don't make any sense to me. From what I can gather, it is not completed all the way around before you start to join it to the first completed motif (in the upper left hand corner). The directions are very confusing. That won't work like that. You need to put some kind of picture here to explain it. I would really appreciate it if you could explain this better or put a video or picture or something. I want to make this blanket for my nephew who will be born the 1st of May. Thank, Bettyw
bettyw41
Mar 04, 2010
The above comment was right on, but it did not help, because you did not do anything to improve it. In addition, the directions are not clear for the 2nd motif. If I am reading them correctly, the 2nd motif is not finished all the way around before you start to join it to the 1st motif in the upper left hand corner. That just doesn't work. Please show a picture or a video or give better explanations for the 2nd motif. Thanks, Bettyw41
Beckerri
Oct 31, 2009
This looks like it is a beautiful baby blanket and might be what I am looking for, but the picture is so small, I can't tell. You really need to have closer, more detailed pictures on your website.
Report Inappropriate Comment
Are you sure you would like to report this comment? It will be flagged for our moderators to take action.
Thank you for taking the time to improve the content on our site.