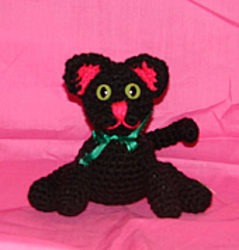
Sporty Kitten
This sporty kitten free crochet amigurumi pattern is good luck for all you black cat lovers! Try this free easy crochet pattern and give a gift to your favorite niece!

Materials:
- Sport yarn - about 1.5 oz MC
- Small amount pink
- Size E crochet hook (US)
- 15 mm cat eyes
- Polyfill
- Yarn needle
- Small piece of ribbon (optional)
Note: Do not join rounds unless otherwise indicated.
Mark beginning of each round with a stitch marker or scrap of yarn.
Head and Body
Rnd 1: Starting at top of head, with MC yarn, ch 2, 6 sc in 2nd ch from hook. (6 sc)
Rnd 2: 2 sc in each sc around. (12 sc)
Rnd 3: (Sc in next sc, 2 sc in next sc) repeat around. (18 sc)
Rnd 4: Sc in each sc around.
Rnd 5: (Sc in next 2 sc, 2 sc in next sc) repeat around. (24 sc)
Rnds 6 - 8: Sc in each sc around.
Rnd 9: (Sc in next 2 sc, decrease 1 sc over next 2 sc) repeat around. (18 sc)
Rnd 10: Sc in each sc around.
Rnd 11: (Sc in next sc, decrease 1 sc over next 2 sc) repeat around. (12 sc)
Attach eyes centered over rnds 5 - 6 of face having 2 sc between eyes.
***Stuff head firmly***
Rnd 12 (This rnd starts body): 2 sc in each sc around. (24 sc)
Rnd 13: (Sc in next 3 sc, 2 sc in next sc) repeat around. (30 sc)
Rnds 14 - 19: Sc in each sc around.
Rnd 20: (Sc in next 3 sc, decrease 1 sc over next 2 sc) repeat around. (24 sc)
Rnd 21: Sc in each sc around.
Rnd 22: (Sc in next 2 sc, decrease 1 sc over next 2 sc) repeat around. (18 sc)
***Stuff body firmly***
Rnd 23: (Sc in next sc, decrease 1 sc over next 2 sc) repeat around. (12 sc)
Rnd 24: (Decrease 1 sc over next 2 sc) repeat around, leaving a length of yarn for sewing, fasten off. (6 sc)
Add more stuffing to body and sew opening closed. Weave in loose ends.
Legs (Make 2)
Rnd 1: Starting at foot, with MC, ch 3, 2 sc in 2nd ch from hook, 4 sc in next ch, working around onto opposite side of starting ch, work 2 sc in next ch. (8 sc)
Rnd 2: 2 sc in next sc, sc in next 2 sc, 2 sc in each next 2 sc, sc in next 2 sc, 2 sc in last sc. (12 sc)
Rnds 3 & 4: Sc in each sc around.
Rnd 5: Sc in next sc, (decrease 1 sc over next 2 sc) 3 times, sc in next 5 sc. (9 sc)
Rnd 6: 2 sc in next sc, sc in next 3 sc, 2 sc in next sc, sc in next 4 sc. (11 sc)
Rnds 7 - 9: Sc in each sc around.
Rnd 10: Sc in each sc around, join in next sc, fasten off.
Stuff legs and sew opening at rnd 10 closed and sew legs to sides of lower body in a sitting position.
Arms (Make 2)
Rnd 1: Starting at paw, with MC, ch 2, 6 sc in 2nd ch from hook. (6 sc)
Rnd 2: (Sc in next 2 sc, 2 sc in next sc) repeat around. (8 sc)
Rnds 3 - 8: Sc in each sc around.
Rnd 9: Sc in each sc around, join in next sc, fasten off.
Stuff arms and sew opening at rnd 9 close. Sew arms to sides of body over rnds 12 - 15 to align with legs.
Back Of Ears (Make 2)
Row 1: Starting at top point of ear, with MC, ch 2,3 sc in 2nd ch from hook, ch 1, turn. (3 sc)
Row 2: 2 sc in first sc, sc in next sc, 2 sc in last sc, ch 1, turn. (5 sc)
Row 3: Sc in each sc across, ch 1, turn.
Row 4: Sc in each sc across, ch 1, DO NOT TURN.
Edging: Work 3 sc evenly down side of ear, work 3 sc in starting ch of top point, work 3 sc evenly up side to row 4, sl st in forst sc of row 4, fasten off.
Front Of Ears (Make 2)
Work rows 1 - 3 of back of ears using pink yarn instead of MC yarn.
Row 4: Sc in each sc across, changing to MC yarn in last step of last sc, break off pink, ch 1, DO NOT TURN.
Edging: Repeat as for back of ear.
With a length of MC yarn, sew one front and one back ear section together to form one ear.
Sew ears to top of head over rnds 1 - 5.
Muzzle
Rnd 1: With MC yarn, ch 2, work 6 sc in 2nd ch from hook. (6 sc)
Rnd 2: (Sc in next sc, 2 sc in next sc) repeat around. (9 sc)
Rnd 3: (Sc in next 2 sc, 2 sc in next sc) repeat around. (12 sc)
Rnd 4: Sc in each sc around, join in next sc. Leaving a length of yarn for sewing, fasten off.
Sew muzzle to center of face under eyes. With a length of pink yarn, embroider nose and mouth onto muzzle.
Tail
Note: Row counting is not important for tail.
Rnd 1: With MC, starting at point of tail, ch 2, 6 sc in 2nd ch from hook. (6 sc)
Continue working rnds of sc in each sc around until tail measures 5 inches long or desired length.
Do not stuff tail. Fold pipe cleaner in half and insert into tail leaving about a half an inch of the pipe cleaner sticking out.
Place tail in center of back at bottom of body, insert the visible pipe cleaner into the body for extra support. Sew tail into place. Curve tail into shape.
Tie ribbon into a bow around neck if desired.
Weave in any remaining loose ends.
Read NextPomp Poodle in Pink
Your Recently Viewed Projects
Thanks for your comment. Don't forget to share!
Report Inappropriate Comment
Are you sure you would like to report this comment? It will be flagged for our moderators to take action.
Thank you for taking the time to improve the content on our site.