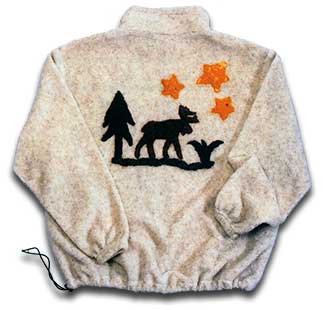
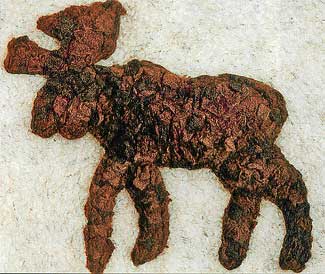
Folk Art Moose Applique
This applique project from Sulky of America uses a technique called rag wool embroidery to create the look of traditional rug hooking in a fraction of the time. The strolling moose applique, inspired by folk art, is great for clothing or home accents. In this example, a Berber fleece jacket is the base. Use only 100% wool for this project so as to ensure proper felting.
Materials:
- Sewing Machine with the capability of adjusting the presser foot pressure
- Darning foot or a clear presser foot
- Denim Machine needles size 14/90 or 16/100
- 1 "fat-sixteenth" or 9" x 14" medium to dark brown 100% wool for the Moose
- 1-1/2 "fat-sixteenth" of gold 100% woold for the stars
- 1-1/2 "fat-sixteenth" med-dark green 100% wool for tree, shrub & grass
- 12" x 12" pieces of polyester felt: 2 gold, 2 dark green, 1 dark brown (felt should coordinate with the wool)
- Sulky KK 2000 Temporary Spray Adhesive
- Sulky Polyester Invisible Thread in both clear and smoke
- Sulky Super Solvy, either on the 12" roll or by the yard (1 yd. required)
- Rotary cutting supplies (mat, ruler, cutter)
- German wooden free-motion machine embroidery hoops, size 6-10"
- Fine-line, permanent-ink black marker
- Berber fleece jacket
- Optional: the "Strolling Moose" designs are also available on disk for owners of embroidery machines. They may be ordered at www.ragwool.com.
- Pattern 1
- Pattern 2
Preparing the Fabric
- All of the wool will be prepared the same. For example, if you're using 3 shades of brown for the moose, those colors may be cut at the same time and mixed. Otherwise keep your wool colors separate.
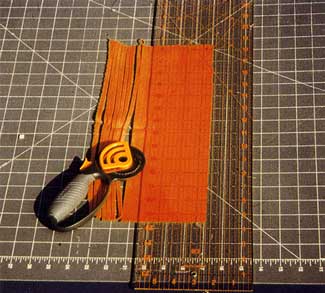
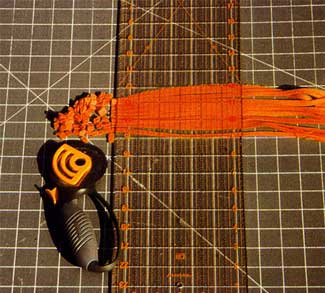
- Using your rotary cutting tools, cut 1/4" to 3/8" wide strips from the piece of wool fabric. You don't need to measure accurately; variation in size is fine.
- Take the strips of wool and lay them horizontally on the cutting mat. Cut the strips once again approximately 1/4" wide. What you've just created are hundreds of tiny bits of wool squares we'll call "cutlets".
Prepare the Sewing Patterns
- Lightly spray the star pattern from pattern sheet with Sulky KK 2000 Temporary Spray Adhesive and place a 12" x 12" piece of Super Solvy stabilizer over the pattern.
- Using a fine-line, permanent-ink marker, trace the star outline and sewing lines of the pattern onto the Super Solvy.
Note: Trace the smaller star twice.
Setting the Design in Cutlets
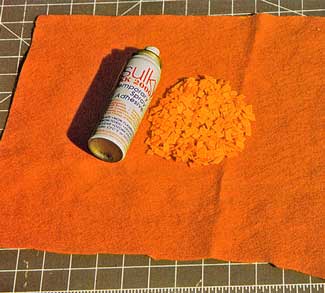
- Lightly spray the coordinating color of felt with KK 2000 Temporary Spray Adhesive. This really helps control the cutlers.
- Scoop up a large pinch of cutlets and begin placing them in the center of the felt. Continue adding to the sides of the cutlet pile until the wool cutlets extend at least one inch beyond where the design will be sewn. Squish the pile down with your hand to compress the cutlets. Fill in areas that appear thin. Steam press the pile of cutlets using an up and down motion.
Note: The iron should be hot enough to steam, but not so hot that it will melt the polyester felt.
- Lightly spray KK 2000 over the wool cutlets and the surrounding felt.
- Place the super Solvy with the traced design over the center of the cutlet pile
Note: When sewing over dark colored wool, it may be beneficial to first place an unmarked piece of Super Solvy over the cutlet pile, followed by the Super Solvy with the traced design. Having two layers of Super Solvy creates a hazy appearance which makes it easier to see the lines. Spray KK 2000 between the layers of Super Solvy to prevent shifting.
TIP: What you want to achieve is an area of wool that is approximately 3/8" thick and which will extend beyond all sides of the template. The most important thing to remember is that there should be no holes or gaps where you can see the base fabric. To help prevent "air pockets", build your cutlets from the middle of the felt and work your way toward the outside.
Hoop the Cutlet Sandwich
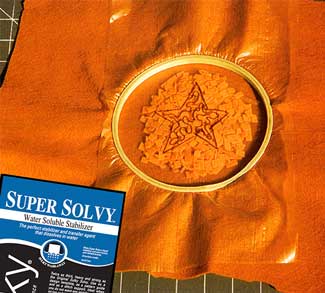
- Tightly hoop the "cutlet sandwich" in an appropriate size German hard-wood hoop. The hoop should not be touching any of the cutlet pile, and should be large enough so there is at least one inch from the inside hoop edge to the pattern markings.
Tip: When hooping for machine use, place the larger of the hoop rings down first, followed by the material, and then the top portion of the hoop. Lightly tug at all edges so that the "sandwich" is very taut.
Setting up the Sewing Machine
- When sewing on something this thick, decrease the presser foot pressure in order for the applique to sew properly by gliding over the top of the "sandwich". Consult your machine's manual on how to make this adjustment.
- Set the machine on straight stitch. Increase the stitch length a notch or two. Adjust this as needed while sewing if the stitches are too close together. Insert a "denim" needle size 14/90 or 16/100. A denim needle has a much stronger shaft. Place either a darning foot or a clear open-toe foot on your machine.
Remember: The feed dogs should remain in the "up" position
- Thread the top with either clear or smoke Sulky Polyester Invisible thread. Clear should be used on the lighter color wool, while the smoke works best on the darker fabrics. Using the wrong color does make a difference. Insert any color or type thread in the bobbin that contrasts with the felt to allow better visibility when it is time to cut out the applique. Decrease the upper thread tension by half. To determine if your tension is correct, sew a test piece. Take a scrap piece of felt and fold it several times to mimic the thickness of the cutlet sandwich. Sew through the layers. If there is bobbin thread being pulled to the top, the upper tension is too tight. Keep sewing and decreasing the upper tension until the bobbin thread is no longer visible. Record this number for later use.
Sewing the Applique Design
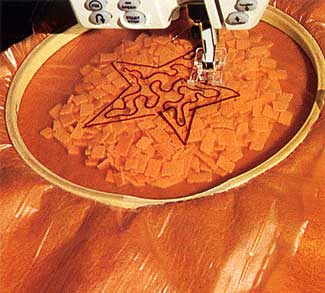
- On the pattern, the starting position is marked. Always sew the outline first. If your machine has the option of needle position "up or down", set it to the down position because it is easier to pivot when the machine has stopped with the needle in the material. If the design contains inner or outer corners, backstitch at these places for added strength.
- Sew the outline, backstitching several times at the beginning. Recheck your upper thread tension and your presser foot pressure as you stitch. You should be able to move the hoop freely, and the bobbin thread should not be visible.
- After completing the outline, begin sewing the inner sewing lines. Always keep the line in front of you. As you're sewing, turn the hoop. When stopping to pivot, always stop with the needle in the material. If turning is difficult, lower the presser foot pressure some more. With just a little practice, you'll find that you are moving the hoop without even thinking about it. Try to focus your eyes not at the needle, but rather slightly in front of the presser foot.
- Finish sewing the design, then backstitch several times.
Finishing the Design
- Remove the hoop from the machine and carefully remove the excess Super Solvy from around the outer edges of the stitching. Brush away the excess cutlets that weren't sewn, and place then in a baggy for later use.
- The remaining wool should be underneath the Super Solvy, but it will have various length cutlers protruding from the edges. With a sharp pair of scissors, redefine the outline by trimming the wool to within 1/8" to 1/4" of the outline. Be very careful not to clip any of the design's threads.
- Under a running faucet, thoroughly wash away all of the Super Solvy, working the design with your fingers. it is very important to completely remove the Super Solvy. As the 100% wool absorbs the water, the wool will literally inflate.
- Toss the finished design in the dryer for approximately 25 minutes or until dry, or the design may be air-dried.
- Inspect the design for any areas where the base fabric may peek through. To fix any gaps: thread a hand needle with the sewing thread, double the thread, and knot; from the back of the base fabric, bring the needle through to the top and thread a spare cutlet through to its center onto the needle; take a small stitch back through the cutlet's center and through to the back of the fabric; pull the thread snugly to work the wool into the needed area; add as many spare cutlets as needed, then cut and tie off the thread; from the front, trim the added pieces of wool so they are the same height as the rest of the design.
- With the felt side up, carefully cut out the applique using the contrasting bobbin thread as a guide; cut to within 2-3 millimeters of the outline. when you turn it over, no felt should be visible.
- Repeat steps 1 through 7 for each design element, ie., tree, moose, etc.
Applying the Appliques to the Jacket Back
Two Options to apply the applique:
Option 1: Use a straight stitch around the outside edge. The stitching line should fall 1/8" from the outside edge.
Or
Option 2: Use a buttonhole stitch or a blind hem stitch to sew a couple of straight stitches on the garment and then swing to the left. Adjust the width of the swing so that it catches the applique.
Note: The "grass" applique can be treated as two separate elements, or sewn together to create one long piece.
- When all of the designs are dry, lightly spray the appliques with KK 2000 and pin them to the jacket using the picture as a layout guide. You don't have to pin nearly as much when you have sprayed with KK 2000.
- Depending on the wool color, thread your sewing machine with either clear or smoke Sulky Invisible Thread. Keep your top tension decreased for the monofilament thread so that you don't see the bobbin thread on top.
- Once your garment is complete, future washings should be done with care. Hand wash and drip-dry all finished items. Mark and store a small baggy containing the various color cutlets used in the project for possible future repairs.
Read NextDIY Upcycled Crochet Jean Shorts
Your Recently Viewed Projects

Thanks for your comment. Don't forget to share!
Report Inappropriate Comment
Are you sure you would like to report this comment? It will be flagged for our moderators to take action.
Thank you for taking the time to improve the content on our site.