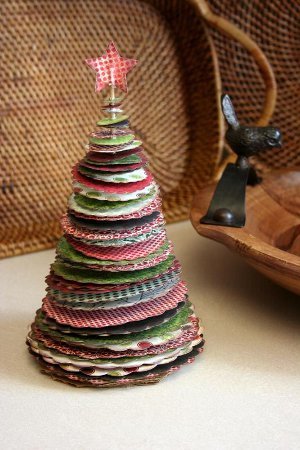
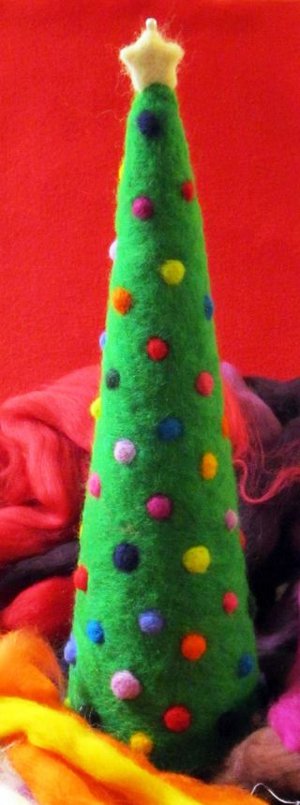
Needle Felted Christmas Tree
Wondering how to decorate a mantel for Christmas? Why not create a Needle Felted Christmas Tree? Better yet, make two or three of different sizes for a striking display. Best of all, these homemade Christmas tree crafts from Lindsay Obermeyer won't shed pine needles!
Materials:
- 1 STYROFOAM™ brand foam 12" x 5" cone
- 2 24" of kelly green roving
- 1 4" of cream wool roving
- 1 3" each of assorted colors of wool roving (orange, pink, lavender, deep rose, red, blue, navy, forest green, magenta)
- 1 Clover Pen Style Felting Tool (holds 3 needles)
- 1 Clover Felting Needle Tool (holds five needles)
- 1 Refill package of fine gauge (40) needles
- 1 Clover Needle Felting Mat (small)
- 1 Miniature star cookie cutter
- 1 Felt, 9" x 12" sheet in kelly green
- 1 Aleene's Original Tacky Glue
- 1 Extra long hat pin with a pearl top
- Scissors
- 1 Ultra fine permanent black marker
Instructions:
- Place the STYROFOAM™ cone on the green flat sheet of felt and carefully trace the base. Cut out the circle and set aside.
- Loosely pull apart the kelly green roving and wrap around the cone, setting aside at least 10 inches. Do not do the base.
- Using the larger needle felting tool with 5 needles, begin felting the wool. Move your needles across the surface to adhere the roving to the cone without crushing it. If you stay too long in one place, you risk weakening the foam base.
- Check for bare or thin spots and fill in with extra roving.
- Pull apart the remaining roving (approximately 4") and roll into a loose log shape. Place one edge of the log onto the mat and use the pen tool to begin felting a point. This will be the top of your tree. Continue shaping, turning the work as you go for even felting to develop. Leave tails at the base to allow you to attach to the cone.
- Once it is fully formed, place on top of the cone and felt into place. You may need to add a little more roving at the join to fully adhere it and cover and thin spots. The tip of your tree will feel softer and squishier than the base as there is no foam inside.
- Pull a small tuft of colored roving. Place it on your mat. Use one loose needle and twirl it onto your needle. Needle felt it onto the cone. For dimension of the dot, focus more of you needle felting along the edges rather than the center.
- Continue adding more dots of color around the surface of the tree, leaving the bottom and very tip empty.
- Place the star miniature cookie cutter on the mat. Fill it with cream roving. Use the pen tool to felt it. Use a loose needle to continue along the edges where the pen tool can't reach.
- Remove the cutter. Turn the star on its edge and use a loose needle to finish shaping.
- Glue the felt circle to the base of the cone. Carefully trim off any overlap.
- Add a pinch of glue to the base of the star. Stick the hat pin through the top and place on the tip of the tree.
- Once the glue has dried, you may remove the pin or leave as added decoration.
Read NextFolded Book Christmas Tree