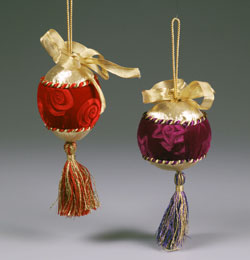
Tree Trimmers Embossed Velvet
Decorate your Christmas tree with these beautiful tree trimmers. A vintage look your tree will love and so will you.
Materials:
- STYROFOAM Brand Foam:
- 3-1/2" ball
- 3-13/16" x 2-13/16" egg
- Gold lamé fabric, 4" circles, four
- Acetate rayon velvet: red, purple, 11" x 3" strip each
- Rubber stamps with bold, deep-cut images, approx. 1-1/2" diameter, two motifs (Note: Stamps with fine lines and details aren't recommended for embossing on velvet)
- Cord: 2mm gold, 2/3 yd.; 4mm red/gold, 4mm purple/gold, 1/2 yd. each
- Tassels: red/gold, purple/gold, one each
- 5/8" metallic gold wire-edge ribbon, 1-1/2 yd.
- Sharp pencil
- Ruler
- Scissors
- 1/2" x 11" strips of white paper, two
- Straight pins
- Fine-line black marking pen
- Spray bottle filled with water
- Iron
- Ironing board
- Serrated knife with pointed tip
- Awl or ice pick
- Cloth-covered floral wire
- Wire cutters
- Compass (optional)
- Thick, white craft glue
Steps:
- Wrap a 1/2" x 11" strip of paper around circumference of ball; trim ends to fit. Fold strip in half, forming 1/2" x 5-1/2" strip; mark 1-5/8" from fold. Pin foldline over center top of ball. Carefully rotate strip around ball, using marking pen to create a dotted line around ball using the 1-5/8" measurement as your guide. Remove paper strip and connect dots. Repeat at opposite end, pinning strip at center bottom to begin. Use a sharp pencil to score foam on marked lines, creating a top, center, and bottom section on each shape. Repeat for egg.
- Emboss each velvet strip by placing a rubber stamp, image side up, on ironing board or firm work surface. Place velvet, wrong side up, over stamp. Mist velvet with water. Avoiding steam vents, press a dry, hot iron firmly to velvet on top of stamp and hold in place for 20-30 seconds. Lift iron straight up to remove. Note: Adjust heat setting on iron if velvet sticks. If velvet isn't completely dry, press again without shifting fabric on stamp. Continue to add embossed images as desired, moving velvet over stamp after each one is complete.
- Center embossed red velvet over center section marked on foam egg. Use tip of serrated knife to tuck long edges into scored lines, folding under one short end and overlapping it onto opposite end. Center bottom section of egg on a gold lamé circle and again, tuck edges of fabric into scored line with serrated knife. Repeat to cover top half of foam with gold lamé.
- Follow Step 3 to cover ball with purple velvet and gold lamé.
- Wrap matching 4mm cord around scored lines at top and bottom of velvet band on each ornament and cut to fit. To prevent raveling, squeeze glue on ends of cords and twist fibers together. Allow to dry. Glue cord to scored lines, aligning ends with velvet seam.
- Use awl or ice pick to carefully form a tiny hole in center top of each ornament. Cut a 12" length of 2mm gold cord and knot ends together. Glue knotted end into hole, forming hanger. Repeat for remaining ornament. Allow to dry.
- Cut two 24" lengths of wire-edge ribbon. Form each length into a 4-loop bow and secure the center with a 4" wire. Trim wire ends to 3/4" from ribbon. Use awl or ice pick to form a tiny hole in each ornament in front of cord hanger. Attach a bow to each ornament, gluing wire ends into hole.
- Use awl or ice pick to form a hole in center bottom of each ornament. Center a 2" length of wire through top of each tassel, bend ends upward, and then twist together to secure. Attach a matching tassel to bottom of each ornament, gluing wire ends into hole.
®™ Trademark of The Dow Chemical Company ("Dow") or an affiliated company of Dow. For more project ideas, please see styrofoamstyle.com.
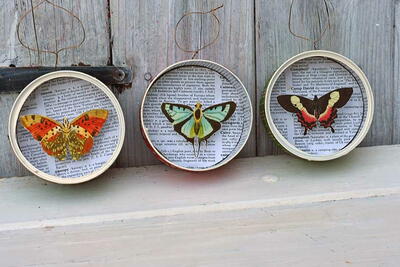
Read NextUpcycled Tuna Can Butterfly Ornament