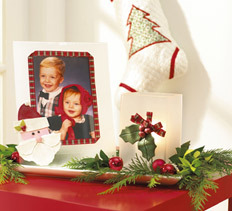
Clay Frame and Holly Votive
Present your kids in this lovely Santa Christmas frame. You can have it next to a nice holly votive candle. It makes for a great decorative display.

For Both
- 1 yd. of 3/4" plaid Christmas type ribbon
- Pigment powders*: Spring Green, Micropearl, Red Russet
- Small craft brush
- Acrylic roller
- Frost spray
- Tacky craft glue*
- Craft knife or clay cutter, parchment-lined baking sheet, ruler, scissors
Pattern
For Frame
- 5" x 7" cardstock
- 5" x 7" photo
- 8 1/2" x 11" L-shaped Lucite frame
- Oven bake clay*: Whipped Cream, Poppy, Wasabi, After Midnight, Blush
- Tacky craft glue*
- Cosmetic blush, parchment-lined baking sheet, plastic placemat or waxed paper (to protect work surface), ruler, scissors, tape
For Votive
- 2" x 4" x 6" high flat sided glass votive/vase
- Oven bake clay*: Poppy, Clover
- 3" holly leaf clay or cookie cutter
- Scrubby pad- for texture
- Soft cloth
- Window cleaner
- Tea light
Steps:
Frame
- Frost frame. Center cardstock paper left to right and down from top of frame about 1 1/2". Use a tiny bit of tape to hold it onto the frame. Spray edges with frost finish spray. Let dry then apply a second coat. Carefully remove cardstock and set aside to dry completely.
- Make clay pieces. Roll out Whipped Cream to about 1/8" thickness. Place beard pattern onto clay and use craft knife or clay cutter to cut out four pieces. Cut one of these in half to form moustache. Cut out one hat brim. For hat top, roll a tiny ball and slightly flatten.
- Roll out Blush clay to same thickness and cut out one face using pattern. For nose, roll a small marble-sized ball of clay.
- For eyes, roll two tiny balls of After Midnight.
- Roll out Poppy clay to same thickness and cut out hat pattern. For berries, roll three tiny pea size balls of clay.
- Roll out and flatten a 1/4" thick piece of Wasabi clay. Use craft knife to cut out two diamond shapes for leaves. Use dull side of craft knife to mark leaves with veins.
- Use craft brush to apply Micropearl pigment powder to hat ball, brim, beard, and moustache pieces. Apply Red Russet to berries and hat, and Spring Green to leaves. Apply cosmetic blush to cheeks and just a bit on nose.
- Place all items on baking sheet and bake according to manufacturer's directions. Let cool in oven before removing.
- Assemble. Cut enough ribbon to outline frosted area on frame. Apply a tiny bead of glue around frosted edge. Gently press on ribbon, turning over at corners.
- To keep Santa pieces from sliding as you glue, lay frame flat, extending "L" base over edge of table or bracing other end. Apply glue to back of Santa’s face and press onto lower left corner of frame. Glue two beard sections onto frame and slightly onto bottom of face. Glue last whole portion of clay beard to center of first two beard portions. Glue moustache pieces to beard. Glue nose to center of moustache. Glue ball on top of hat.
- Glue hat near top of head, and then glue hat brim slightly covering top of face and bottom of hat. Glue berries and leaves to left side of hat brim. Glue on eyes.
- Finish. Place photo in frame when completely dry.
Votive
- Preparation. Clean glass votive using glass cleaner. Spray outside of votive surface with frost finish spray. Best to do this step outside or in a well ventilated area. Let dry, then apply a second coat if desired.
- Make clay pieces. Condition Poppy and Clover until soft and pliable. Roll out a 1/8" thick sheet of Clover onto work surface. To add texture, press scrubby pad onto clay. Use holly cookie cutter to cut out two leaves. Place leaves onto parchment-lined baking sheet. Gently curve leaves to give a natural appearance.
- Roll three marble size berries from Poppy. Place berries onto end of leaves as shown. Use brush to apply Red Russet pigment powder to berries and Spring Green powder to leaves. Bake in oven according to times and temperature on clay package directions. Let cool before removing.
- Make bow. Cut five 3" lengths of ribbon. Fold each in half to make a loop and glue ends together. For center, roll a 2" length of ribbon and glue in place.
- Assemble. Lay glass votive flat. Apply glue to back of baked clay and press to center of votive. Let dry. Glue ribbon loops around top of berries. Glue on bow center.
- Finish. Place tea light candle in votive.

For more craft ideas, tips & projects from the Creative Home Arts Club, be sure to visit http://creativehomeartsclub.com
Read NextUpcycled Tuna Can Butterfly Ornament