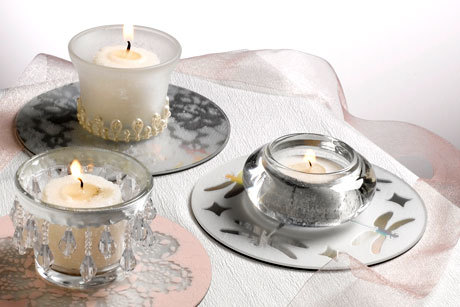
Wedding Votive Trio Decorations
Create this whimsical trio of wedding votives for center pieces as an elegant touch for tables with this project from Krylon.

Materials:
- Krylon Frosted Glass Finish - White (#9040)
- Krylon Indoor/Outdoor Paint - Ballet Slipper (#53526)
- Krylon Easy-Tack™ Repositionable Adhesive - Clear (#7020)
- Clear Contact Paper
- Lace
- Crocheted doily
- Beaded Trims
- Paper Punches (dragonfly, diamond,
- Compact Discs- Two Needed Per Votive
- Votive and/or Tea Light Cups
- Candles
- Contact Cement or Industrial Strength Glue
Steps:
- To create Dragonfly Votive, punch four dragonflies and four diamonds from the clear contact paper. Peel off the backing and press the shapes onto the shiny side of one CD.
- Using the Krylon Frosted Glass Finish, spray several light coats on CD. When dry, peel off the contact paper.
- Glue a second CD to the bottom of the frosted one (printed sides together) using a contact cement. Glue the votive cup to the center of the frosted CD with contact cement.
- To create Lace Votive, coat the back of lace with Repositionable Adhesive. Press lace onto the shiny side of one CD.
- Spray several light coats of the Krylon Frosted Glass Finish over lace–covered CD. When dry, remove lace.
- Glue a second CD to the bottom of the frosted one (printed sides together) using a contact cement. Glue the votive cup to the center of the frosted CD with contact cement. Using heavy duty double-sided tape, attach beaded ribbon to the top lip of the votive cup.
- To create Pink “Crackle” Doily Votive, Spray the doily with Repositionable Adhesive. Lightly mist the shiny side of a CD with the spray adhesive (the heavier the coating of adhesive, the more cracks you will have in the paint layer). Press doily onto center of the CD.
- Spray 2 to 3 coats of Ballet Slipper. Remove doily. As the paint dries, you will notice it pulling apart slightly. This is the cracks forming.
- Spray the entire CD and the votive cup with the Frosted Glass Finish.
- Attach the plastic beaded trim to the bottom of the votive cup with glue.
- Glue a second CD to the bottom of the paint CD (printed sides together) with contact cement then glue the votive cup to the center of the painted CD with contact cement. Let dry.